Navigation
Install the app
How to install the app on iOS
Follow along with the video below to see how to install our site as a web app on your home screen.

Note: This feature currently requires accessing the site using the built-in Safari browser.
More options
-
Hello there guest and Welcome to The #1 Classic Mustang forum!
To gain full access you must Register. Registration is free and it takes only a few moments to complete.
Already a member? Login here then!
You are using an out of date browser. It may not display this or other websites correctly.
You should upgrade or use an alternative browser.
You should upgrade or use an alternative browser.
1967 Build called Electra
- Thread starter JRANGER
- Start date
Grabber70Mach
Well-Known Member
That's looking good, are you pleased with the outcome?
Sent from my VS980 4G using Tapatalk
Sent from my VS980 4G using Tapatalk
JRANGER
Active Member
"Grabber70Mach" said:That's looking good, are you pleased with the outcome?
Sent from my VS980 4G using Tapatalk
I am pleased with the color but because of the confined space i messed up and got too close in some areas causing runs. Plus I turn the gun up too far and spilt paint on the door causing drips. Also kinked the hose up one and spit onto the cowl. So hose areas I need to address and will be putting on another coat after a little work
JRANGER
Active Member
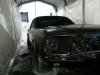
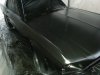
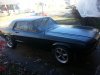
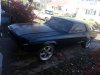
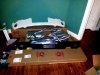
Well I pulled her out today and will let her sit in the sun for a day or so before I wet sand and put her back in the booth. She looks great from a distance but the closer you get the more you can see the runs and such. I also removed the plastic floor and will replace that before putting her back in. That way less dust. As of right now I am thinking tomorrow afternoon ill start the wet sanding with 400 grit and then clean her up and put her back in. That way wed afternoon i can put the final coat on her.
Attachments
Grabber70Mach
Well-Known Member
Is it possible that most of it can be wet sanded out? I remember when I had a truck painted it had a lot of runs and imperfections in it, kinda worried me. But my friend that owned the shop told me not to sweat it, they would come out. He was right when they finished you couldn't even tell where they were. I give you big kudos taking on a task like you did.
Sent from my VS980 4G using Tapatalk
Sent from my VS980 4G using Tapatalk
JRANGER
Active Member
They can be wet sanded out but its a satin finish so if i buffed it after it would be more glossy. I only put on 2 coats so once I wet sand it out I will give it a final coat and hope for no runs!
For the most part, I feel good about my first time paint a car")
For the most part, I feel good about my first time paint a car
Couple things that might help now and long term.
For the runs, don't try to sand them out at first but rather use a nib file to cut them down. You'll have much better success and be less prone to sand down/through in other areas.
http://www.autobodytoolmart.com/steck-s ... 10522.aspx
Second, as long as you are going to lay down more paint, take those door handles and antenna off first. Otherwise, in no time you will likely get some paint cracking and coming off do to flex at those joints. Nothing would drive me crazier than seeing chipped paint around the door handle every time I went to open the door.
JRANGER
Active Member
"Horseplay" said:Couple things that might help now and long term.
For the runs, don't try to sand them out at first but rather use a nib file to cut them down. You'll have much better success and be less prone to sand down/through in other areas.
http://www.autobodytoolmart.com/steck-s ... 10522.aspx
Second, as long as you are going to lay down more paint, take those door handles and antenna off first. Otherwise, in no time you will likely get some paint cracking and coming off do to flex at those joints. Nothing would drive me crazier than seeing chipped paint around the door handle every time I went to open the door.
Thanks for the info
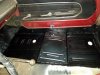
Well with it sitting out in the sun I couldnt do nothing with my staycation I used to work on the car. I jumped inside with a respirator and goggles. Grinded on the welds, wire wheeled, prepped the passenger side pans, and painted them with rust encapsulator
Attachments
JRANGER
Active Member
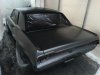
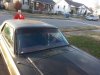
Windshield is in..... Was a royal pain in the ass.. I got beading compound everywhere including my hair. Some parts of the gasket tore and it took me all day.. However it is in, and it is sealed. I still have to put urethane on it against the glass but on the rear I may just put it in dry and them inject the beading compound after today. I had to use gas to wipe it off the glass and the car and now im worried that it may of messed up the paint but i cant tell as of right now...blah
Attachments
SELLERSRODSHOP
Well-Known Member
"JRANGER" said:Windshield is in..... Was a royal pain in the ass.. I got beading compound everywhere including my hair. Some parts of the gasket tore and it took me all day.. However it is in, and it is sealed. I still have to put urethane on it against the glass but on the rear I may just put it in dry and them inject the beading compound after today. I had to use gas to wipe it off the glass and the car and now im worried that it may of messed up the paint but i cant tell as of right now...blah
sometimes its easier if you call a brother down the street... even better yet one that spent 25 yrs putting those things in on a daily basis... just sayin'... :dun
JRANGER
Active Member
lol...Well I still have the rear left so I may just get with you. The video's just made it look so easy i thought i could handle it....I WAS WRONG LOL!!!
JRANGER
Active Member
Wasn't as hard as the front but the bottom corners of the rear glass were challenging. Got it installed though.
JRANGER
Active Member
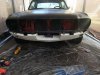
Got some new stuff New front Valance, Exhaust system, rear valance, and screws. Waiting on my chockostang disc break conversion kit as well.
Manage to cut a 2" deep notch in the front valance and get it fitted in. However the bumper bracket ripped out of the frame rail so i have to figure out about welding in a 10" of frame rail.
New front Valance, Exhaust system, rear valance, and screws. Waiting on my chockostang disc break conversion kit as well. Manage to cut a 2" deep notch in the front valance and get it fitted in. However the bumper bracket ripped out of the frame rail so i have to figure out about welding in a 10" of frame rail.
Attachments
tarafied1
Well-Known Member
valance looks good

JRANGER
Active Member
Thanks ! For the price i sure cant complain
Fst Blk
Well-Known Member
I've considered that valance and the lower e nose. I think I want to try to custom fab one out of fiberglass. Start by building a wire frame and covering that with glass. I see it in my head, but actually making it work is a different tale.
Digging it :thum
Bill
Digging it :thum
Bill
JRANGER
Active Member
Have you done glass work before? Its a royal pain!!! lol The wire frame idea works, i have done that with some mesh but others also get foam blocks and carve them how they want and such. The wire frame makes it a little hard getting it straight sometimes but it can be done. Just know your gonna need a lot of patience and bondo to get it smooth. Plus it gets expensive quickly
Fst Blk
Well-Known Member
"JRANGER" said:Have you done glass work before? Its a royal pain!!! lol The wire frame idea works, i have done that with some mesh but others also get foam blocks and carve them how they want and such. The wire frame makes it a little hard getting it straight sometimes but it can be done. Just know your gonna need a lot of patience and bondo to get it smooth. Plus it gets expensive quickly
Yeah, I know. Problem is, I don't want a front bumper. Everything you find uses one or if it doesn't requires a new hood. I see this crap and I get ambitious :rr
http://www.powerblocktv.com/episodes/TK ... bumper-fab
Bill
JRANGER
Active Member
ahh yeah haha...Lots of work but it could be worth it. I like the bumper look
JRANGER
Active Member
Well havent updated this thread in awhile so i thought i would:
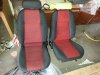
Retro Fitted 2002 Mustang Seats.
Painted/Dyed the seats
Installed 3 point Seat Belt setup
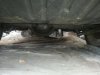
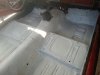
Painted on SprayDead Sound Deadener on the floors
Installed full 2" exhaust and then replaced the mufflers with Imitation Flowmasters
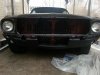
Got black Primer on the front Valnce
Re-installed headlights and turn signals
Installed the rear bumper
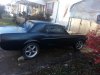
So basically I got it ready to drive to my buddies shop this weekend. We have a charity project we are working on for some lady and we are all going to go chip in and see what all we can get done on her old chebbie truck. Had to bring the stang for all the guys to see
Retro Fitted 2002 Mustang Seats.
Painted/Dyed the seats
Installed 3 point Seat Belt setup
Painted on SprayDead Sound Deadener on the floors
Installed full 2" exhaust and then replaced the mufflers with Imitation Flowmasters
Got black Primer on the front Valnce
Re-installed headlights and turn signals
Installed the rear bumper
So basically I got it ready to drive to my buddies shop this weekend. We have a charity project we are working on for some lady and we are all going to go chip in and see what all we can get done on her old chebbie truck. Had to bring the stang for all the guys to see