• Hello there guest and Welcome to The #1 Classic Mustang forum!
    To gain full access you must Register. Registration is free and it takes only a few moments to complete.
    Already a member? Login here then!

Fordrule's 64 falcon build

fordrule

Member
Some of you know that I purchased craigs drag falcon to build a rat rodded tourer...basically build and practice on the falcon and the masterpiece will be my beloved jo-jo..

730486_10200195472384719_260109049_n.jpg

804585_10200269457114291_1793307974_n.jpg


862543_10200269456554277_768261196_n.jpg

804400_10200195438463871_1872368799_n.jpg

566209_10200195472704727_1587694663_n.jpg


tomorrow is climbing into the engine bay and put her on jacks...hopefully pull fenders without all the bolts rusted to the nuts and maybe even pull, master cylinder, heater assy..
 
Last edited by a moderator:
Looks like you're rockin' and rollin' Joey, pics #1,4,5 didn't show for me even on refresh.
Jon
 
I went to a swap meet in Lebanon TN today (kinda last minute decision), it was lame. Not much there but I was surprised to see a guy with Falcon parts! They were pretty much all 63 or earlier but still... I looked to see if he had any side trim. No. Had a "Sprint" steering wheel. $100!!!
anyway, core support looks good.
I can't see all the pics either.
 
"tarafied1" said:
I went to a swap meet in Lebanon TN today (kinda last minute decision), it was lame. Not much there but I was surprised to see a guy with Falcon parts! They were pretty much all 63 or earlier but still... I looked to see if he had any side trim. No. Had a "Sprint" steering wheel. $100!!!
anyway, core support looks good.
I can't see all the pics either.

that was probably the same guy joey went to see last weekend in lebanon. he stopped by here on his way home too. :shrug
 
here is some more progress from the weekend. stripped the hood and both fenders and started to strip the undercoating and paint from the fenderwells. had to drill off two bolt heads. ones not going to be to hard to replace but the nutplate in the cowl is going to be a pain to replace. I am going to need to look at renting a media blaster and get it all done rather quickly
12978_10200280868399566_1800909926_n.jpg

382351_10200280868559570_1408529629_n.jpg

11229_10200280868679573_830753780_n.jpg

even my girlfriend was out there helping me.
539829_10200280867839552_106359303_n.jpg


this was an odd mod that I discovered...probably to adjust the clutch
525753_10200280866999531_623318766_n.jpg


some of the bad of the floor
377760_10200280865959505_1845746304_n.jpg

538335_10200280866039507_1258965519_n.jpg

602174_10200280865799501_1092397155_n.jpg
 
Last edited by a moderator:
here is some progress today...hopefully finish up the core support and prep ir for paint. I need to take some pics of the rust damage so i can get some advice on how to attack it....
602207_10200402619683272_2139211567_n.jpg

486084_10200402619403265_827000531_n.jpg

540988_10200402619843276_829033855_n.jpg

734634_10200402620083282_655332785_n.jpg

33950_10200402620403290_1268396618_n.jpg

529807_10200402620483292_1520307719_n.jpg

529910_10200402621443316_1095683132_n.jpg
 
Last edited by a moderator:
thanks jon :censored ..

wow i hate sandblasting and filtering the media ...uggg...but I am almost at the point to air off and pressure wash the front end and get all the media and acetone to prep to primer. then spray the jet black. I am going to look at a flat clear also..and get new seam sealant before all of that. and figure out what undercoating to spray in the fenderwells. there is some cancer on the cowl and the torque box on the driver side. I'll take pics of it tomorrow and see what togo from here to fix it.
 
Nice job on the engine compartment Joey. I can understand why you hated blasting. It's a slow and tedious job. It's even slower when you have to use a siphon type blaster! You have much patience!!! :thu
 
steve turned me onto a epoxy primer that I am looking at getting. I am thinking I will need to be blasting off that primer that I had laid on the core support and passenger fenderwell to lay all of that epoxy primer....
 
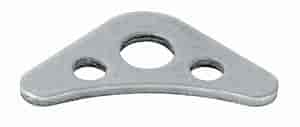
Now would be a good time to seam weld up the engine bay and add a gusset to the sway bar mount. They break off with a strong sway bar. I put a roll bar gusset just off center of the sway bar mount, one on either side of that hole that has the rubber plug in it. The sway bar mount gets seam welded too on my cars.


247-3172.jpg
 
I could be wrong, but I think what Opentracker is saying is to add two of the gussets he showed to your swaybar mount. Place them vertically on either side of the rubber plug, between the bolts shown. It will give a more direct load path to the frame rail. right now the load has to go through the rubber mount, then to then out past the bolts to bent ends attached to the frame rail. Being so far apart the mount can flex and crack.

529807_10200402620483292_1520307719_n.jpg
 
Last edited by a moderator:
"stangg" said:
I could be wrong, but I think what Opentracker is saying is to add two of the gussets he showed to your swaybar mount. Place them vertically on either side of the rubber plug, between the bolts shown. It will give a more direct load path to the frame rail. right now the load has to go through the rubber mount, then to then out past the bolts to bent ends attached to the frame rail. Being so far apart the mount can flex and crack.

529807_10200402620483292_1520307719_n.jpg

Exactly right. The stock bracket will crack and break with a larger sway bar and hard driving. Taking the load path direct to the frame helps a lot.
 
Last edited by a moderator:
Great work on that car Joey. I'm surprised it had that much rust in the floor pans.

John, do you add gussets to Mustangs also?

Bill
 
Back
Top