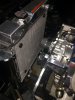
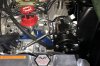
Seems like CVF has become the vendor of choice for pulley systems here at the Fix. They really do make a hell of a nice product.CVF Racing pulleys/brackets arrived yesterday. I unpacked them, felt like Christmas. So many small boxes ! Had to make a trip to the local hardware store and buy some correct length bolts. Began test fitting pulleys and brackets etc., had to switch back to the Flowkooler water pump as the Ford Racing water pump is too short. Will try and fit the electric fan in FRONT of the radiator. A/C pump bracket may be too low to install the pump (cast aluminum valve covers are tall).
Navigation
Install the app
How to install the app on iOS
Follow along with the video below to see how to install our site as a web app on your home screen.

Note: This feature currently requires accessing the site using the built-in Safari browser.
More options
-
Hello there guest and Welcome to The #1 Classic Mustang forum!
To gain full access you must Register. Registration is free and it takes only a few moments to complete.
Already a member? Login here then!
You are using an out of date browser. It may not display this or other websites correctly.
You should upgrade or use an alternative browser.
You should upgrade or use an alternative browser.
Mach1Mark's '65 coupe restomod
- Thread starter Mach1Mark
- Start date
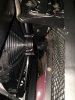
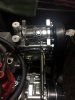
Day 2 of shimming the accessory pulleys. Got the water pump pulley and the alternator pulley lined up. Added a couple of washers under the bolts for the crank pulley to prevent them from bottoming out. Removed the grill support and installed the electric radiator fan as a pusher in front of the radiator. This required I flip the fan blade over in its housing. Someone at Maridyne had a good idea and had the fan blades marked 'pusher' and 'puller' depending on which side of the radiator you mount it. Re-installed the grill support. Tight fit but its all in.
Attachments
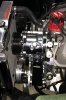
Removed the Flowkooler water pump from the engine and disassembled it. Removed some corrosion and dried gunk from inside and determined the gasket between the pump and the plate needs to be replaced. Thread chased the (4) threads on the pump back for the bolts holding the plate. Chased the (4) bolts on the front of the pump for accessories mounting. Bought a roll of gasket material and some NAPA/Permatex black RTV sealer. Cut out a new gasket and installed it between the pump and plate. Installed water pump to timing cover with new gasket held in place with RTV. Applied Loctite to (4) water pump pulley bolts and (4) crank pulley bolts. Installed alternator and belt and adjusted tension. Locked turn buckle. Test fit A/C turn buckle. Test fit idler pulley.
Attachments
My intake and carbs from Price Motorsport shipped yesterday. Should arrive at my place tomorrow. Install and pics this weekend !!
http://www.pricemotorsport.com/html/body_351windsor_2x4__intake.html
http://www.pricemotorsport.com/html/body_351windsor_2x4__intake.html
Didn't know you were going dual carbs. Sweet! I am assuming you got the shaved height intake for hood clearance?
I've been planning on 48IDA Weber carbs for a long time. The cam I installed is designed to optimize Webers. When I really started researching what I was going to actually buy I came up with an Jim Inglese system which was a substantial amount more that I was thinking I would be spending. Plus, I still have a bunch more parts to complete my build plus I am trying to stay with the vintage racing vibe. The performance and 'wow' factor of the Webers would work but I am anxious to complete my build. The dual fours have a lot of the same 'wow' factor and awesome performance but at half the price. Webers are definitely still on the table, at a later date.Didn't know you were going dual carbs. Sweet! I am assuming you got the shaved height intake for hood clearance?
That's right! I remember you were going with the Webers. I love that look and sound too but didn't want to deal with the tuning challenges etc. I think your choice of the duals is pretty bad ass too.
Begin installation of intake manifold. Had an issue with the fuel log lugs clashing with my spiffy H-M valve covers. Of the options I came up with I decided to grind some of the fuel log lug off to clear. Fits great.
Attachments

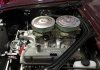
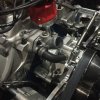
Stabbed the distributor into the block and aligned it according to the indexing marks I placed before I pulled it. I began trying to locate the pre-bent Monte Carlo bar and it looks like it is going to clash with the A/C compressor.
Returned the Ford Racing (1.5" short) water pump to Summit Racing this morning. Last night and today I test fit the power steering pump brackets and installed the power steering pump pulley and beauty cover.
Attachments
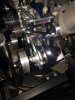
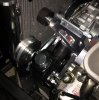
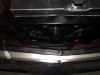
Today after I tested the thermostat by boiling it in a pan of water on the stove I installed it and the new housing. Trimmed and installed the new upper radiator hose as well as one of the heater return hoses. Checked the rest of the hose clamps. Last night I test fit the air conditioning compressor and determined I needed a couple different new spacers to properly align the pulley. The compressor vendor sent me a polished rather than natural finish unit. And the V-belt is too short . . . back to the post office.
Attachments
Looks awesome!
Sent from my iPhone using Smackatalk
Sent from my iPhone using Smackatalk
Grabber70Mach
Well-Known Member
Looking good.
I make oil
Active Member
Looking good!
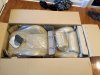
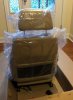
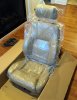
Today, the front seat adaptor brackets and one of the front seats arrived today. Assembled the sliders to the seat bottom and test fit one adaptor to the sliders. These are going to be GREAT seats !!
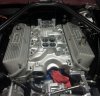
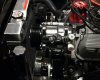
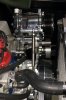
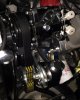
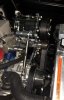
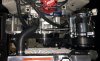
Spent time going back and forth between NAPA and my garage to get a longer serp belt. SUCCESS !! Installed the belt, A/C compressor and P/S pump. Accessories installed and look great !!
Spent time going back and forth between NAPA and my garage to get a longer serp belt. SUCCESS !! Installed the belt, A/C compressor and P/S pump. Accessories installed and look great !!
Attachments
RyanG85
Well-Known Member
She's really starting to come together! Lookin good!
I really like those seats in the different color! They look sharp.
Thanks, Terry. Im glad I could get the front seats that match the rear seat upholstery I bought and installed a year ago. My wife has said she wasn't real sure she liked the new interior color choice but now that she has decided it goes great with the burgundy paint. I knew it would be a great combo from the start.I really like those seats in the different color! They look sharp.
Thursday, my other Procar seat arrived along with the natural finish A/C compressor. Saturday, I removed the chrome A/C compressor and shipped it and the (too short) serp belt back to CVF Racing. Also returned the Global West pre-bent Monte Carlo bar to Summit Racing for refund as it doesn’t fit as advertised. Installed the natural finish compressor. Test fit the power steering hoses to the pump. At least one line needs to be shortened and I'm going to install 45 degree fittings on the steering unit end instead of the 90 degree fittings.
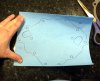
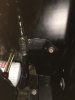
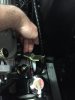
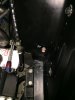
Today, I reworked the late model Mustang clutch cable bracket to work with my model year. Unfastened it from the cable, flipped it over, bent it to fit and drilled a couple of holes. Threaded one. The bracket looks better in person, the pics make is look like crap. I have since decided to powder coat the bracket. Fabbing isnt difficult, you just need a bit of an imagination and some tools.
Today, I reworked the late model Mustang clutch cable bracket to work with my model year. Unfastened it from the cable, flipped it over, bent it to fit and drilled a couple of holes. Threaded one. The bracket looks better in person, the pics make is look like crap. I have since decided to powder coat the bracket. Fabbing isnt difficult, you just need a bit of an imagination and some tools.
Attachments
Last edited:
Two steps forward one step back. You are still making progress. Do you still plan to get a chrome unit?
You're right about fabbing stuff. I seem to have to modify every little thing on my car. Most in the quest to hide/route wires, lines and hoses and such. Hell, just today I made a fixture for straightening hard lines. I'll be damned if I am spending a couple hundred bucks for such a tool if i can make it!
You're right about fabbing stuff. I seem to have to modify every little thing on my car. Most in the quest to hide/route wires, lines and hoses and such. Hell, just today I made a fixture for straightening hard lines. I'll be damned if I am spending a couple hundred bucks for such a tool if i can make it!