• Hello there guest and Welcome to The #1 Classic Mustang forum!
    To gain full access you must Register. Registration is free and it takes only a few moments to complete.
    Already a member? Login here then!

Selene/Fred is a San Jose built 1965 Mustang

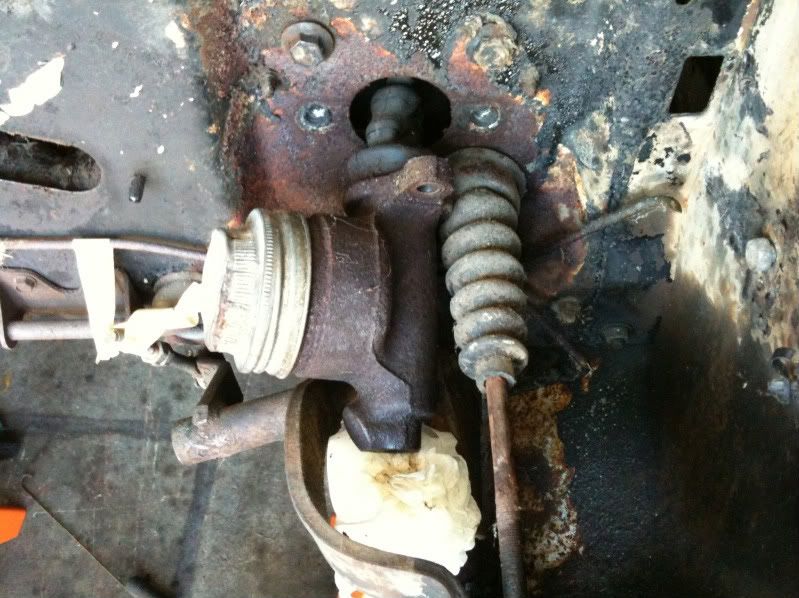
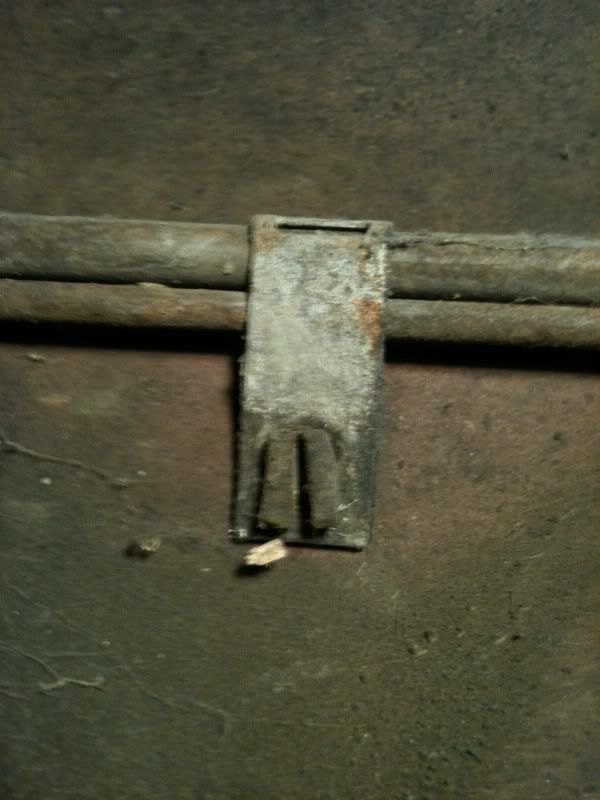
It's been a while since the last update, I had to give my daily driver some much needed TLC. Well, thanks to the encouriging wisdom of Mike(garner67) I have started to remove the lines underneath Fred so I can start cleaning the underside. Ran into a little problem and need some help. How do I release the fuel line and I believe brake line from the following clip without breaking it?

15c6997f.jpg
 
Last edited by a moderator:
IIRC, you stick a flat blade screwdriver in the middle and spread it apart which brings the tabs together on the other side and the bracket will fall out of the car.
 
Thanks Mark. I ended up using some pliers and compressing the tabs above from the interior and they popped right out, but I did try your method and it worked as well.

BTW: I dig the new avatar with the big gun.
 
Back at it again. LoL! IT'S OFFICIAL! Fred and I just had our one year anniversary. I'm happy but a little disappointed in our progress. Fred says I don't invest enough time in our relationship to be where we need to be. That's what they all say, okay I get it.

I started off by trying to remove the brake master, I removed all the bolts from the engine compartment but noticed of course that there is a rod that is attached to the brake pedal. Duh!

7ed84027.jpg


I was having a frustrating day, decided to tear out all the super thick insulation on the toe board which was a pain in the rear and didn't really help my cause. I did a little research and all I found out was that by removing the pin where the pedal and rod join they would just magically separate. :nk It's not happening, does anyone have any suggestions on how to separate the pedal and the brake master rod?

As I was trying to play with the brake pedal I kept having the under dash wiring in my way so I figured I can work on removing the electrical to free up some space. I had already removed the engine compartment harness before we removed the engine, so the rear electrical harness would be step one. I was able to snake through the rear wiring harness through that wretched little hole down by the rocker panel where the door meets the rear quarter, pulling through from the rear towards the front. What a time consuming task that was, goodness.

96a23602.jpg


Unfortunately I had to cut two connector ends off because the rubber protectors were to big to push and pull through. Now that I am thinking about it I feel stupid for not having disconnected the rear wiring harness and the under dash harness snaking it out from front to back avoiding cutting anything at all. WOW! Too late for that one, moving on.

After removing the rear harness, I started back under the dash and I can officially say I am not having fun. Another question for all the gurus that I hope take a look at this thread every once in a while. I can't for the life of me get the wiper, light and ignition switch removed from the dash? How is it done? I probably will not be using them again but I don't want to damage the dash or mess up the wiring anymore than I already have.

1dbbd3c8.jpg


Thanks again everyone for all your help with Fred so far. A year has come and gone, and I don't intend on given up and plan on seeing this through to the end.
 
Last edited by a moderator:
You learned a good lesson the rear wire harness, grasshopper!

Light switch removal: on the back of the switch inside the compartment is a button: pull out the lever to full ON and press and then pull out the lever. Then rotate the bezel on the dash and then everything comes apart.

Wiper: there's a hex key pin on the handle: loosen and the handle comes out. I believe the bezel also rotates and everything comes apart.
 
My memory's a bit foggy re: the stop light switch/pushrod. I think it's a combination of pulling and rotating up. There's also an electrical connector to take off. A picture of the switch may help you to understand how it's installed:

REPF506602.jpg


Frank
 
"Midlife" said:
You learned a good lesson the rear wire harness, grasshopper!

Light switch removal: on the back of the switch inside the compartment is a button: pull out the lever to full ON and press and then pull out the lever. Then rotate the bezel on the dash and then everything comes apart.

Wiper: there's a hex key pin on the handle: loosen and the handle comes out. I believe the bezel also rotates and everything comes apart.

Very good lesson was learned in regards to that rear wire harness. I wish I would have just asked ahead of time on the procedure, it would have saved me a huge headache and having to cut up those two connectors.

"crustycurmudgeon" said:

Thank you soo much for that video Frank, it was so easy to do once I saw the video. Thanks again.
 
Taking a little break from the car to re-energize, I got a little bit of a late start but going to see the rest of the day through working on Fred.

The very first thing on my list was to follow through removing the underdash harness.

IMG_7601.jpg


I really wanted to focus on not having to cut any wires and pull the harness out in one piece.

It took me a bit of time but I was able to get it all out. Wuwhoo!

IMG_7610.jpg


I cant wait to get back outside and continue, I was soo happy I got the harness out in one piece. (So I think)
 
Last couple of nights I have been working on a few things, when I get frustrated with one I pick up where I left off previously on another. Not the right way to do things but it keeps me sane and taking something apart. Currently working on removing the steering wheel so I can then remove the steering column which then will alow me to remove the clutch/brake pedal assembly. The night the photograph was taken, I was in the chat room area with Jeremy and Duane, Duane was kind enough to send me the link on how to deal with this new task, I became annoyed learning that I needed a steering wheel puller. Blaw! I proceeded to remove the horn piece and the nut underneath, hit the new road block so I moved on and removed the acceleration pedal, speedo cable, e-brake cable followed by trying to figure out the removal of the heater core. LoL. I wanted to share this particular photograph I took because all the help that I recieve from everyone really means a lot. Thanks again everyone.

a6fc982c.jpg
 
I've never used a steering wheel puller. Just loosen the nut, and start banging on the back of the steering wheel, going around the circumference. Eventually, it will loosen up.
 
"Midlife" said:
I've never used a steering wheel puller. Just loosen the nut, and start banging on the back of the steering wheel, going around the circumference. Eventually, it will loosen up.

I wish I could say the same. I just took my 16oz rubber to it and Fred took it like a champ. Didn't budge one bit, come to think of it, Fred didn't even flinch.

e2aaf45d.jpg


:shy :rp

99c700d8.jpg


I hope it was only because I was soo tired and it was midnight so I was trying not to make too much noise. I will try again tomorrow, and will approach it with the great words of Celebrity Death Match in mind, "Lets get it on!".
 
Last edited by a moderator:
I've found that it's easy to strip the threads in the steering wheel. Make sure you use the right bolts. You'll get a large assortment with the puller and probably none of them will be right. You may need to make a trip to the hardware store to get the right ones (I'm guessing 1/4 x 20).

IIRC, that steering wheel was in really nice condition.

Frank
 
One rule I have always tried to follow when a wheel is stubborn like that, keep the retaining nut in place but loose from the hub. As you are pounding and pulling, the wheel may decide to suddenly let loose and smack you in the face. I have seen this happen close up......real close up.
 
"crustycurmudgeon" said:
I've found that it's easy to strip the threads in the steering wheel. Make sure you use the right bolts. You'll get a large assortment with the puller and probably none of them will be right. You may need to make a trip to the hardware store to get the right ones (I'm guessing 1/4 x 20).

IIRC, that steering wheel was in really nice condition.

Frank

I think it's a repro, but you did mention it to be a nice repro when everyone came over to pull the engine and transmission. Thank you for the hardware specs, I will be calling Craig after work to see if I can arrange pick up of the puller and go from there.

"fordrule" said:
congrats on the process of the beast. kudos to working on him in slacks and dress shoes lol..

Since I work in San Jose, I tend to hang out in San Jose after work. As soon as I got home I felt the need to go out into the garage and give Fred a good pounding. :nk I changed right after I couldn't get the wheel off because I decided to try and make a couple of technical write ups while I'm at it and just maybe help some noob like myself in the future. I have converted to flat front/non cuffed pants, so I figured I would give these last pleated/cuffed pants a good run for their money.

"AzPete" said:
One rule I have always tried to follow when a wheel is stubborn like that, keep the retaining nut in place but loose from the hub. As you are pounding and pulling, the wheel may decide to suddenly let loose and smack you in the face. I have seen this happen close up......real close up.

That is some A+ advice Pete, thanks. I definitely don't want to end up looking like the dentist from the movie The Hangover. LoL :ep Glad you made it through your experience okay, it sounds like it was a really close one.
 
Abe, You can pickup a "loan a tool" steering wheel puller from most of the DIY auto parts stores.... and yes, the generic bolts that come with these kits never seem to be the correct size for these cars.

Personally, I wouldn't be hitting with a hammer a nice condition steering wheel that I planned on re-using.
 
Back
Top