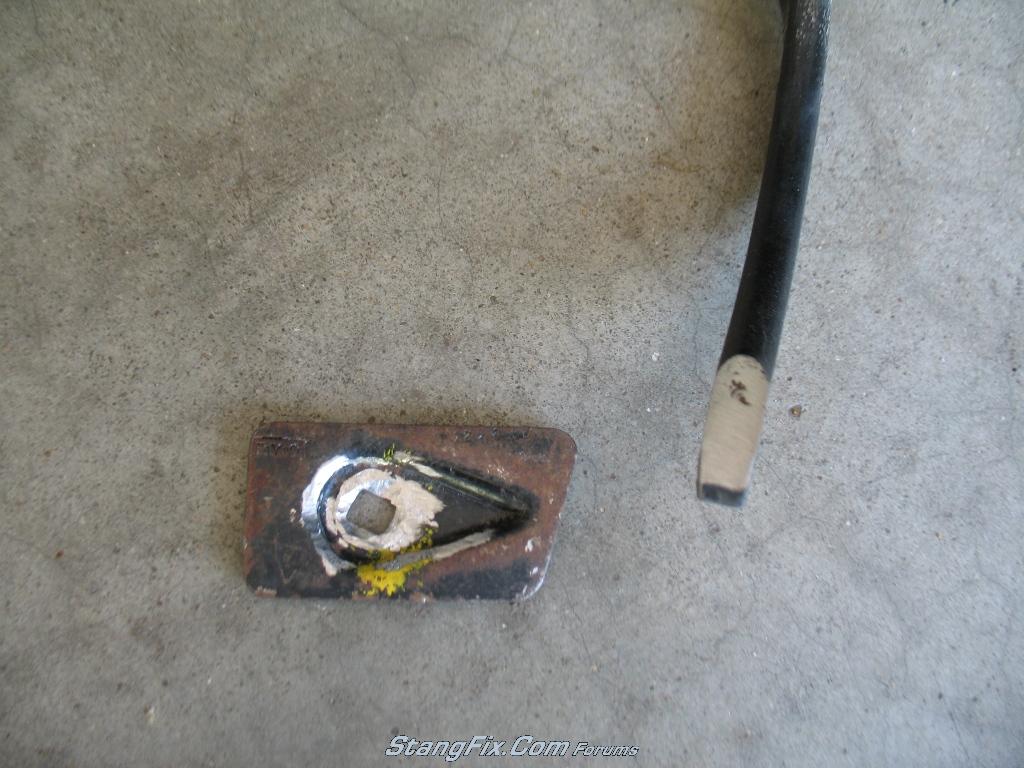
• Hello there guest and Welcome to The #1 Classic Mustang forum!
    To gain full access you must Register. Registration is free and it takes only a few moments to complete.
    Already a member? Login here then!

The T56 conversion into a 70 Mach 1

"buckeyedemon" said:
it looks like you may need a little more heat in the welds...focus more of the heat on the thicker metal...

be sure your metal is clean. that includes rust and any coatings (like factory zinc coatings). yes you can weld thru it most of the time but don't handicap yourself.

is your tip/liner clean? i once had a liner that had a bunch of buildup in it. it was causing the weld to sputter.

are your drive rollers in good shape? enough tension?

I borrowed my neighbors Hobart 140 that he had only used a couple times so it all should be good. It was on heat setting 2 out of 4 so it likely didn't have enough heat. After-the-fact I realizes this and I probably should have turned up the wire feed speed as well. Learning as I go so to speak. I did make sure all metal was clean prior to welding. Made that mistake with galvanized pipe and it didn't stick for crap.
 
Grinding a bevel on the pieces will give you more surface area for the weld making it stronger. This is very important on thicker metal when using a 110V welder that is not able to supply the voltage to make deep penetrating welds.
 
"jmlay" said:
Grinding a bevel on the pieces will give you more surface area for the weld making it stronger. This is very important on thicker metal when using a 110V welder that is not able to supply the voltage to make deep penetrating welds.

That was one thing I actually did. I beveled them to about 30°. I was attempting what they call a full penetration weld, but apparently didn't get the heat high enough and didn't have my wire speed fast enough. Next time I'll know these things and will hopefully have enough spare steel to practice enough on prior to welding the real deal :ecit
 
Well I tackled the front half of the transmission install today. Below are the steps taken.

I first installed the pilot bearing using a bearing driver. Since it was an automatic car before, I didn't have to remove an old pilot bearing.

231_16_06_10_7_44_57_0.JPG


After the pilot bearing, I slid on the motor plate and began preparing the flywheel. I took an old Tshirt and some brake cleaner and cleaned up the friction surface of the flywheel. Regardless if it is a new or used flywheel, it is necessary to get any oil from fingers or anything that would cause clutch slippage.

231_16_06_10_7_44_58_1.JPG


I then installed the flywheel using Blue Loctite, ARP -100 - 2801 flywheel bolt kit torqued to 85 ft-lbs.

231_16_06_10_7_44_58_2.JPG


I then installed the Quicktime Bellhousing and proceeded to check it's alignment with my Mitutoyo dial indicator and starrett magnetic base. I ran into one snag, my flywheel is aluminum and aluminum is not magnetic. The friction surface is magnetic, but I was getting inconsistent readings and decided that it wasn't enough to keep the magnetic base from moving. I then removed one of the flywheel bolts and started looking around the garage for steel that would reach from one of the pressure plate bolts to the removed flywheel bolt. Ironically, a spare motor mount plate that I made was a perfect fit :ecit So I bolted that plate up and mounted the dial indicator base to the plate. That prevented the base from moving around, and got consistent readings. I started by placing tape at the 3, 6, 9, and 12:00 positions of the bellhousing. This isn't a standard bellhousing that has a complete circle to house the transmission. It has cutouts and areas that kept throwing off my readings, so I rotated those four tape locations slightly as can be seen in the pic below.

231_16_06_10_7_44_58_3.JPG


I used a carpenters T and straightedges to ensure the points I mark on the tape are across from each other. I then proceeded to rotate the crankshaft by the dampener and check the readings on the dial indicator. At what is supposed to be the 9:00 position I set the dial to 0. Rotating to the 12:00 position I got a reading of -.005" Rotating to the 3:00 position I got -.003" Rotating to the 6:00 position I got a -.004" So to summarize, the pair of 9:00 and 3:00 resulted in a runout of 0.003". According to my research you divide that number in half and if it is less than 0.005 you are good to go and don't need offset dowels. The pair of 12:00 and 6:00 has a difference of 0.001", so that is definitely good. Since one had a reading of -0.005 and the other had -0.004", it appears the diameter of the hole is larger than that of the other location I checked. Also, I removed the dial indicator and mounted it again and got the same measurements within a thousandth. A couple pics, but forgot to snap a pic of the 12:00 measurement

The 3:00 measurement:
231_16_06_10_7_44_59_4.JPG


The 6:00 measurement:
231_16_06_10_7_46_09_0.JPG


Now that the bellhousing alignment is within spec, I removed the bellhousing and proceeded to install the clutch and pressure plate. Prior to this, I got out the brake cleaner and cleaned up the surface on the flywheel as well as the pressure plate. Using the alignment tool I held the clutch centered in place while I installed the pressure plate. I used Blue Loctite and ARP - 150 -2201 pressure plate bolts torqued to 24 ft-lbs. After torqued down, I removed the alignment tool.

231_16_06_10_7_46_09_1.JPG


After that I reinstalled the bellhousing and using the supplied Gr 8 hardware I torqued the bolts down to 45 ft-lbs.

231_16_06_10_7_46_09_2.JPG


This was the progress for the day. I'll be tackling the reverse solenoid tomorrow. There is a heavy spring inside the solenoid that I'll be swapping out with a softer spring, but still heavy enough to minimize mistakenly putting the car in reverse while doing down the freeway. I'll then get the hydraulic throwout bearing installed, and raising the transmission up into place :pbj
 
Last edited by a moderator:
Update to the progress. I'm having issues getting the trans to slide all the way in. I'm a little less than 1/2" away from the trans mating up with the bellhousing but it just won't go in. Gonna drop the trans and check the clutch to pilot bearing alignment, as well as use some sandpaper on the trans dowels to ensure they aren't the reason it's so tight fitting. It was to the point that the dowels were just starting to go into the bellhousing holes. I was under there bench pressing this beast of a transmission for a few hours trying to get it in there at all possible angles and it just wasn't gonna go.
 
You could always...... gulp..... pull your bellhousing back off the engine and try mounting it onto the removed transmission to rule out the dowel pin engagement.
 
I agree with Dave. Pull the bellhousing off and put it on the transmission. I cut the heads off of a couple long bolts and threaded them into the block. That gave me a positioning tool so that the transmission would slid straight back. They don't have to be that long, just long enough to get out of the block when you are done with the alignment. I suppose you could also do that with mounting the tranny to the bellhousing. Just an idea. Good luck with it. You are making good progress.
 
I finally got it on. Sanded the dowels on the trans as well as the hole in the bellhousing. Jacked it back up and it slid right on. I had test fitted the bellhousing to the trans before and remembered that they were somewhat tight but figured it'd slide on with a little bit of effort. Guess I should have done something at that point in time. Oh well. Taking a break from the heat, then will be installing the Xmember and then messing with bending the brake pedal. I'll post later with pics on the progress from today, including the hydraulic throwout bearing install. That thing was a piece of cake.
 
Time to tackle the reverse lockout solenoid. There are a few posts on random forums about what to do with the reverse lockout solenoid. The reverse lockout solenoid is controlled by the computer that activates the solenoid when the car is traveling less than 3mph and allows easy shifting into reverse. On the T56, you have 1st, 3rd, 5th, and Reverse all forward so there is a chance that the driver could mistakenly miss 5th gear and go into reverse while traveling at higher speeds. I hooked up my shifter and tried going into reverse and it darn near took two hands to shift it into reverse. Most people hook up a momentary switch to the dash and press a button each time they want to shift into reverse. To me, that is a huge pain in the arse. Others buy a shifter knob with the button and use that for the reverse solenoid switch. Others hook the solenoid up to the brake pedal, but the only down fall is that the solenoid is activated each time you touch the brakes. There are aftermarket solutions that mimic the computer, but they run about $100. The other solutions are to completely remove the solenoid and put a pipe plug in the trans (to fill the hole), or to use a softer spring. I chose to use the softer spring, which will still not be as easy to shift into reverse but won't take two hands to do it. If I find that I'm not happy with the effort, I will put the stiffer spring back in and hook the solenoid up to the brake pedal. The softer spring is going the easy route for now and may likely change my mind. So here was the process:

Went to Menards and bought a new spring with thinner wire

231_21_06_10_4_59_28_0.JPG


I then took the solenoid apart.

231_21_06_10_4_59_30_2.JPG


Here is a comparison of the two springs

231_21_06_10_4_59_29_1.JPG


I then installed the new spring, but found that it had too many windings and was basically compressed in the installed state

231_21_06_10_4_59_30_3.JPG


Easy fix. I just stretched the spring out and then cut it in half.

231_21_06_10_4_59_31_4.JPG


New spring installed:
231_21_06_10_5_01_22_0.JPG


Solenoid all assembled

231_21_06_10_5_01_22_1.JPG


Piece of cake. I still need to install the shifter to see if it made it any easier to find reverse. Up next is the brake pedal modification, since it ended up having too much space between the clutch and brake pedal pads
 
Last edited by a moderator:
Another update. I'm actually further ahead than this post, but just update whenever I get time. I tackled bending the brake pedal. I had to bend the pedal enough so that the pad moved 1" closer to the clutch pad. Using some heat with the pedal in a vice, I was able to muscle it and bend it perfectly. The only downfall was that the pad was now crooked when installed and was VERY noticeable. So the only thing to do was grind off the original weld. I figured that since I was already removing the pad I might as well remove the pad off the manual brake pedal and weld it onto the power brake pedal.

Here is the cut pad removed:
231_21_06_10_5_03_54_1.JPG


and here is the correct pad removed:

231_21_06_10_5_03_55_2.JPG


and finally here is it all welded up, painted, and installed. The clutch pedal is an inch or two higher than the brake pedal, which from what I've read is normal.

231_23_06_10_7_49_35_0.JPG


I also received more parts in the mail today from NPD. Notice one thing that doesn't belong? Yep, they sent the wrong clutch pad trim. So if anyone needs a 65-68 stainless clutch trim let me know. I definitely am not impressed with the stainless trim on the brake pedal just by looking at it. I'm not sure if its supposed to be this way, but there is a bigger lip on the top and left side. Actually, the bigger lip looks more correct and the lower and right sides don't have enough lip. This results in a gap between the stainless and the pad.

231_23_06_10_7_49_35_1.JPG


Parts purchased were the clutch pad and trim, disc brake pad and trim, parking brake pad (trim was ok on car), 65-68 lower shift boot (cheapest cause I'll be cutting it up), shifter trim plate, parking brake return spring, clutch pedal bumper, and a parking brake cable clip that got lost somehow.
 
Last edited by a moderator:
I can't help but think you'll be happier with the power brake clutch pedal facing on it. I always wondered how well the rubber pad and stainless trim would stay on a "sawed off" power pedal, since the left side would actually be lower than it should be.
 
I had previously installed the hydraulic master cylinder but forgot to post about it. As shown in the first post, I'm using the McLeod hydraulic throwout bearing. PLEASE NOTE: If you have a Cobra T56 you DO NOT need the sleeve that is shown in that picture. The Cobra already has the sleeve built in, so I get about $110 refund from ModernDriveline for the sleeve. This makes the hydraulic setup a bit more reasonable IMO.

The first thing I did was measure the depth from the pressure plate fingers to the front face of the bellhousing. Using the little pin that slides out of the caliper, you can easily measure this depth:

231_21_06_10_5_01_22_2.JPG


I measured a depth of 2.30". Using that same straightedge and caliper, I measured the depth from the trans face that meets the bellhousing to the face of the throwout bearing. The bearing comes with an aluminum spacer that must be used with this transmission. Also, the inner race of the bearing with the seals that slides onto the sleeve is threaded. I think the older hydraulic bearings used shims to adjust the height. With this one, you basically slide the bearing on and turn it to adjust it out or in. Super easy! Also note that the bleeder hose must be at the top during the final depth measurement. According to the instructions, the differences between the depths measured must be a minimum of 0.100" and a maximum of 0.300". As shown in the pic below, that measurement was 2.25" which did not meet the minimum differential. I made one more revolution and ended up with a measurement of 2.13", which results in a clearance of 0.17" and is within spec!

231_21_06_10_5_01_22_3.JPG


Here is a profile of the bearing assembly:

231_21_06_10_5_01_22_4.JPG


and another picture:

231_21_06_10_5_03_52_0.JPG


After that was all done, it was just a matter of jacking the trans up and sliding it into place. That was easier said than done as mentioned in a previous post, but it was accomplished. Here are a few pics of the installed trans with the crossmember in place.

231_21_06_10_5_03_56_3.JPG


231_21_06_10_5_03_57_4.JPG
 
Last edited by a moderator:
"johnpro" said:
I can't help but think you'll be happier with the power brake clutch pedal facing on it. I always wondered how well the rubber pad and stainless trim would stay on a "sawed off" power pedal, since the left side would actually be lower than it should be.

I too thought of that and had taken a grinder the the back left side so that the "bump" ended up being flush with the remainder of the pedal. This was only done where the trim and rubber would cover the metal. I thought for sure I was going to grind through the metal but there was still some left! I agree with you though, its much better with the correct metal pad on there :)
 
Here is a to-do list to help keep me on track:

  • Paint and install steering column
  • Install brake booster and M/C and bleed brakes
  • Connect hydraulic hoses and reservoir, then bleed hydraulic clutch system
  • Install parts shown in picture from NPD
  • Cut and install lower shifter boot
  • Install shifter with gaskets, leather shifter boot, chrome shifter bezel, and shifter knob
  • Finish a little bit of underhood wiring
  • Install drivers valve cover and then export brace
  • Install new Taurus fan into new aluminum fan shroud, install onto radiator, and then install in car
  • Install 3g alternator and upgrade wiring to battery in trunk
  • Install instrument cluster and dash pad
  • Wire up reverse lights
  • Return and reorder 1350 pinion yoke and install it, along with the driveshaft
  • Lower car to ground and measure final driveline angle as well as the driveshaft angle
  • Finalize my parking brake solution and install it
  • Drain power steering, coolant, oil, trans, gas, and rear axle fluids
  • Refill power steering, coolant,oil,trans, gas, and rear axle fluid
  • Double check all bolts and fasteners prior to starting and driving car

I am probably missing a few things and may add them as I remember. There is definitely light at the end of the tunnel :ecit :ecit The one thing that I won't have done will be the electronic speedometer. I'll have the factory tachometer installed and will follow my wife's car to get a feel for what RPM is at the speed limit. I still have the pegleg 3.00 gears, so with a combination of 0.62 6th gear ratio and 25" or so tires I'll be spinning 2000rpms at 80mph

Most of the driving will be around town, so I'll "go with the flow" of traffic. I have plans for an Autometer gauge cluster but funds are getting tight towards the end of this conversion. I'm trying to find a deal on a good used 5" Phantom electronic speedometer. Seems to be a hard find on Ebay
 
Well I've come down to the last miscellaneous stuff in the project and as usual it's giving me the most headaches.

-The hydraulic clutch line was missing the union to connect it to the throwout bearing, so bleeding the system had to wait.
-NPD sent me another wrong clutch pedal stainless trim, but finally found the correct one and are sending it this way. There was a labeling issue apparently.
-I got my Scott Drake leather shift boot and the darn thing is too short. When installed, it is about 2" too short when shifting back.
-I've been fighting the install of the monte carlo bar for 4 days. I finally got it to drop in and none of the friggin holes match up. None!
-I cut the aluminum fan shroud yesterday and with the Taurus fan installed the clip that holds the fan to the motor sticks out too far and contacts the radiator. May have to make spacers for the shroud
-I'm still waiting on wiring for the alternator to come in the mail, so the 3g alternator upgrade has to wait.
-I ordered what I thought was a standard 1350 pinion yoke and apparently our cars use a longer version. Mine was a 5" long yoke whereas the standards are 4", so I have to mail that bastad back and pay and extra $30 for the longer version.


Everything went so smoothly up until now. Seems everything I touch doesn't work, so I am gonna take a break from it all and come back in a week or so. I'll update the threads with pictures possibly tomorrow, as I don't have the pics at work.
 
A little update. I've updated my to-do list above to show the items remaining. Today I wired up the reverse light switch. Its pretty basic install. The T56 uses the standard 2-pin Weatherpak connector on the right below, so my harness involved using the connector on the left:

CON-1-029.jpg


My reverse light/neutral safety switch connector was cut at the underdash harness, so I connected the two red/blue wires to bypass the neutral safety and then wired up the remaining black/red wires to a weatherpak connector.

I forgot to paint the M/C and it was a rusty mess, so I'm waiting on the paint to dry before installing it and bleeding the brakes. I'm now going to attempt to bleed the hydraulic clutch using a Mighty Vac. Too many people try to bleed the clutch using the pedal, which creates tiny air bubbles and then complain they can't get the system fully bled. Using a handheld vac pump is the way to go to eliminate these bubbles and speed up the bleeding process.....or so I hope! :wi

Gave up on the Monte Carlo bar, and finally got some underhood wiring done for the 3g and Duraspark so I'll install the export brace once the M/C is installed.
 
Well I'm down to the nitty gritty on this project as you can see in my above to-do list! I'm going to install the dash hopefully tonight or tomorrow night, then finish up the pinion yoke/driveshaft, then bleed the clutch and start draining/refilling the fluids (among other misc stuff as seen in the updated list). Almost there!!!!
 
List updated. Gonna install the radiator and fab up some temporary aluminum brackets for it. Then I'll install the export brace, measure the driveline again, finish the parking brake setup, run the power wire for the alternator back to the trunk. Somewhere in that mess I'll drain whats left in the gas tank, top off the fluid and start cranking her over.
 
You are doing a great job on the swap. You will love that tranny when you get the car going. I think it is the best tranny out there for our cars. Not the easiest to install as you have learned but a great tranny.
 
Back
Top