• Hello there guest and Welcome to The #1 Classic Mustang forum!
    To gain full access you must Register. Registration is free and it takes only a few moments to complete.
    Already a member? Login here then!

1968 Mustang Fastback GT 302 4V

atevres

Member
Hello everyone! :yah

It 's been a while since I last wrote and I decided to start the post of the work that I'm doing for my Fastback.

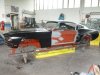
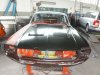
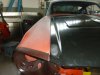
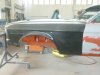
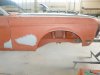
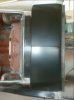
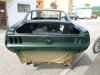
As I mentioned in my post presentation, given the state of the entire floor pans and freim rails of my fastback, I bought a coupe to a fastback conversion in recovering the roof of the fast.

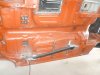
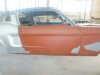
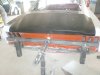
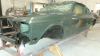
Yesterday I finished completely dismantle the coupe. Putting on a template created by me, so do not get lost the original measurements of chassis and body and cut the roof.

Now I am almost ready to install the fastback roof, then wait for the rear quarter etc. to complete the work.

It 'a job a bit complex and long, but it is a task possible without many changes, being coupe and fastback on the same floor.

I decided to remove the entire assembled where rest on the b-pillar and mount the whole roof structure recovered. :confu

I have a great need of your help then reinstall it, because I took a lot of screws and small screws, and even shop manual and body parts, I think your experience will be the best help.

Thanks to all the forum. :wor
 
That ain't a small job you are doing !!
Double check before welding something together !!
Which vin are you keeping ? The one from the fastback I hope .
 
"B67FSTB" said:
That ain't a small job you are doing !!
Double check before welding something together !!
Which vin are you keeping ? The one from the fastback I hope .

I will use Title - VIN and door tag Fastback 302J Code. :thu
 
Keep the pictures coming... Are you planning to splice in the quarter panels, or replace them alltogether with the dynacorn quarters? Also, are you going to keep the full A pillars from the fastback too or splice it at the windsheild pillars? I'm looking forward to seeing this mine was also a coupe that I converted over to a fastback.
 
Updating something: I removed the roof to replace the drip side. Came the fenders and trunk dynacorn of big business began to assemble all the parts.
It was not easy at all. To be perfect believe it is not possible with quste parts which have many differences of measurements between them. Then think any '60s car is the same as all other measures mm.
I am looking for to find the right balance of lines and proportions, and edit these parts repro that leave much to be desired.

All in all we are getting the result.
 
Updating a while the situation today.

The body has been completely welded, assembled to see the airs and closures of the sheets.
Welded Total Control subframe connector (slightly modified the left for passing gas line in original).

Soon more pictures of these days we started to sand and fill various points to sealing and painting. (October will be ready? :-\)
It will be Highland Green with C gold stripes. 8)

Thanks
 

Attachments

  • 14.jpg
    14.jpg
    90 KB · Views: 104
  • P1080650.jpg
    P1080650.jpg
    163.2 KB · Views: 101
  • P1080645.jpg
    P1080645.jpg
    144.2 KB · Views: 100
  • P1080867.jpg
    P1080867.jpg
    181.4 KB · Views: 102
  • P1080871.jpg
    P1080871.jpg
    165.2 KB · Views: 102
  • P1080873.jpg
    P1080873.jpg
    136.1 KB · Views: 28
I purchased the deck lids 3 (THREE) times! :mad:

Dynacorn same all three times, always different measures. The first two wore badly despite changes cut and paste. :eek:

The third arrived but after two changes seem to be very good. :)
 

Attachments

  • P1080870.jpg
    P1080870.jpg
    142.3 KB · Views: 28
  • P1080874.jpg
    P1080874.jpg
    142.5 KB · Views: 27
  • P1080876.jpg
    P1080876.jpg
    170.9 KB · Views: 28
  • P1080860.jpg
    P1080860.jpg
    45.1 KB · Views: 31
Looking very good. Very nice collection of pics showing all the hard work these beasts can require when bringing them back to life.
 
Sorry if I've updated recently, I've been getting busy schedule ..
The car has been painted this weekend, and I must say that after almost 2 years of hard work the emotion of seeing her so beautiful was very large.
 

Attachments

  • P1090860.jpg
    P1090860.jpg
    104.2 KB · Views: 38
  • P1090863.jpg
    P1090863.jpg
    90.2 KB · Views: 36
  • P1090866.jpg
    P1090866.jpg
    160.6 KB · Views: 33
  • elkt.png
    elkt.png
    1.8 MB · Views: 35
"The Italian Bullet" has been born !!!!! :nwort :nwort

Looking realy nice man !! :thum :thum
 
Back
Top