• Hello there guest and Welcome to The #1 Classic Mustang forum!
    To gain full access you must Register. Registration is free and it takes only a few moments to complete.
    Already a member? Login here then!

Rear Axle Upgrade and Restoration

67TXStang

Member
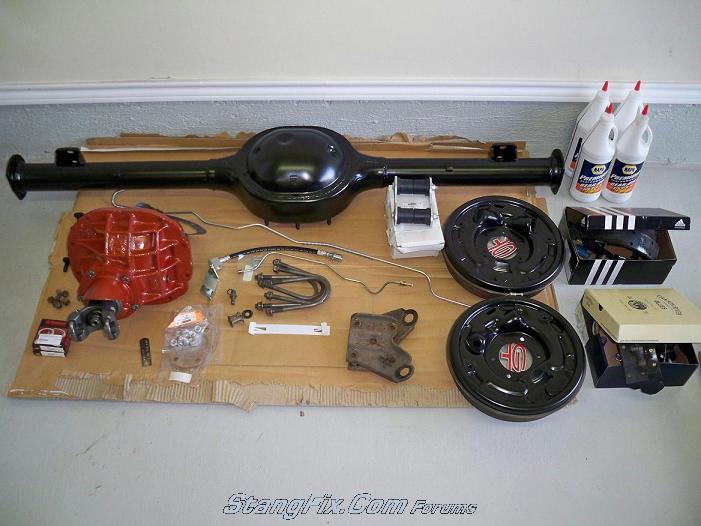
I decided to start off the new year with another Mustang project. This afternoon, I removed the rear axle from my Mustang. I've purchased a Detroit Tru-Trac differential and some Motion 3.25 gears (still have the original toploader).

I've not removed the rear axle from a car before. It was not difficult. In fact, the most difficult part seemed to be getting the clip off which holds the rubber brake line hose to the car. My approach is likely unconventional but I did not want to jack the car up real high. It would have been easier to roll it out on its wheels but this worked fine.
MGalleryItem.php

MGalleryItem.php

MGalleryItem.php

MGalleryItem.php


I'll likely not move forward very quickly on this project as work is really hectic right now. I plan to take advantage of this three day weekend to clean the center section so I can have it rebuilt with the new differential and gears.

I've not had gears replaced before. I have a Richmond rebuild kit which comes with Timken (sp?) bearings. There is a local machine shop which wants $250 for the job. A transmission shop recommened by a local restorer wants only $120. I'm tempted to go with the cheaper of the two. Anyone have suggestions on questions to ask to determine who is the best?
 
I've removed the brakes, axles, and all the nuts which retain the center chunk except for four. The axle is on two jack stands with the chunk facing downwards. I've hit it around the edge with a rubber hammer but it will not separate. Anyone know a good way to separate the chunk from the axle housing?
 
Use a bigger hammer.....

After 40+ years, that center section is fused pretty good to the axle housing.

If the axles are removed and ALL of the center section nuts/washers are removed, just keep smacking it and it'll finally start to seperate.

Do NOT under-estimate the weight of the center section. It'll put a nice dent in the top of your foot/hand/fingers.
 
Yes they are extremely heavy. Consider having a floor jack under the chunk, just touching it. I've used the floor jack to both lower and raise the chunk into position. Very handy.
 
+1, have something to help with the weight. You may think your young, strong and can handle it, but laying on your back trying to lift or hold that weight with just your arms is a lot harder than you would think, think of a heavier transmission in a smaller package.
 
Thanks for the tips. I'll see if I can get it out today. I've left a few nuts on partially so the chunk does not free fall when it does brake loose.

I'm thinking about what type paint to use on the housing. I don't have a compressor or spray gun so I'm limited. Any suggestions on a satin black which is durable but in a spray can?
 
Regarding splitting the chunk from the housing, why cant you use a good size chizel and place it against outer edge of the chunk's lip against the housing. I bet a light blow will send a strong enough signal to suddenly split them two apart. Yes keep a couple nuts loosely attached just for safety.
 
The chisel idea worked out. I used a chisel and hammer around the seal area. I went around the pumpkin about three times before the seal loosened and it came lose. Now the dirty cleaning job begins.

If anyone has suggestions on housing paint, I'm still interested. I'm thinking of Eastwood Extreme Chassis paint in the satin sheen.
 
After my center section came out of the parts washer and was rebuilt I removed any remaining oils and then primed with rattle can and painted with red oxide paint (again from a rattle can).

The contrast of the red oxide on the black axle housing looks good IMO.

Of course I don't have any pictures....
 
Dave,
I also did the same.


[admin]Had to remove an image from the new gallery that we threw away. For some reason it was screwing up the rest of the posts on this page.[/admin]
 
I left mine in the 65 natural. I kinda like it natural unlike the rest of you pervs! :lol :lol :lol

Mel
 
I painted both of my housings with rattle can high-heat paint from the local auto parts store. The '66 was painted probably 6 years ago when it was still my daily driver, and the '69 about 3 years ago. Both still look very good.
 
I've cleaned everything up and have it ready for assembly. I decided to go with the Eastwood Extreme Chassis Black paint on the housing. I used some red oxide primer on the pumpkin. It looked idential to the stock color until I put satin Kyrlon clearcoat on it.

The best part of restoring a car is having all the restored parts together like in the picture below. The axle housing is still drying so I can't put it all together yet. Just looking at the picture makes me want to sit down and put it all together. What makes it worse is the weather in Texas today was in the 70's... perfect for a drive.

119_24_01_10_6_11_25.JPG
 
I figured someone would comment on the spring plates. I'm not replacing the leaf springs at the moment and plan to remove the axle again later this year to do a little more work. Since I'm not replacing the leaf springs, I did not do anything with the spring plates.
 
I put together the rear axle and installed it this weekend. Everything went together well without any big problems. The passenger side axle did not slide into the new carrier easily. It required a few taps with a rubber mallet. While the splines looked fine, I suppose the years of use might have caused them to be out of alignment with the new carrier.

I'm very suprised at the amount of effort required to turn the assembly. Without the driveshaft connected and both the rear wheels off, it takes a considerable amount of effort to trun the axle. I expected it might be a little more difficult with the new parts and gear ratio (3.25). It is a little easier to turn using the pinion. I would expect this would put a drag on the motor.

Have any of you noticed this when switching rear axle components? I've not rebuilt an axle before. My only experience with the resistance required to turn the rear axle is in dealing with my open 2.79 setup.
 
"67TXStang" said:
The passenger side axle did not slide into the new carrier easily. It required a few taps with a rubber mallet.

Sounds like a locking rear and the splines weren't matched up correctly.

"67TXStang" said:
I'm very suprised at the amount of effort required to turn the assembly.

It will loosen up some after you break it in.
 
Back
Top