Navigation
Install the app
How to install the app on iOS
Follow along with the video below to see how to install our site as a web app on your home screen.
Note: This feature may not be available in some browsers.
More options
-
Hello there guest and Welcome to The #1 Classic Mustang forum!
To gain full access you must Register. Registration is free and it takes only a few moments to complete.
Already a member? Login here then!
You are using an out of date browser. It may not display this or other websites correctly.
You should upgrade or use an alternative browser.
You should upgrade or use an alternative browser.
Welding shock tower motor mount structure
- Thread starter abrahamfh
- Start date

Dennis Harrelson
Member
I'd start with the perimeter; the same seam you've already plug welded, and it's mate to the rear. then the heavier seams inside those.
Dne'
Well-Known Member
Hi! here's my story! :bowdown
I found the inner shock tower bracing on Ebay, I wrote the guy and sent him some photos of the engine side of my shock towers. He responded telling me the shock towers were in need of repair. So I used my porta power and pressed the shock towers and they became flush and I welded them along the seams. Then on the outter or wheel well side, I welded in the plates that I bought from the man on Ebay. Maybe not the best way to do it, but I was still pretty new at the time. Learning as I go, or as "WE all go"~
hope this helps, and I'm sure others will chime in!
dne'
"Dennis Harrelson" said:I'd start with the perimeter; the same seam you've already plug welded, and it's mate to the rear. then the heavier seams inside those.
Okay, so both front and rear apron seam welded to the shock towers. Gotcha and Yikes.
"Dne'" said:Hi! here's my story! :bowdown
I found the inner shock tower bracing on Ebay, I wrote the guy and sent him some photos of the engine side of my shock towers. He responded telling me the shock towers were in need of repair. So I used my porta power and pressed the shock towers and they became flush and I welded them along the seams. Then on the outter or wheel well side, I welded in the plates that I bought from the man on Ebay. Maybe not the best way to do it, but I was still pretty new at the time. Learning as I go, or as "WE all go"~
hope this helps, and I'm sure others will chime in!
dne'
Dne, that really helps. Wow, I think I am going to have to snoop around for those plates that go on the outside below the LCA's. That is a great idea, I am sure it not only does it help with the overall strength but also keeps all the road grime from building up in there like Fred's did.
Dne'
Well-Known Member
You're most welcome! :bowdown I'll snoop around on Ebay and see if those plates still are online. I'm sure there are other ways to secure/re-enforce the towers, but this is all I really know and a great time to do the Shelby drop if that's in your plans~ ; )
dne'
dne'
monkeystash
Active Member
"abrahamfh" said:Okay, so both front and rear apron seam welded to the shock towers. Gotcha and Yikes.
Abe, that might be an eye sore under your hood. I'm referring to the front aprons only. Those reinforcement plates are a great idea, and something I wish I would have done. I also added a weld around where the shock tower mounts to the frame rail, just outside the motor mounts.
Dne'
Well-Known Member
Abraham, here is the braces I was talking about, found them on ebay, still there! ; )
dne'
http://cgi.ebay.com/ebaymotors/67-68-69 ... ccessories
dne'
http://cgi.ebay.com/ebaymotors/67-68-69 ... ccessories
"abrahamfh" said:Okay, so both front and rear apron seam welded to the shock towers. Gotcha and Yikes.
Dne, that really helps. Wow, I think I am going to have to snoop around for those plates that go on the outside below the LCA's. That is a great idea, I am sure it not only does it help with the overall strength but also keeps all the road grime from building up in there like Fred's did.
Cool, thanks everyone. Some good info for me and anyone else thinking about doing this.
Looks like those are for 67 through 70 but I get the picture, those look real DNE, I will have to find some of those for Fred.
Anyone have any tips on how to flatten the perimeter for welding purposes, or will just filling the gap work.

Looks like those are for 67 through 70 but I get the picture, those look real DNE, I will have to find some of those for Fred.
Anyone have any tips on how to flatten the perimeter for welding purposes, or will just filling the gap work.
Last edited by a moderator:
monkeystash
Active Member
"abrahamfh" said:Anyone have any tips on how to flatten the perimeter for welding purposes, or will just filling the gap work.
I wouldn't flatten it, it's most likely made that way to add rigidity. I would just fill in the gaps. Crank up the heat, that is some thick metal!
Opentracker
Active Member
http://cgi.ebay.com/ebaymotors/67-68-69 ... 4aa94938c1
Here is the link to those braces on ebay. I've done a fair bit of that seam welding and those gaps are not as wide as some I have seen. I like to add roll bar gussets in the corners and over the sway bar mounting point to add rigidity to the structure.

http://static.speedwaymotors.com/RS/SR/ ... 3055_R.jpg
It is a very good idea to seam weld all the seams you can get too. I've been known to do the whole front end. It does help.
Here is the link to those braces on ebay. I've done a fair bit of that seam welding and those gaps are not as wide as some I have seen. I like to add roll bar gussets in the corners and over the sway bar mounting point to add rigidity to the structure.
http://static.speedwaymotors.com/RS/SR/ ... 3055_R.jpg
It is a very good idea to seam weld all the seams you can get too. I've been known to do the whole front end. It does help.
GPR
Active Member
This is what we did on a 65 Fastback we are working on
We also did it to a 67 Fairlane

We also did it to a 67 Fairlane
Last edited by a moderator:
Dne'
Well-Known Member
Good morning Abe! (may I call you Abe?), I was thinking about your shock towers last evening and just trying to advise you for what I know;
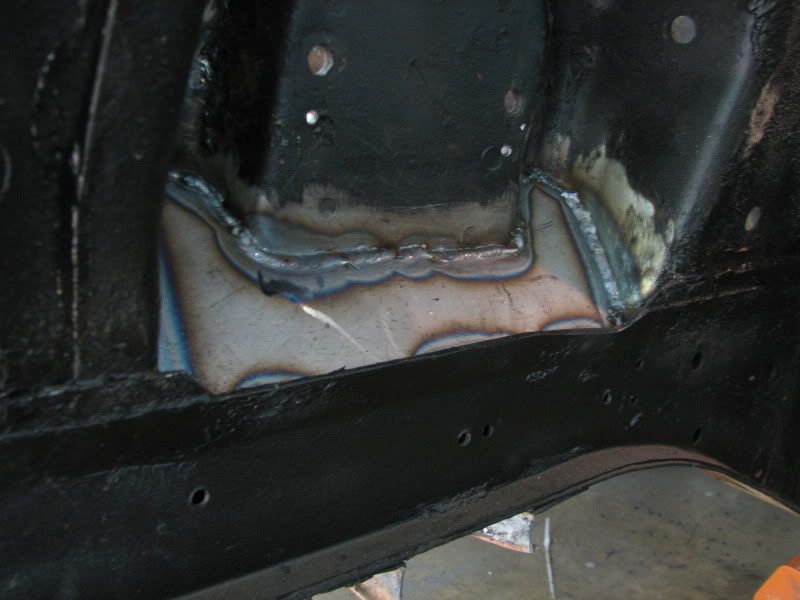
First off, I couldn't quite make out the picture in your last post, but I'm referring to the outter most lip of the area to press back in to weld, BEFORE welding the inner plate in the wheel well area.
Here's my thoughts :bowdown~ I believe that over time the plate that has separated from the shock tower has been caused by years of wear n tear, engine torque, weight of the motor itself, and road terrain. So the separation most likely would affect the camber creating more negative camber cause of the inwardness of that plate we're discussing. That plate used to be flush when it was new. So, that part needs to be pushed back into place and that's where my using a portapower to press it back into place, then weld. But all braces need to be in place before doing it my way. The export brace, Montecarlo, radiator support/crossemembers etc., so that when the plate is pushed back to where it's supposed to be, there wouldn't be any spreading of the frame. It'd be interesting to take specific measurments before and after. Then once the plate is pushed as flush to the actual shock tower, then weld it. Then you can proceed to weld that other plate that goes beneath the UCA.
The photo of my shock tower below was before I pressed it back in. The portapower I'm using is from HF, there's a plate that I made to go in the recess that added spreaded out surface area of the energy during the pressing. I did both towers simutaneously, the front, then the rear. My camber is easy to obtain, my eccentrics that adjust camber~ I have plenty of adjustment, otherwise, I might have had trouble getting adequate + camber! I hope this helps~ just thinking ahead for you! ; )
dne'
"Dne'" said:Good morning Abe! (may I call you Abe?), I was thinking about your shock towers last evening and just trying to advise you for what I know;
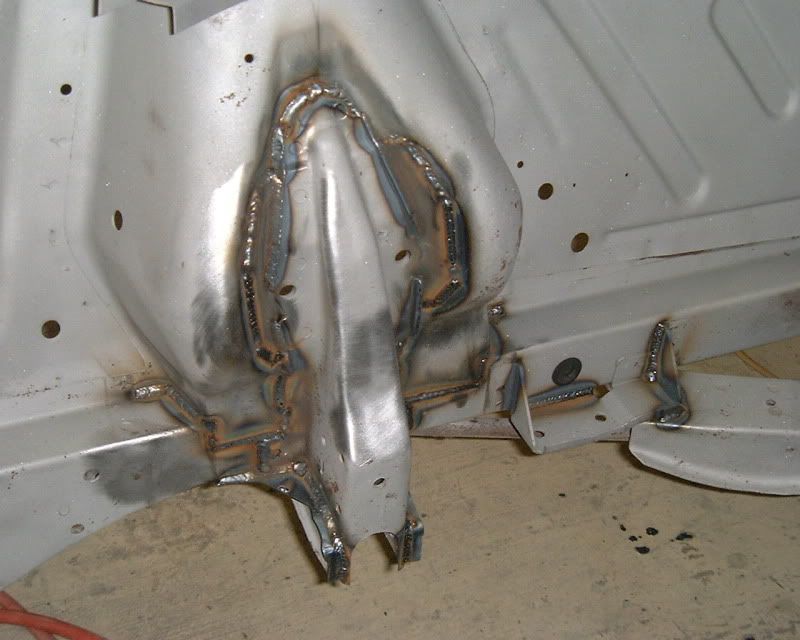
Abe is more than okay DNE. I took your advice and tried to mimic what you did. I ended up cutting a 2x4 and wedging it to press it as close as possible to being almost completely flush.
Thanks again for your amazing help.
Sorry once again to bother you all but I was wondering if there are any tricks on how to get into the space to weld the inner and outer portion together highlighted in the following photograph.
Last edited by a moderator:
Dne'
Well-Known Member
Abe~ I'm just ridiculously pleased that I can help now and then!!
gee, I'm amazed that there hasn't been more folks with much more experience on this adding comments! I had to go out in the garage and look closer at mine to see how it's put together~ it's been a couple years or so. I don't think I welded that part, but I did kind of smooth things over with seam sealer, urethane to make it look nicer and to keep moisture out to some degree.
Abe, is it separated/ing there where you're talking about? Maybe a finer bead with your mig? just keep it fine n simple? don't go wide with your bead? I wish I were there to look at it!
dne'
Ponyman66
Yak, yak, yak
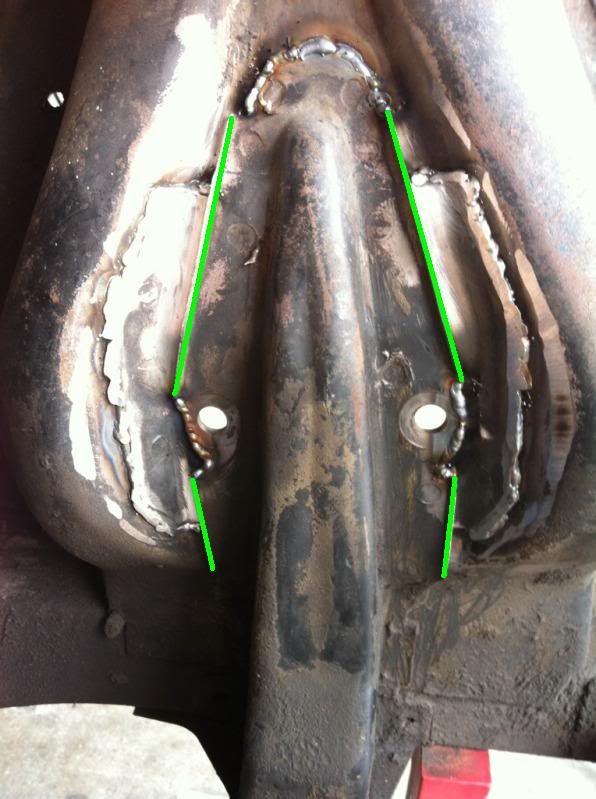
Abe, you're talking about the getting a bead inside the gap, but it's difficult to access because of the "rolled over" portion correct? If so, it's not as big a problem as you may think. Let your wire stick out further from the contact tip. Get it down in the gap prior to pulling the trigger for an arc. Once you start running the bead, just maintain that stick out length. One potential difficulty is you're welding a vertical surface. You'll want to weld uphill for better penetration. With the limited area you're in, you won't have a whole lot of room for tip movement side to side. Just do what you can with the area you have. Your welds show you're getting the hang of it. This is just one more thing to master! You can do it!!! :thu
"Dne'" said:Abe~ I'm just ridiculously pleased that I can help now and then!!
gee, I'm amazed that there hasn't been more folks with much more experience on this adding comments! I had to go out in the garage and look closer at mine to see how it's put together~ it's been a couple years or so. I don't think I welded that part, but I did kind of smooth things over with seam sealer, urethane to make it look nicer and to keep moisture out to some degree.
Abe, is it separated/ing there where you're talking about? Maybe a finer bead with your mig? just keep it fine n simple? don't go wide with your bead? I wish I were there to look at it!
dne'
There is very little seperation, it is more the fact that its bent upwards at the highlighted parts on the photograph. It is keeping my nozzle from from getting as close as I would get when welding. I really appreciated your help DNE, I really do. It feels really nice to help someone doesn't, you should feel good, you without a doubt helped me out.
Thank You.
"Ponyman66" said:Abe, you're talking about the getting a bead inside the gap, but it's difficult to access because of the "rolled over" portion correct? If so, it's not as big a problem as you may think. Let your wire stick out further from the contact tip. Get it down in the gap prior to pulling the trigger for an arc. Once you start running the bead, just maintain that stick out length. One potential difficulty is you're welding a vertical surface. You'll want to weld uphill for better penetration. With the limited area you're in, you won't have a whole lot of room for tip movement side to side. Just do what you can with the area you have. Your welds show you're getting the hang of it. This is just one more thing to master! You can do it!!! :thu
Right on the money brotha! That sounds like something I can try and do. I have been welding upwards so far with most of the shock tower. I had to make sure twice that my hair didn't catch fire. (It farkin hurt! :hide :kburn) There will definitely be very very little room but I think I can make it work somehow. Thank you for the encouragement, soon as I get off tomorrow I am going to weave my way through traffic to get back in the garage and finish them off.
Dne'
Well-Known Member
OK, this is a different idea, but there are bonding agents, or maybe even stuff like JB weld (maybe in a caulk form), I know it's meant to put two surfaces together, or has been used to fill a hole due to stripped threads and retapped, it's just a far fetched thought. Ooooor, you could always just stitch weld it (1" ish in length), that would probably be strong enough vs. a continous weld along the entire perimeter.
We shall figure this out, yep yep yep! ; )
We shall figure this out, yep yep yep! ; )
manley
Member
"Dne'" said:
Does anyone know how much effective difference there is between welding in a plate like this versus a plate the is only as wide as the center flat section of the shock tower?