• Hello there guest and Welcome to The #1 Classic Mustang forum!
    To gain full access you must Register. Registration is free and it takes only a few moments to complete.
    Already a member? Login here then!

1963.5 Falcon Convertible

phlegm

Active Member
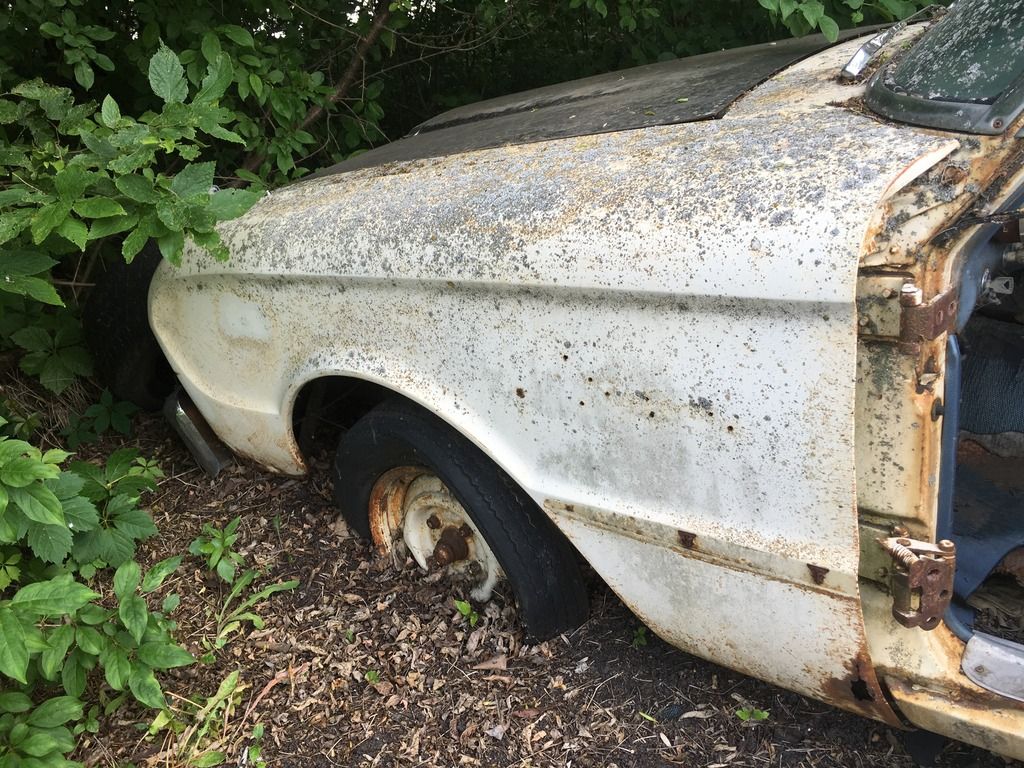
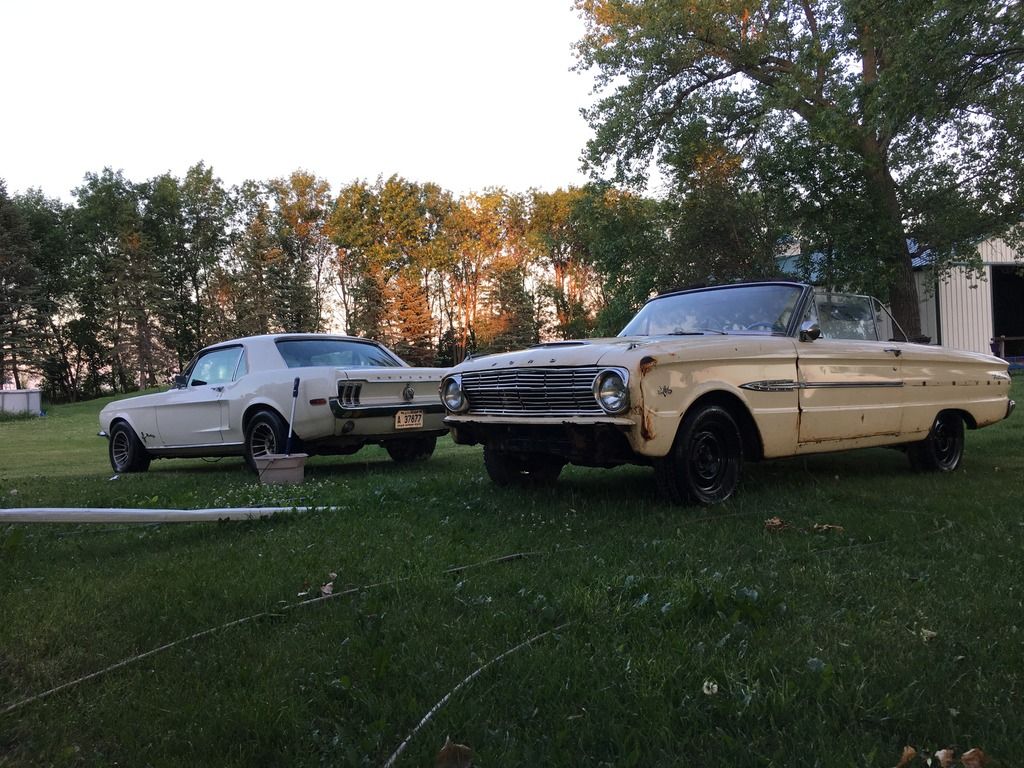
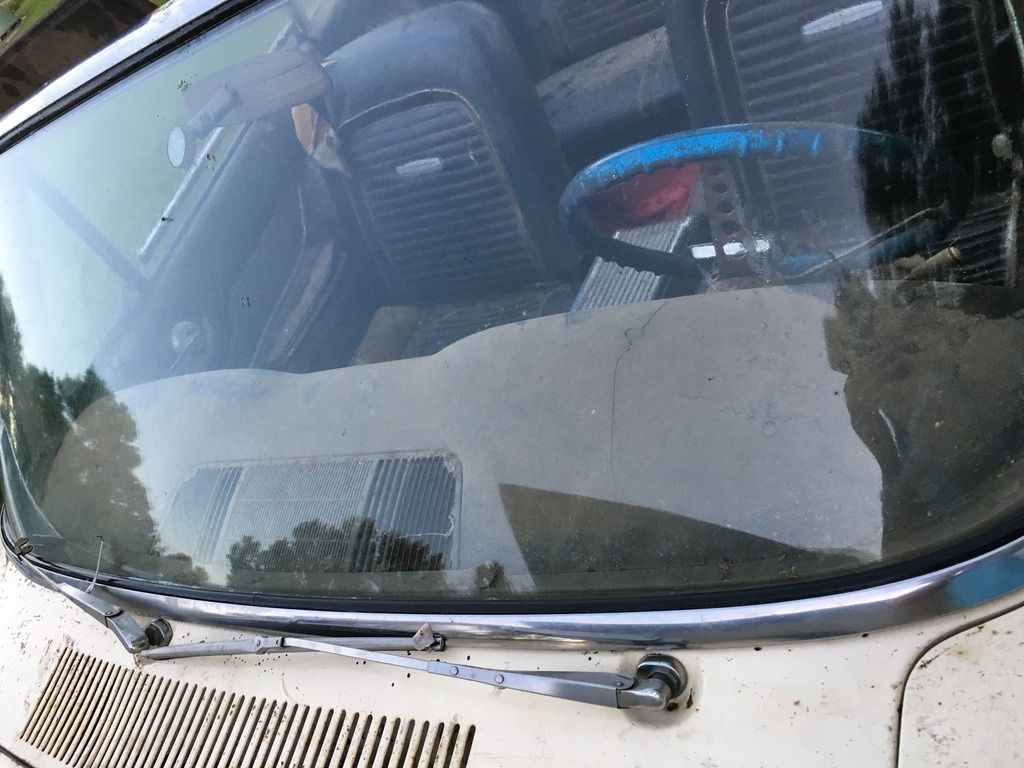
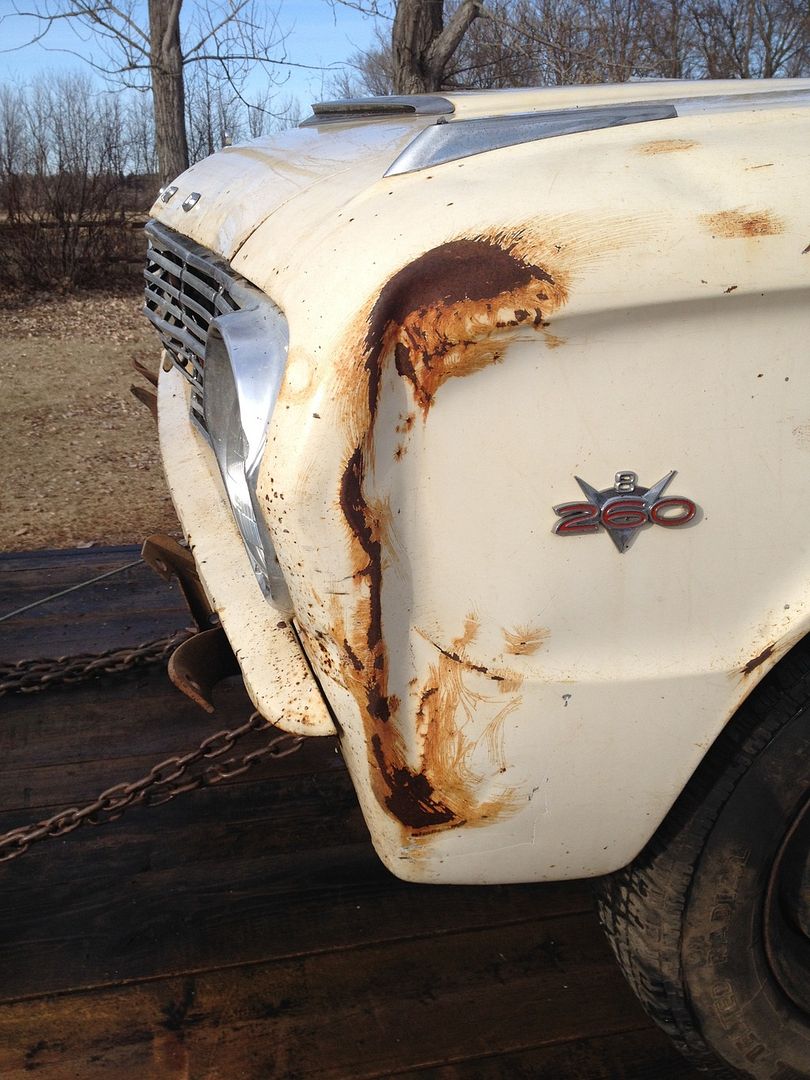
Originally this car had a 260/4speed, it still has the 4 speed, but the SBF has been upgraded/updated to something blue, could be a 289 or a 302. It still has the 4 speed and I have a spare for it as well.


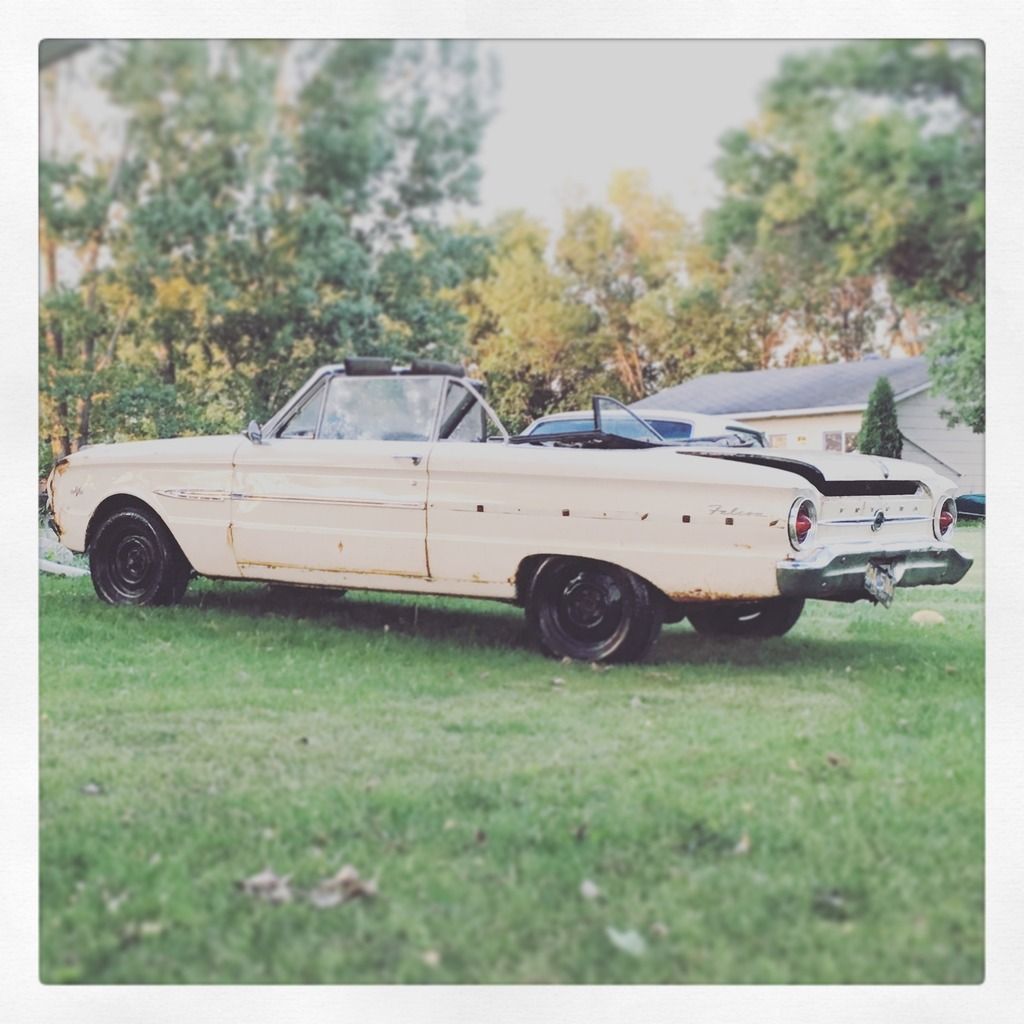
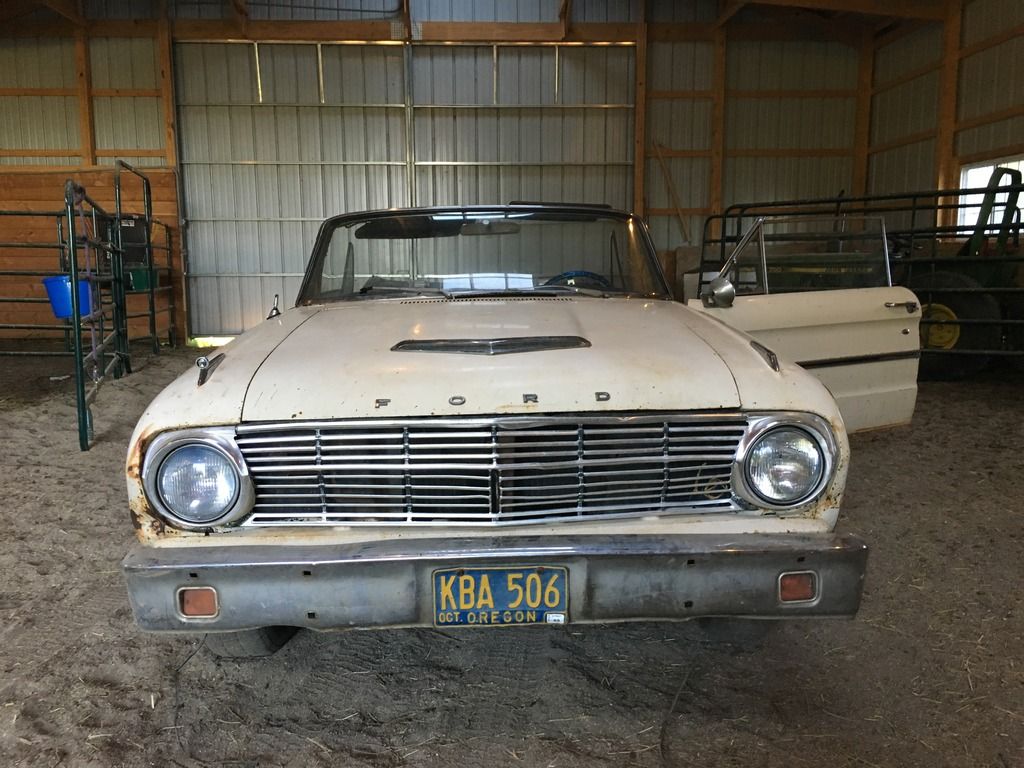
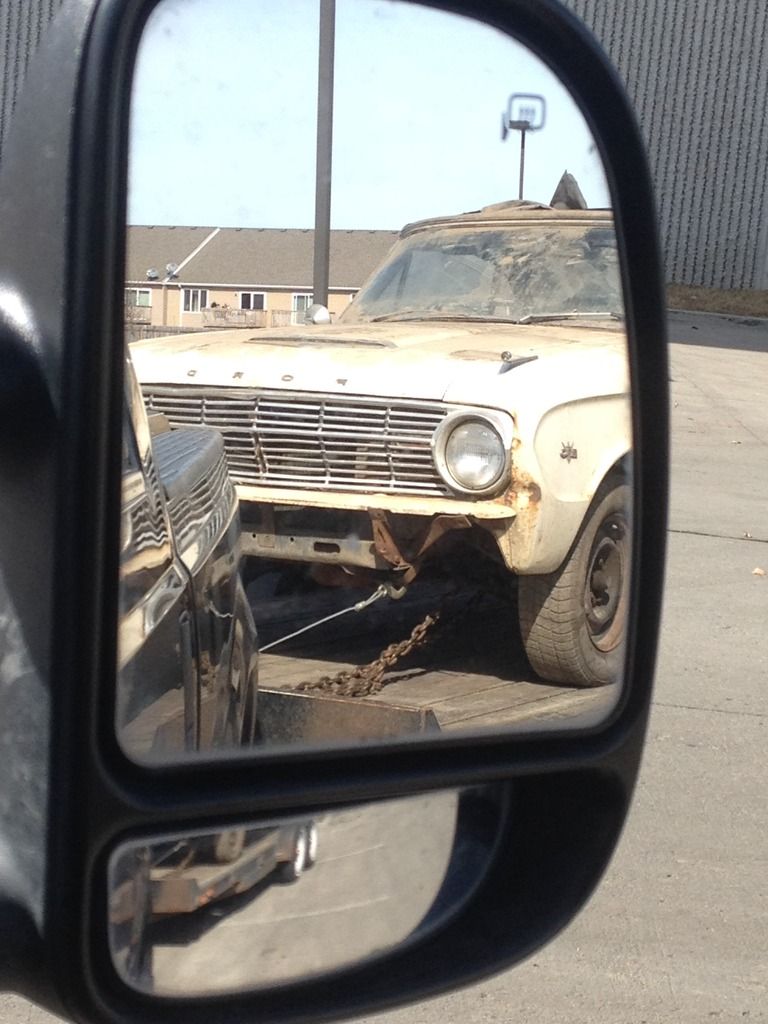
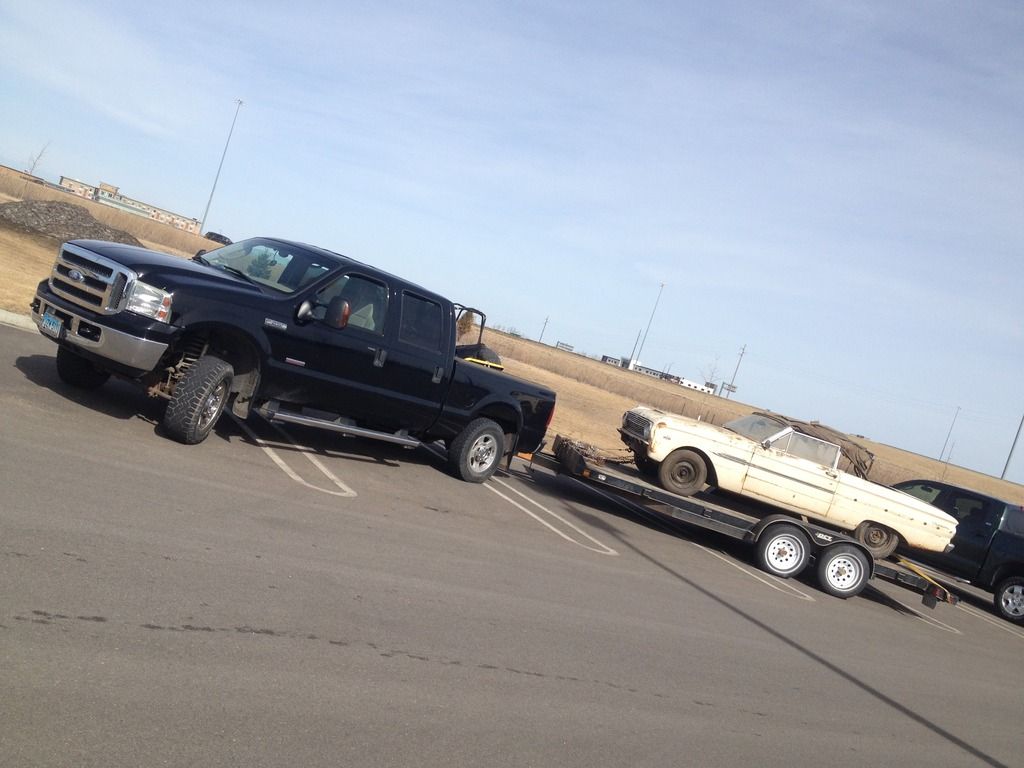
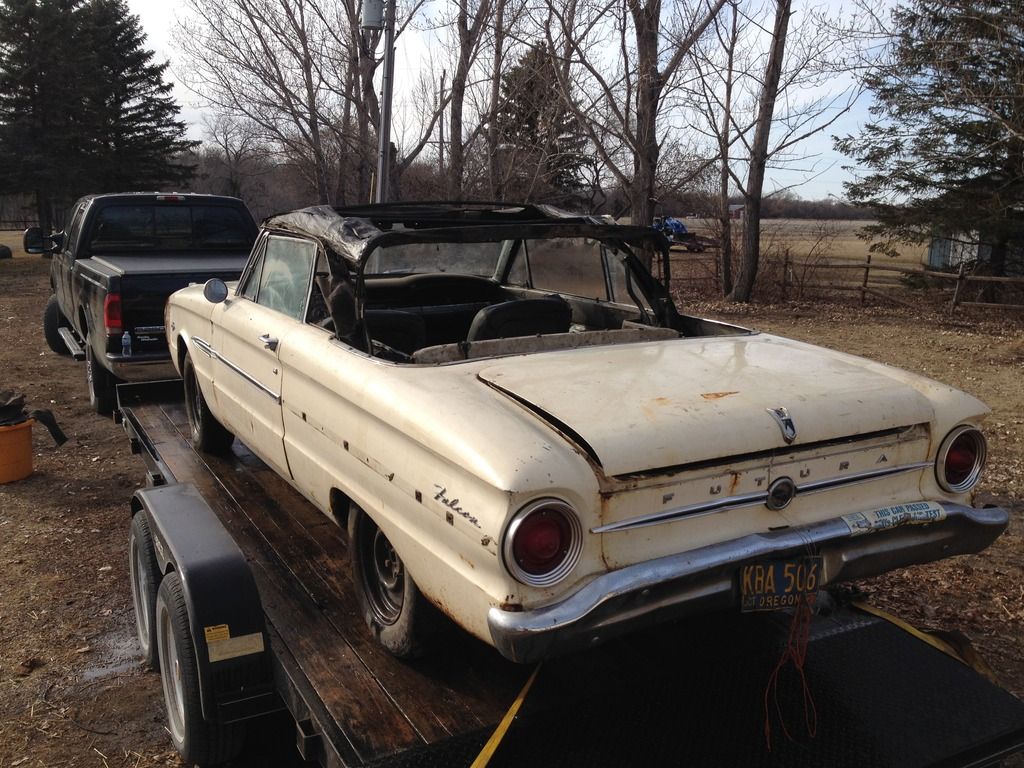
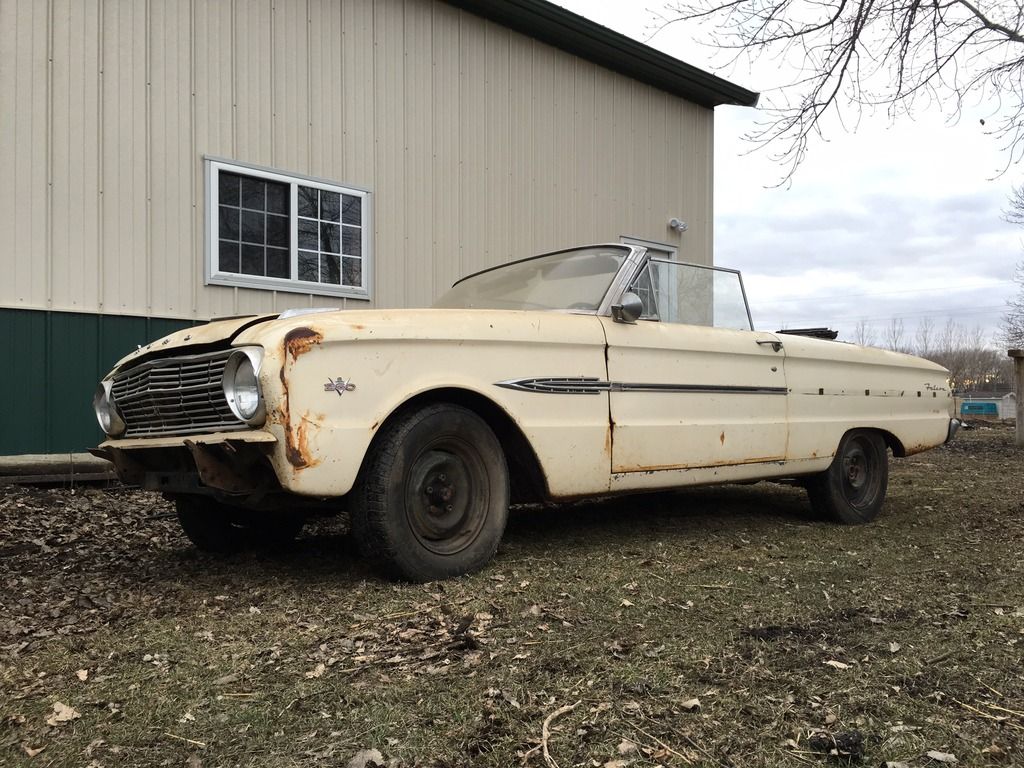
This car is an old family project, it was bought by my parents back in '84 and has been in storage of one sort or another since 1986. Since the last time it was registered in OR, it has approximately 2000 miles on the odometer. Those miles are from when we flat towed it using a tow bar from OR to ND in 1988; I don't know why Dad didn't pull the driveline, I was in my young teens at the time and didn't know any better. This car has been one of those projects that belongs to a family member that always intended to work on it, yet never found the time, then so much time passed that it because a white elephant and everybody was afraid to touch "Dad's Falcon". A few years ago, Dad gave it to me, last year I brought it home.

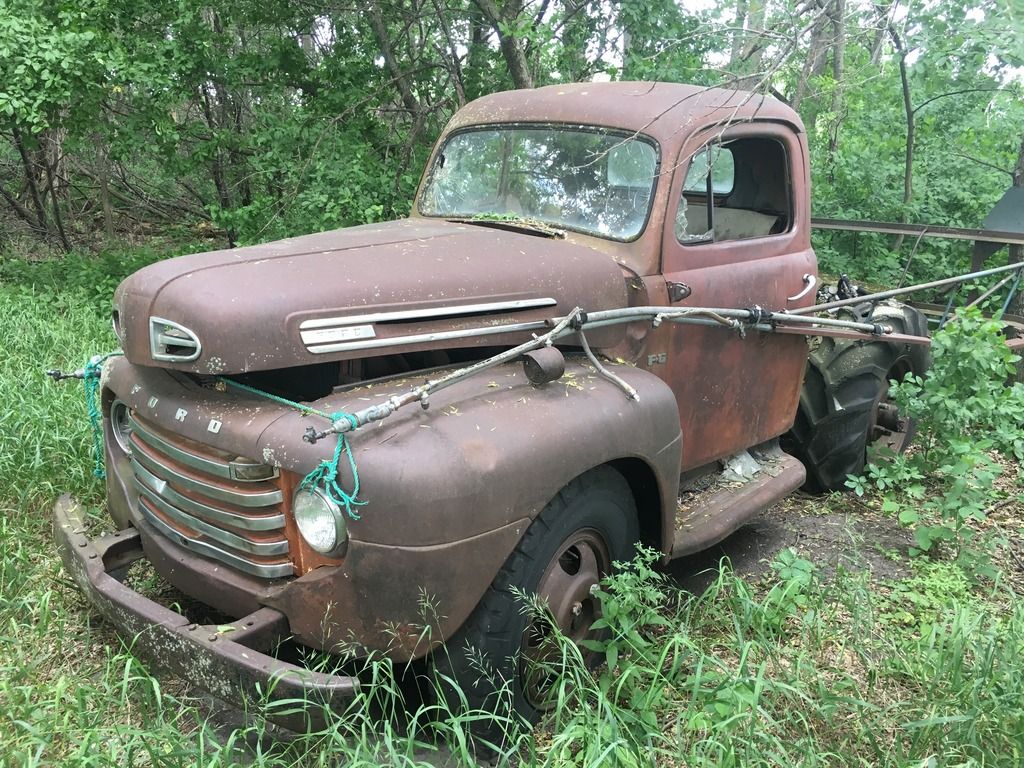
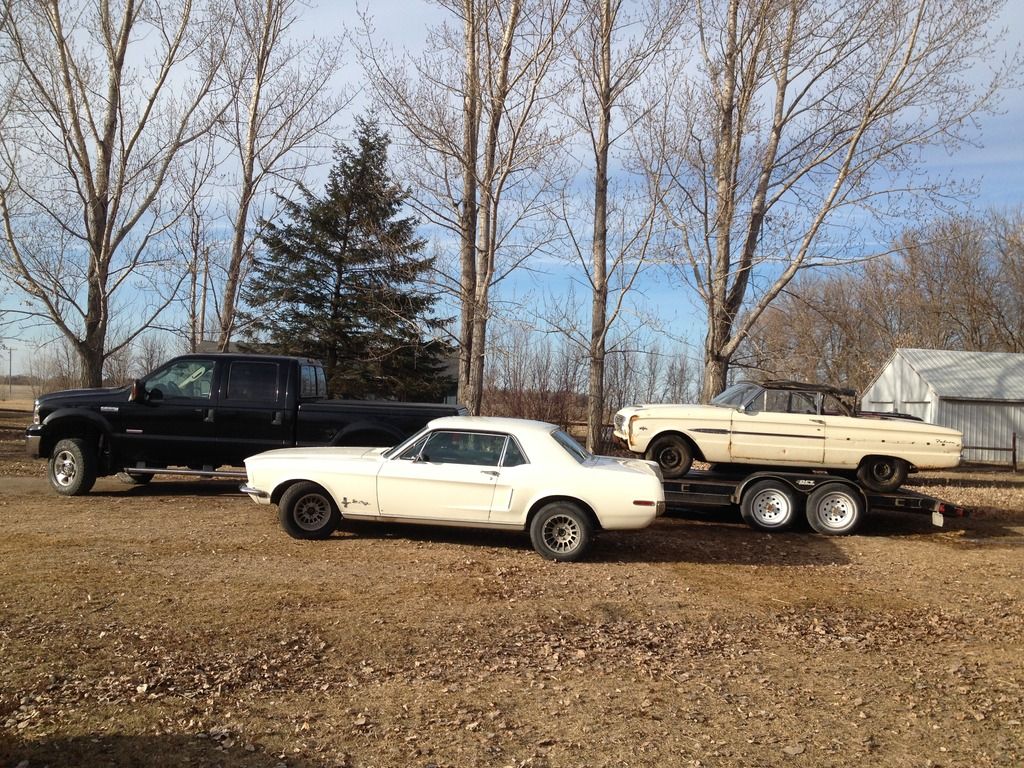
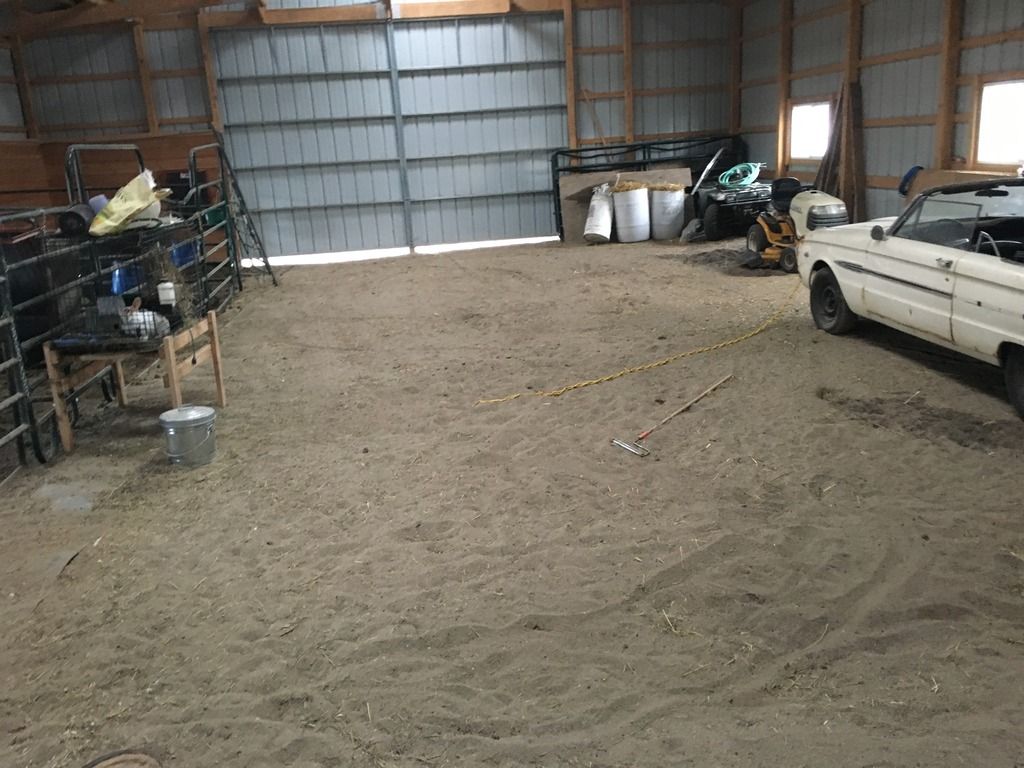
What is funny is that between this that I had not brought home a project in the 12 years that I've lived back in ND. Then last Spring, that suddenly changed.

It followed me home, and then I HAD to keep it..
IMG_1567_zpsmmpqe3sw.jpg


And I also bought the boy a go-cart for his 5th birthday, I got to start them early...
IMG_1566_zps48pconyu.jpg

IMG_1671_zpsx6uq3pk9.jpg


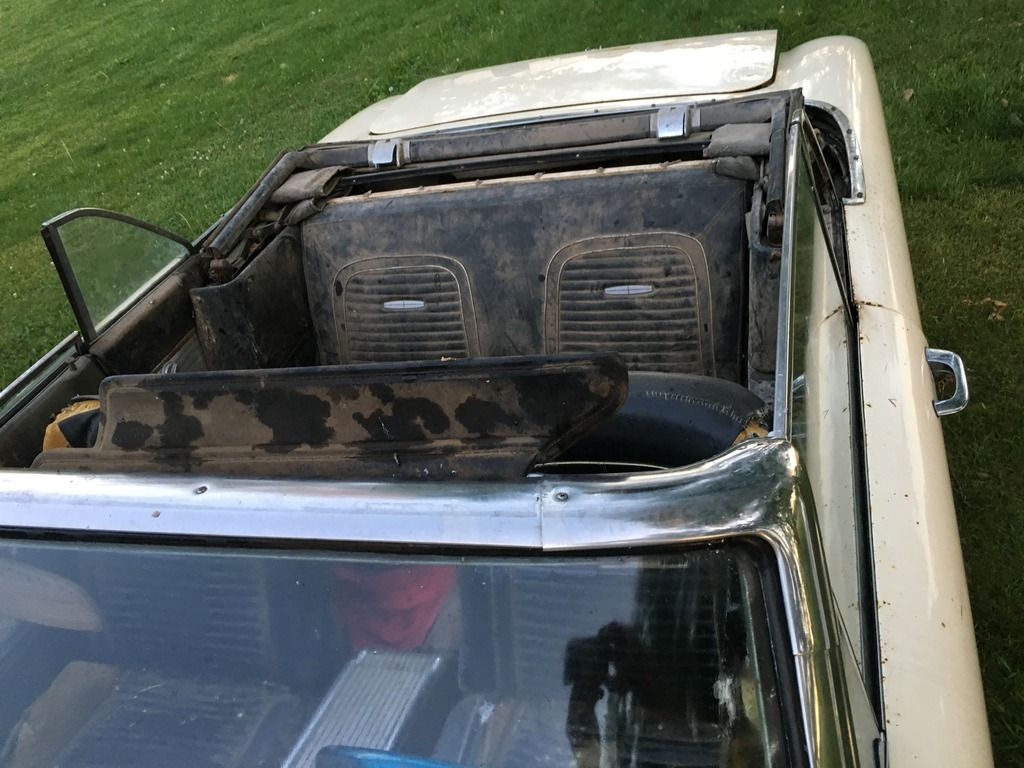
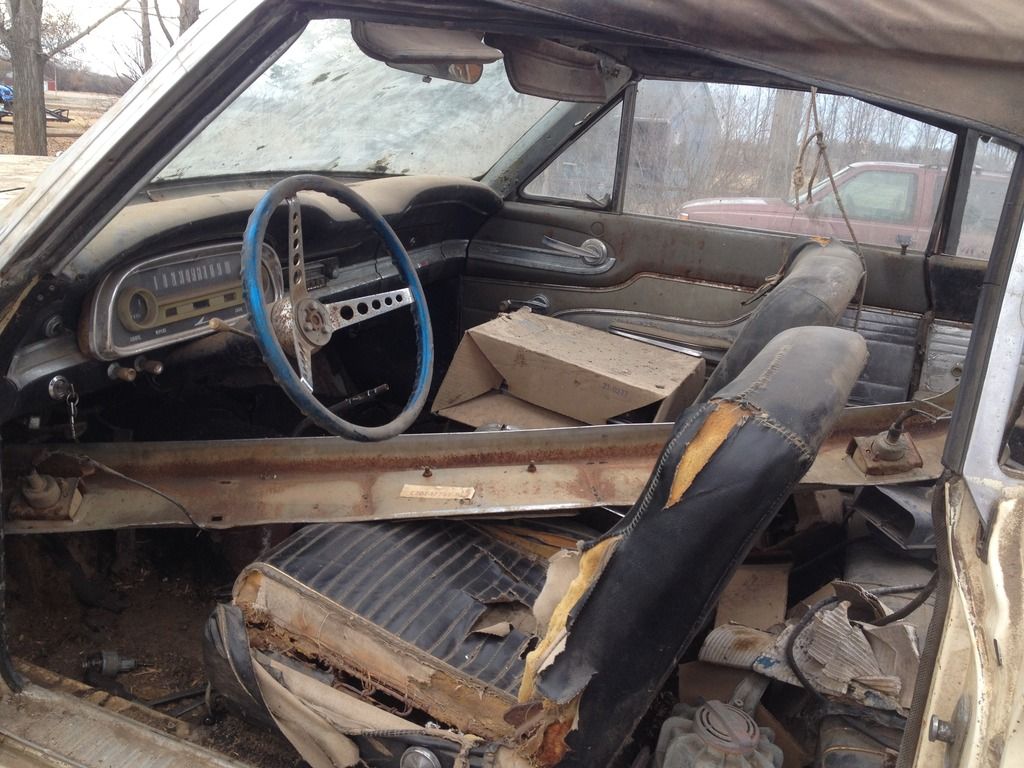
The exterior of the car is in very decent shape with a few dents here and there, a mismatched passenger door, broke out driver side rear window, it is missing the truck lock mechanism.

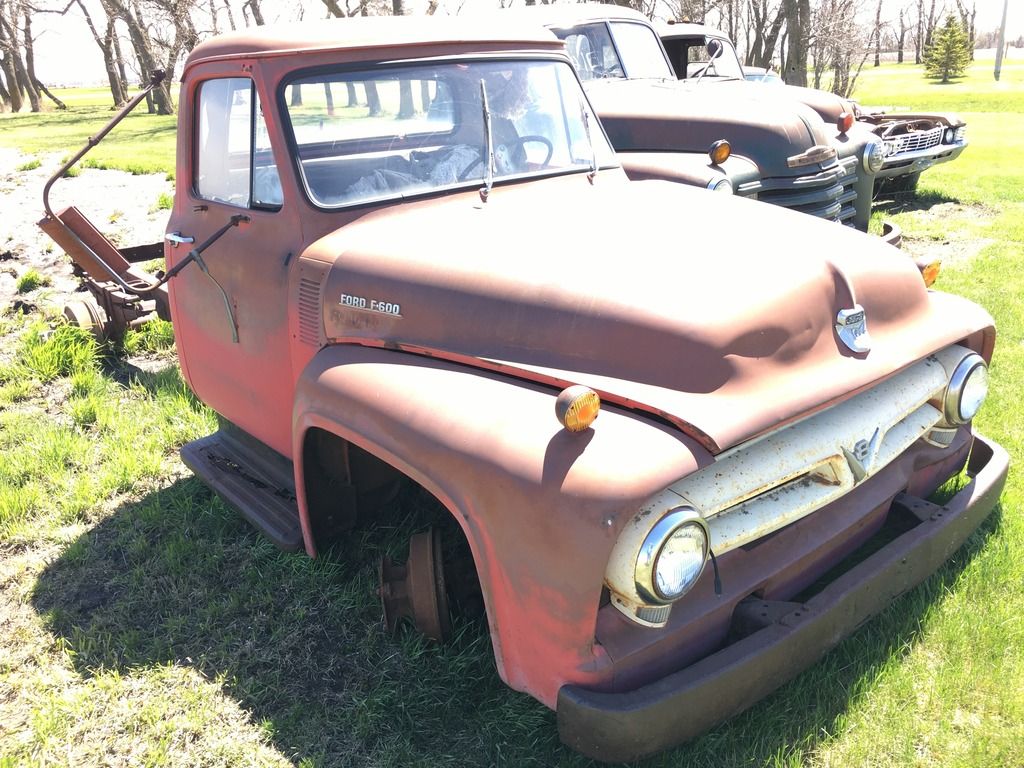
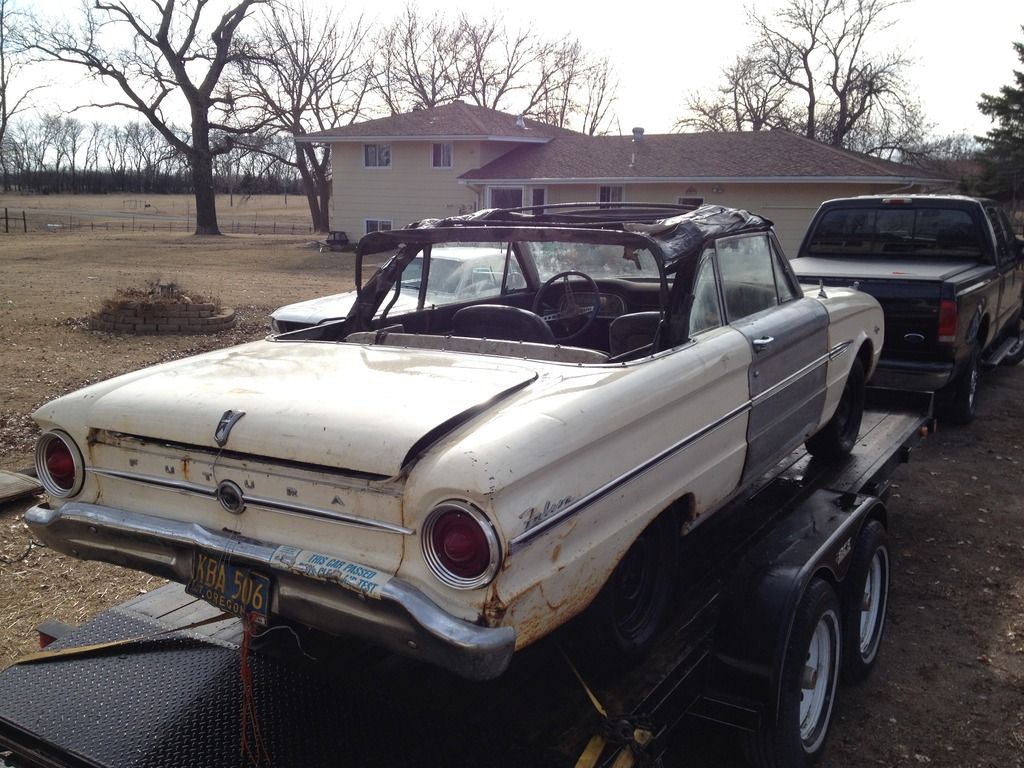
I sold that brown 4dr thing in the background.
IMG_1645_zpslvqdqiof.jpg

IMG_1647_zps4kjbk8v9.jpg

IMG_1656_zpsyaf3p4bz.jpg

IMG_1652_zpsnzwuhknn.jpg


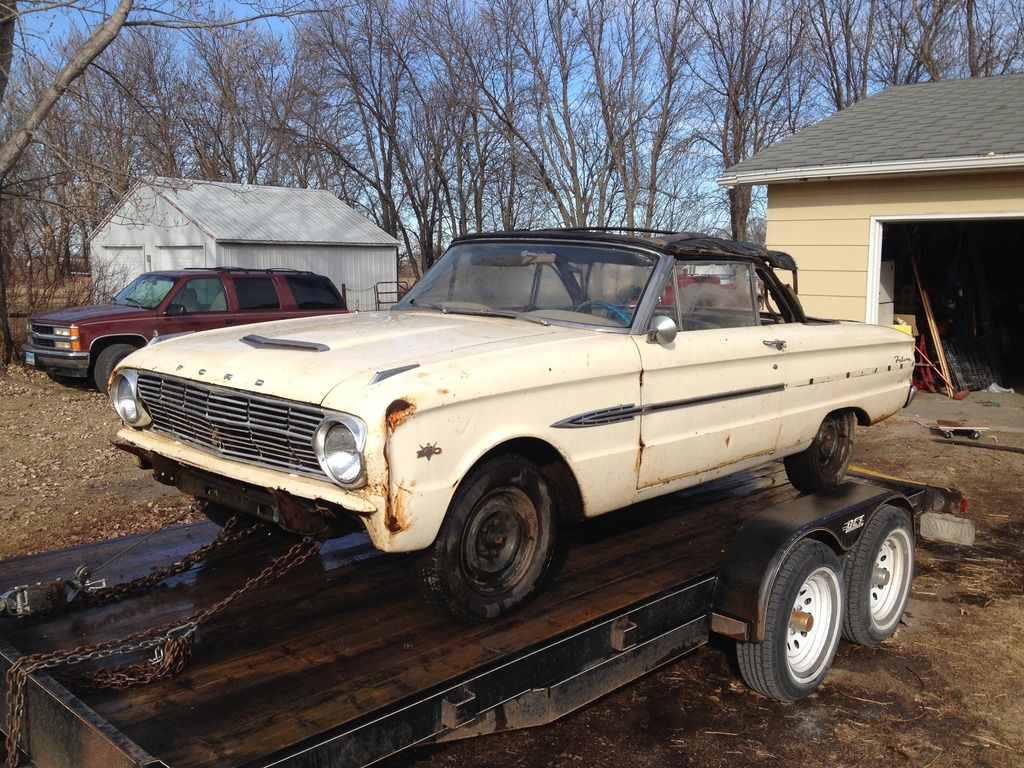
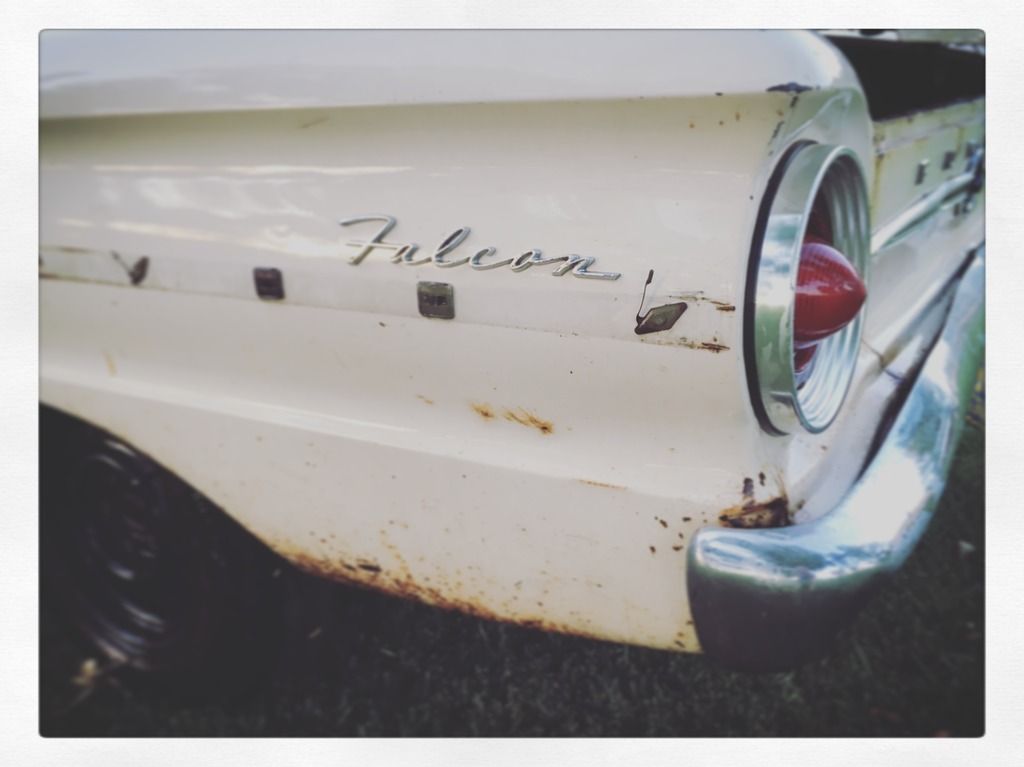
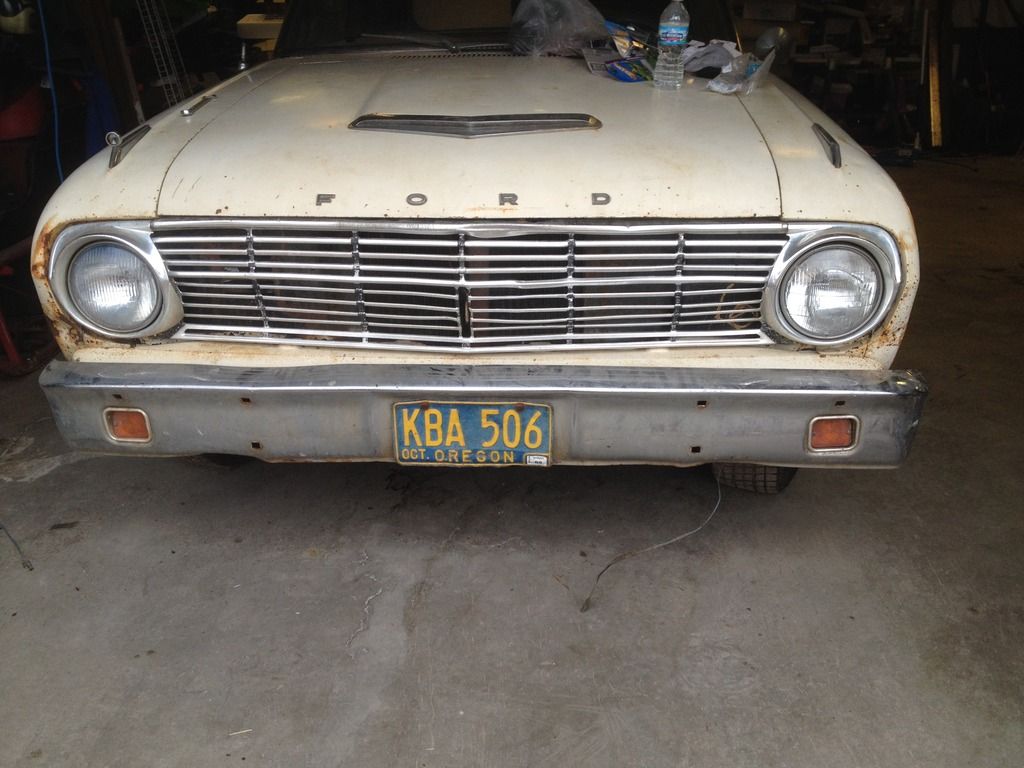
The front bumper doesn't look too bad.
IMG_1805_zps1l14depz.jpg


The power top works great, the motor fired up and ran after who knows how long.
The clutch slips a little bit.
The brake system was completely dry of brake fluid.

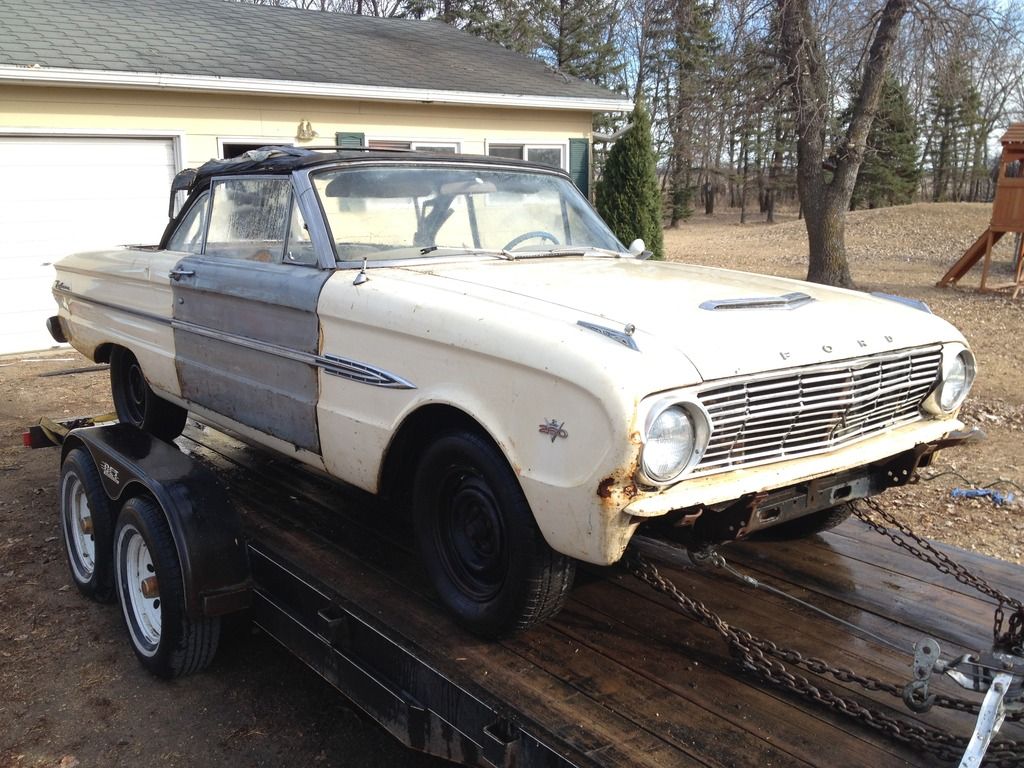
The major exterior body damage is the driver front fender.
IMG_1661_zpsihdc6cti.jpg

and the passenger quarter panel near the tail light.
IMG_1657_zps39rwgi8s.jpg

I'd like to find a replacement fender, the quarter panel doesn't look like it should be too bad.

The real problem lies on the inside, under the rear seat.
The car was stored inside and on concrete most of the years, however that did not mean the roof didn't leak, nor did it mean that rain, snow, or mouse urine didn't get into the car.

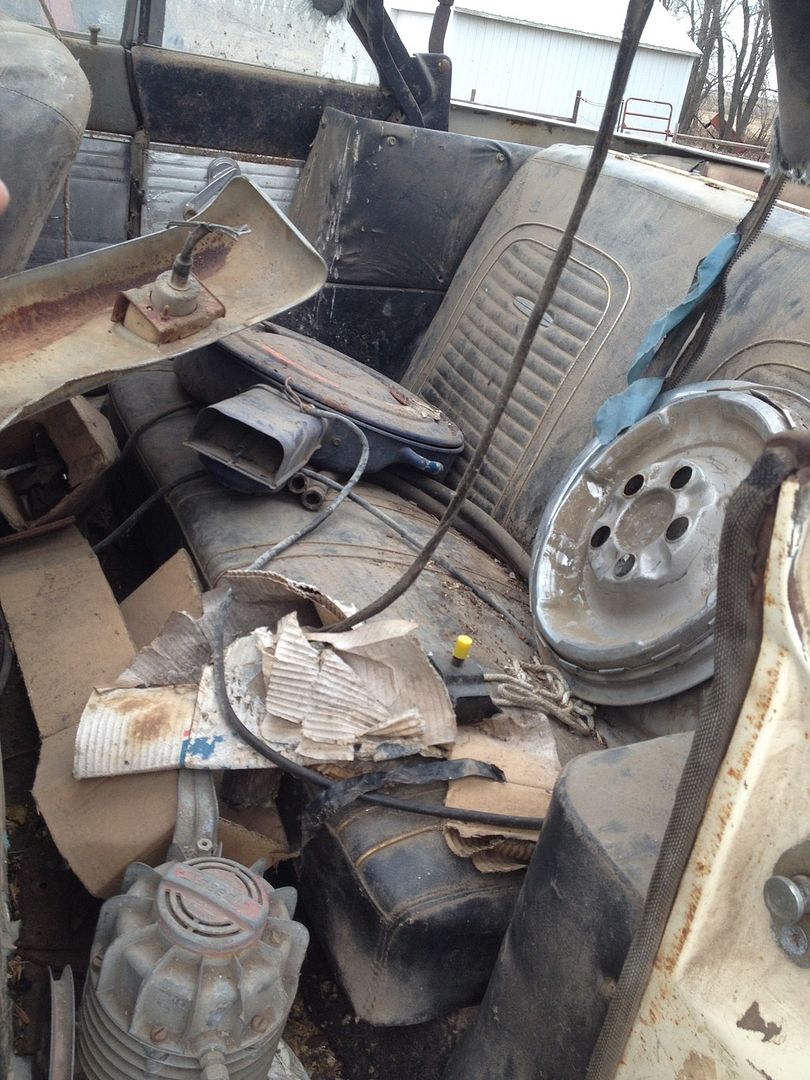
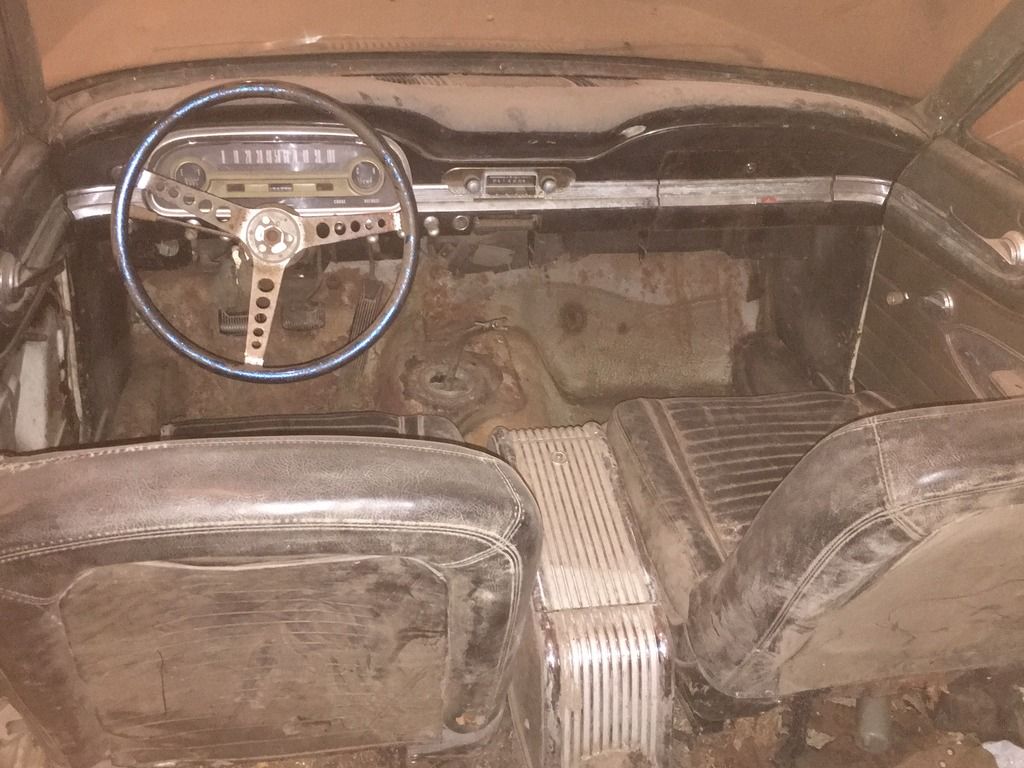
I spent the better part of a day ripping off the rotten top material, tearing up the carpet, and removing detritus from interior and trunk.

As it was when I brought it home, full of random stuff, rust, and mouse droppings.
IMG_1577_zpsdjodjwce.jpg

IMG_1579_zpspkzzqvfk.jpg


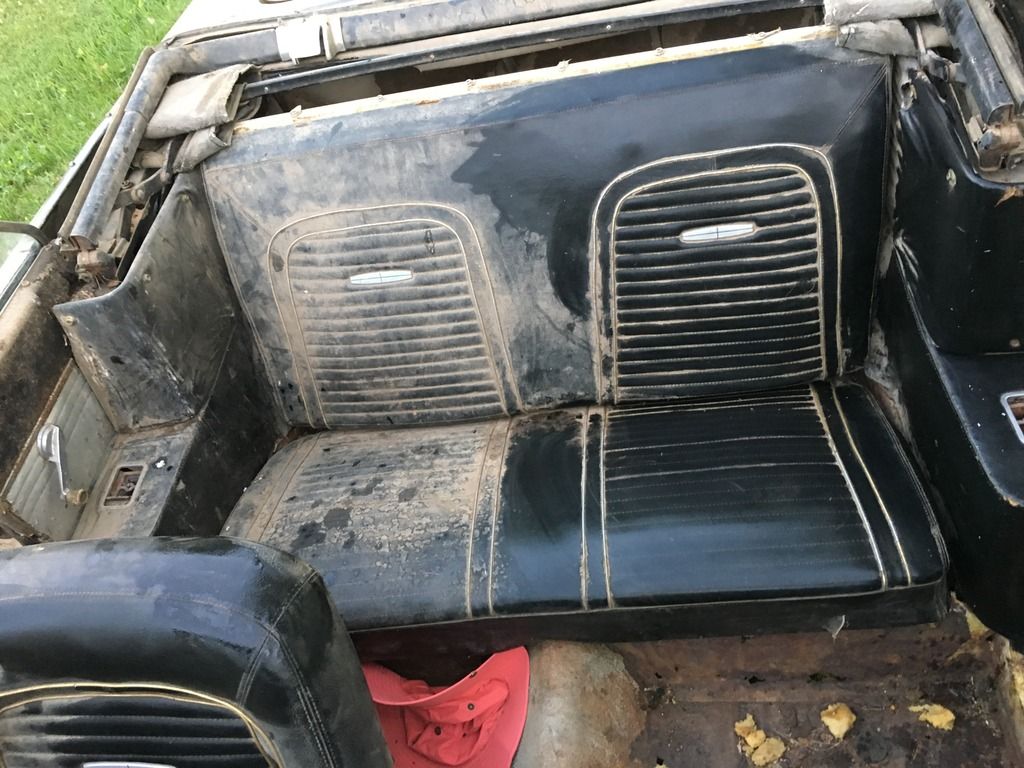
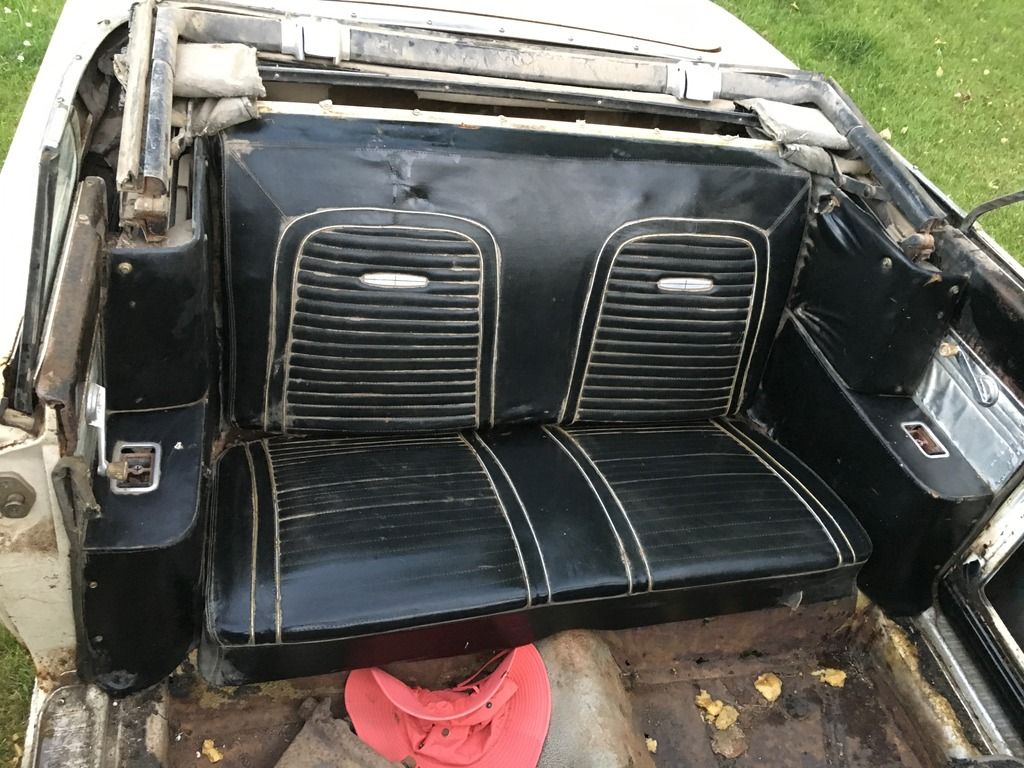
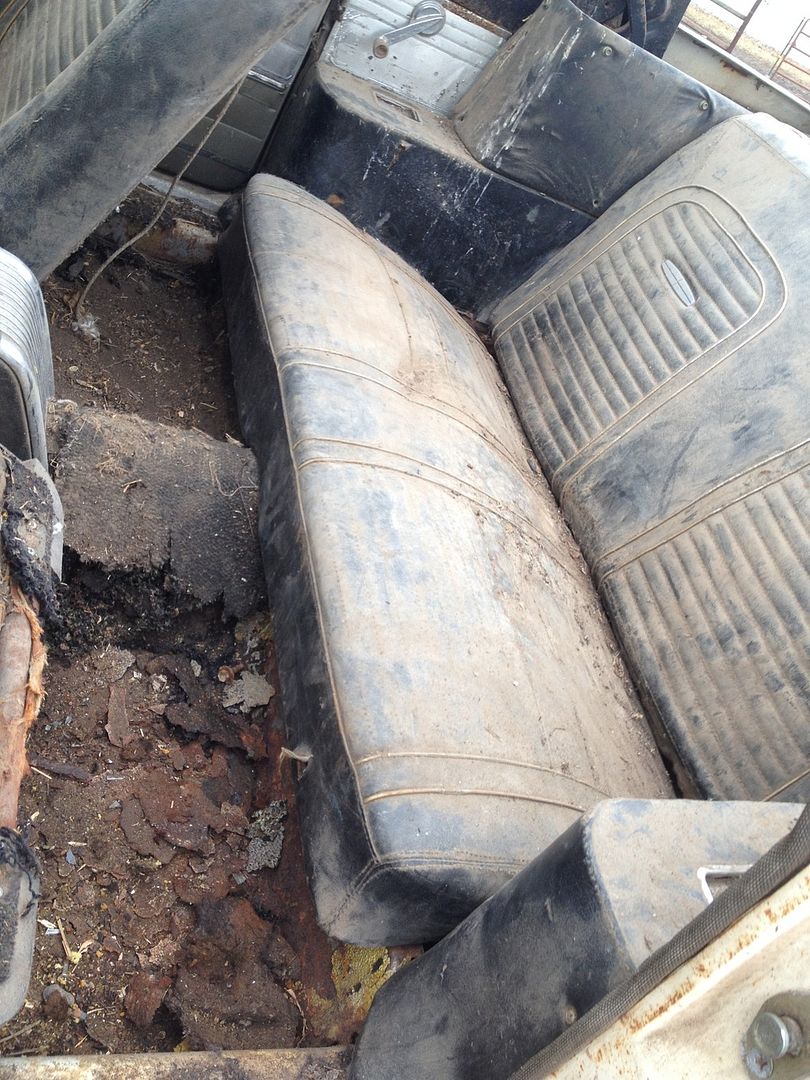
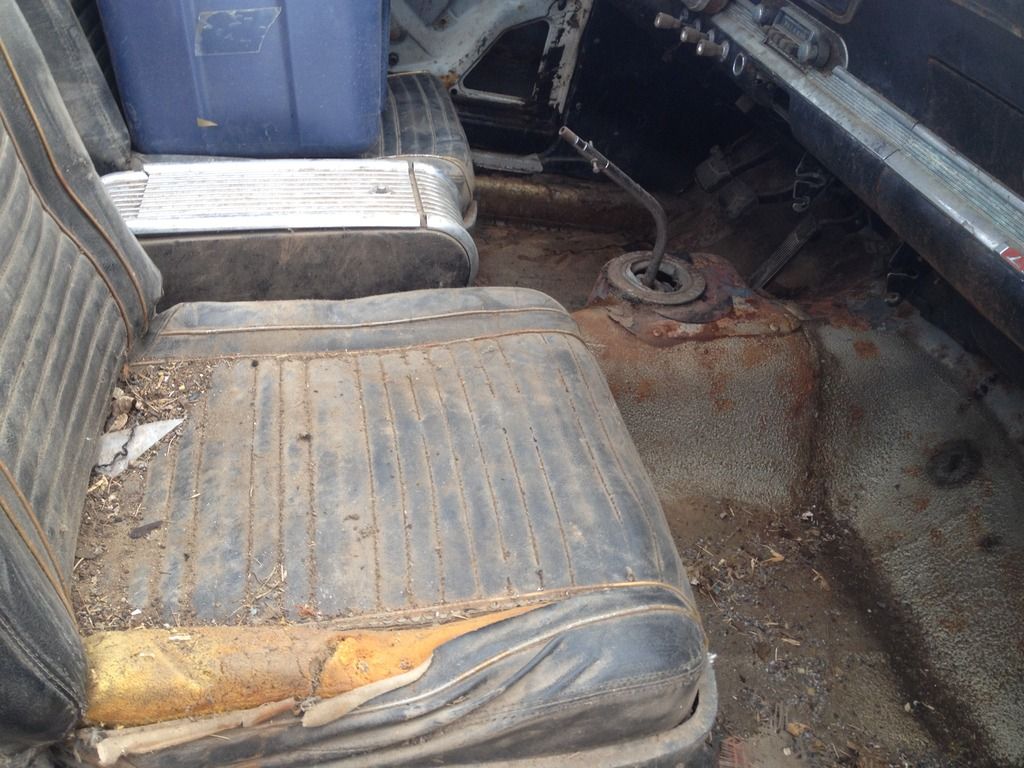
Emptied of its larger items, the rear seat looks good.
IMG_1581_zpsuckm8ht4.jpg

IMG_1586_zpscfgxziat.jpg


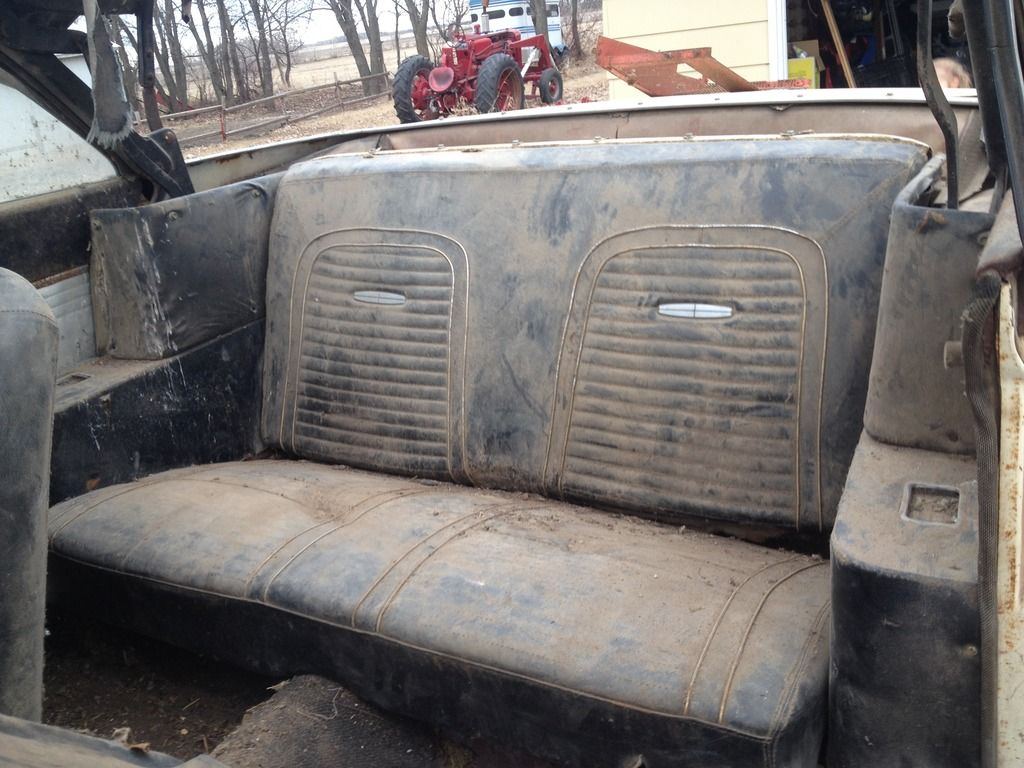
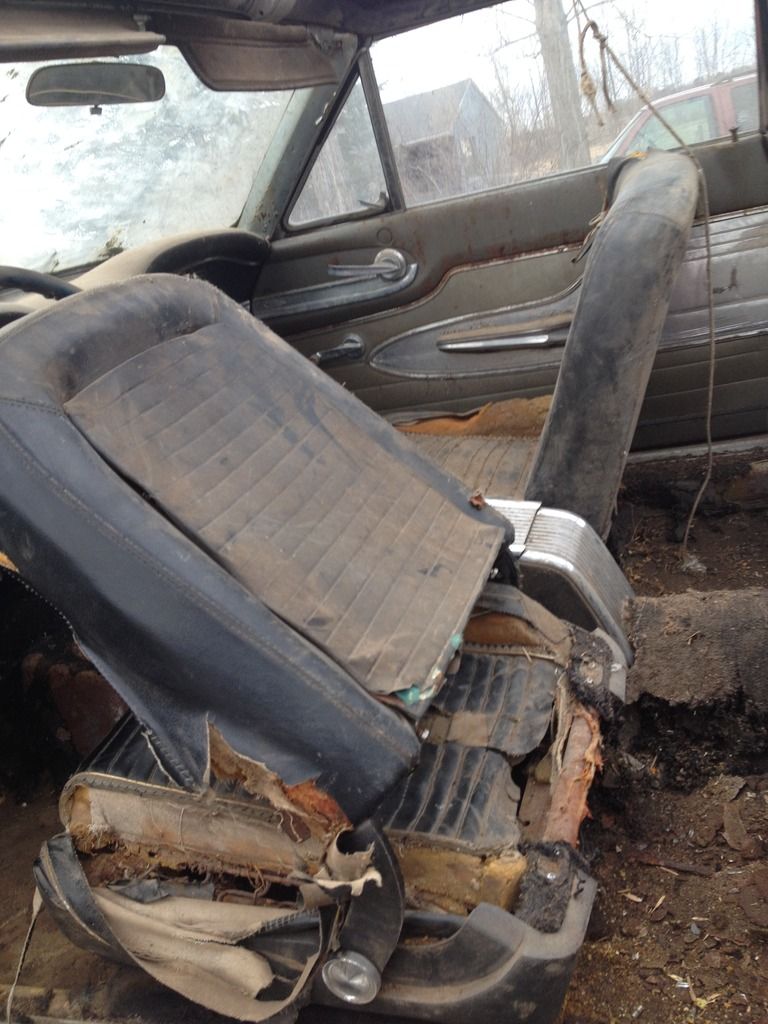
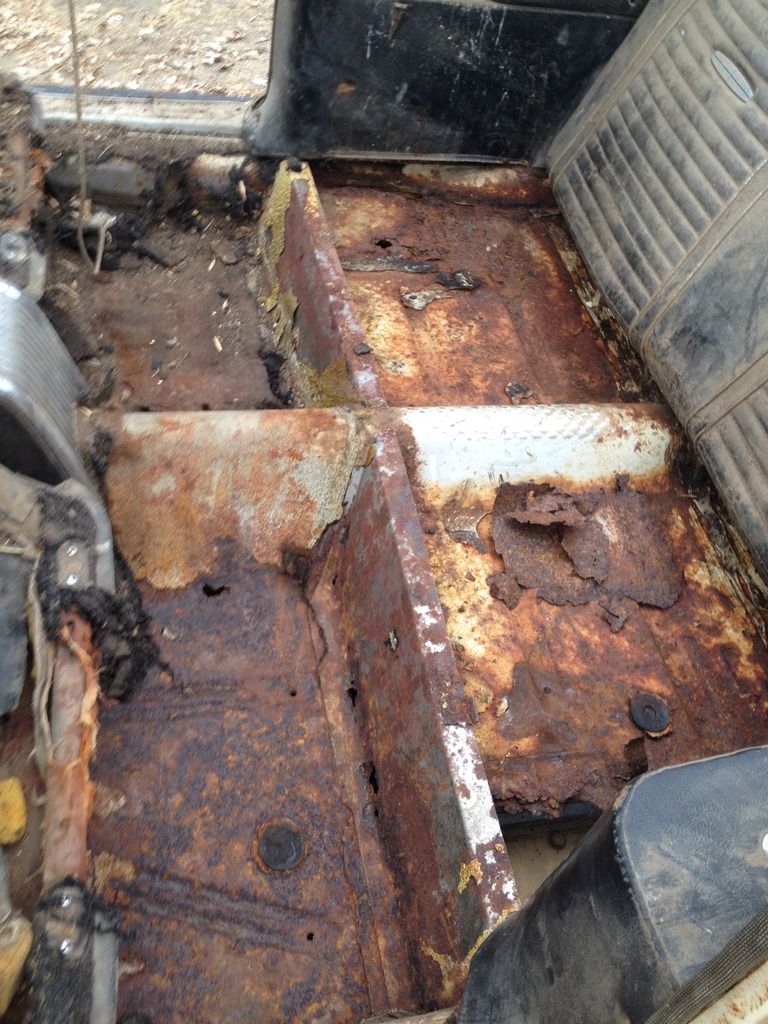
The front seats are trashed, but the floor pans are in great shape.
IMG_1582_zps1iuaysul.jpg

IMG_1595_zpshntfysad.jpg

IMG_1288_zpsb5uxuxdc.jpg


So now on to the bad parts...

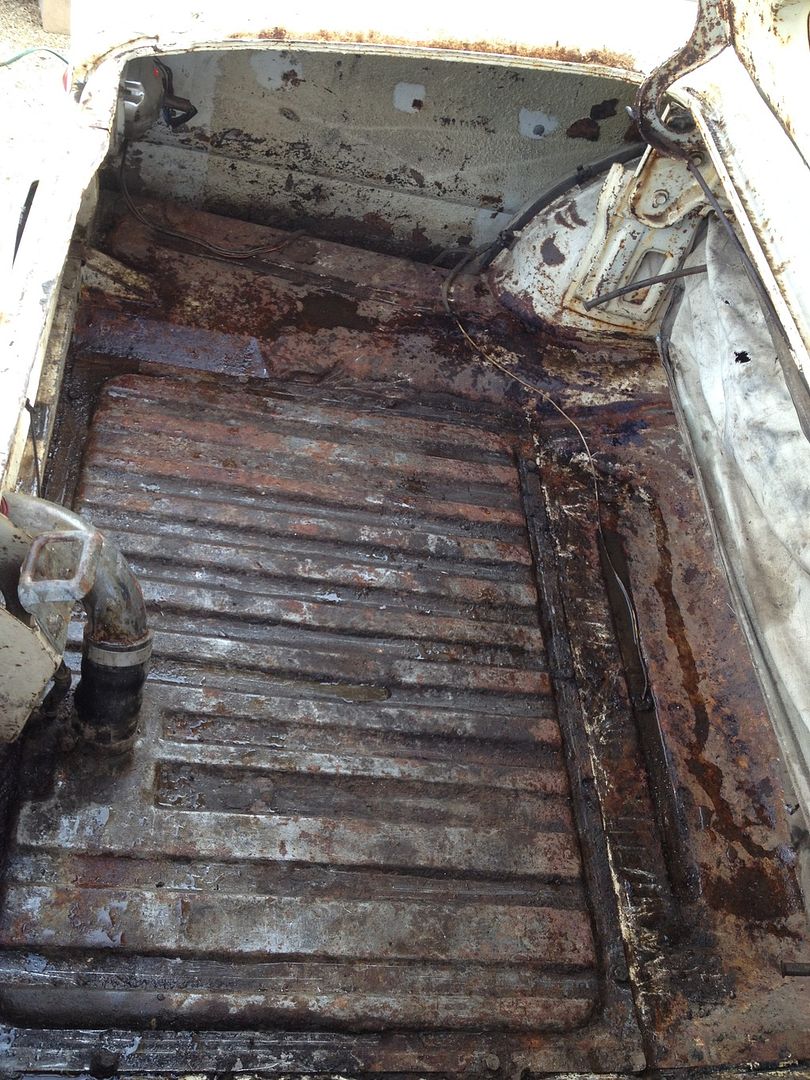
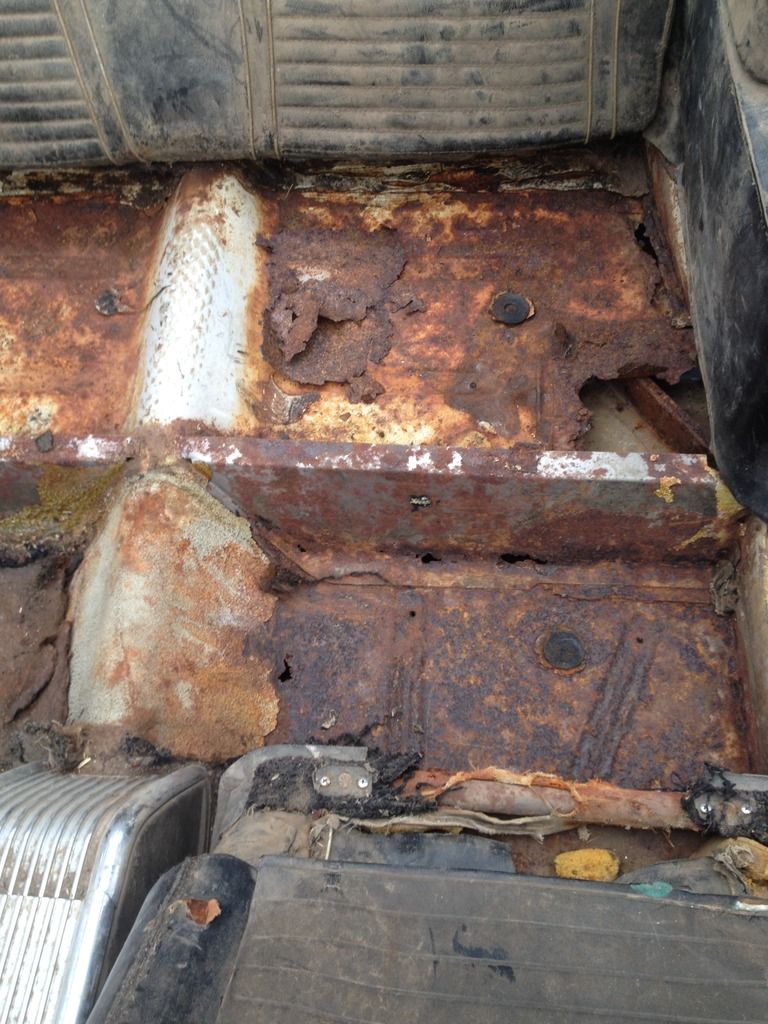
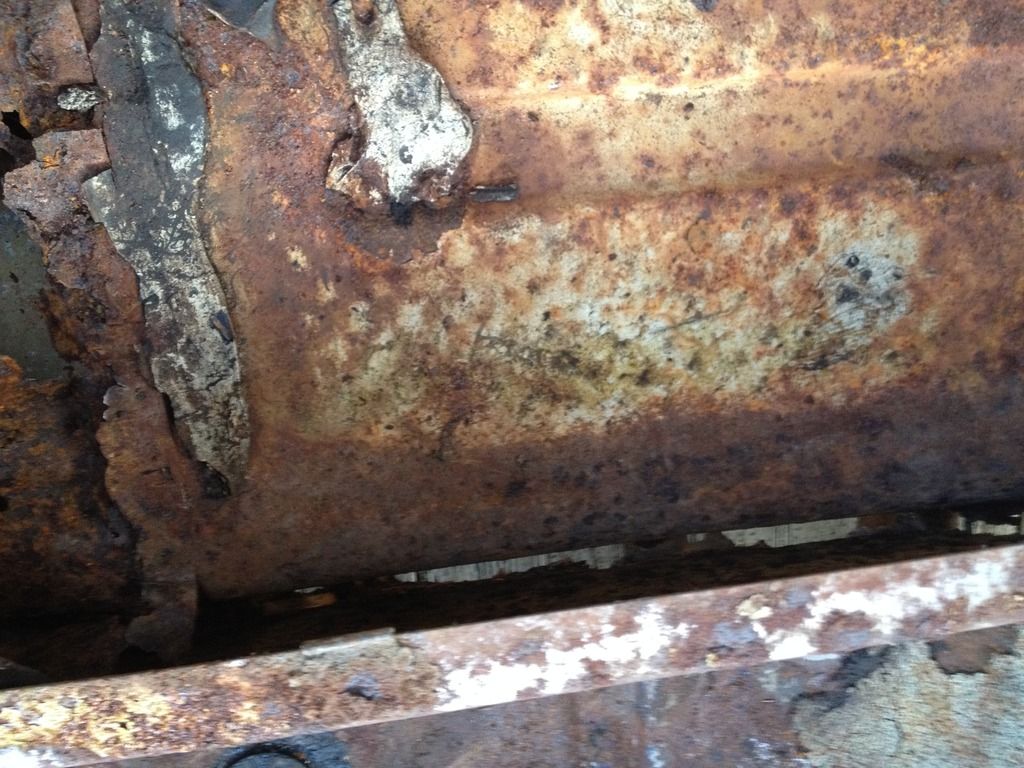
The trunk drop offs are full of pin hole rust.

IMG_1667_zpsv1bzz3ty.jpg

IMG_1668_zpsxvqg1tag.jpg

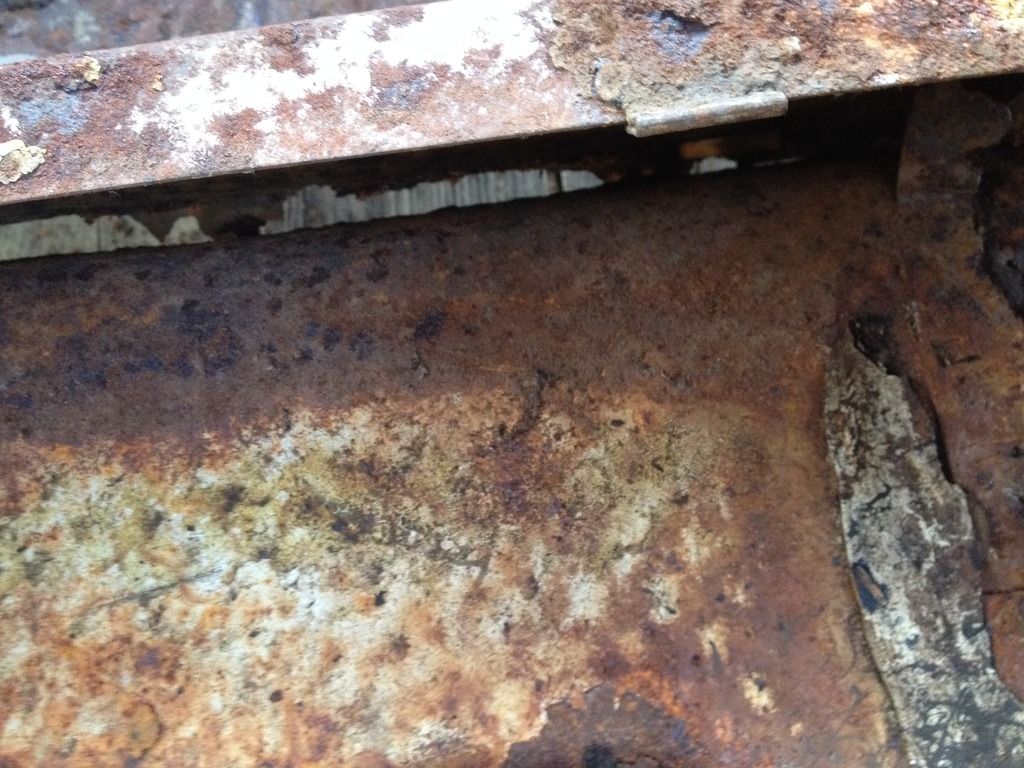
The other side isn't quite as bad.
IMG_1669_zpslfgvw3o4.jpg


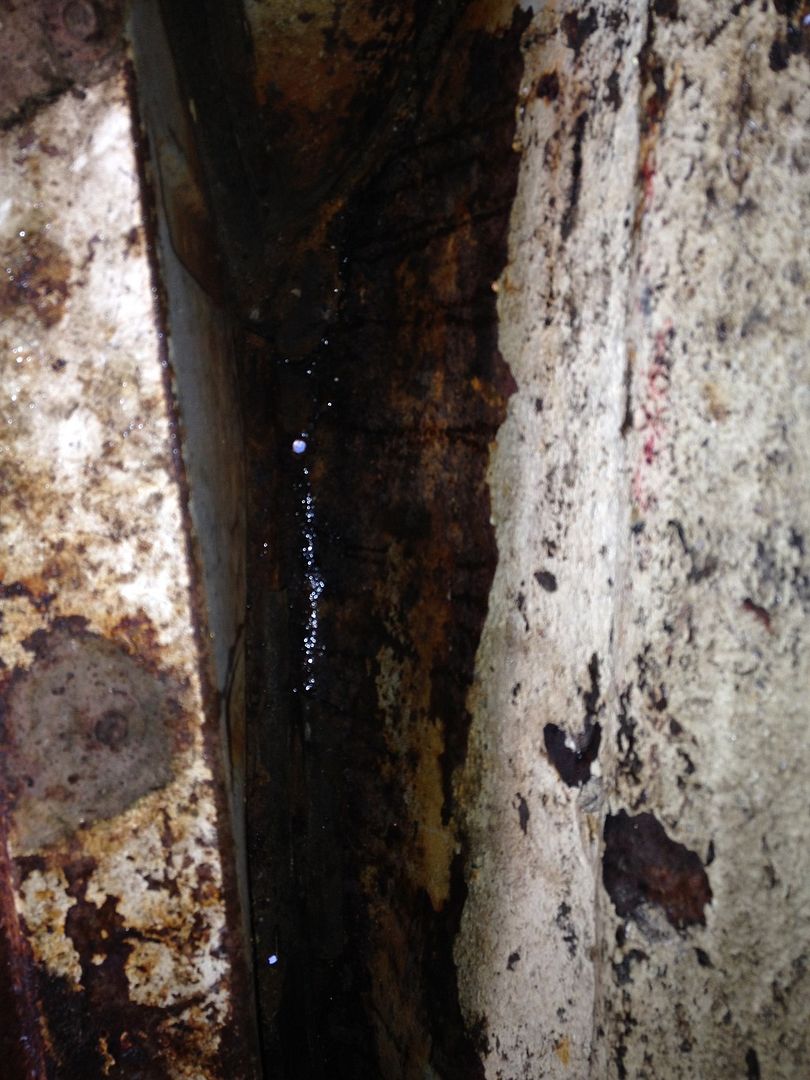
Enough dancing.. the real problem is all related tot he rear seat support/divider.
IMG_1589_zps7sts8zng.jpg

IMG_1587_zpsjfurfju1.jpg


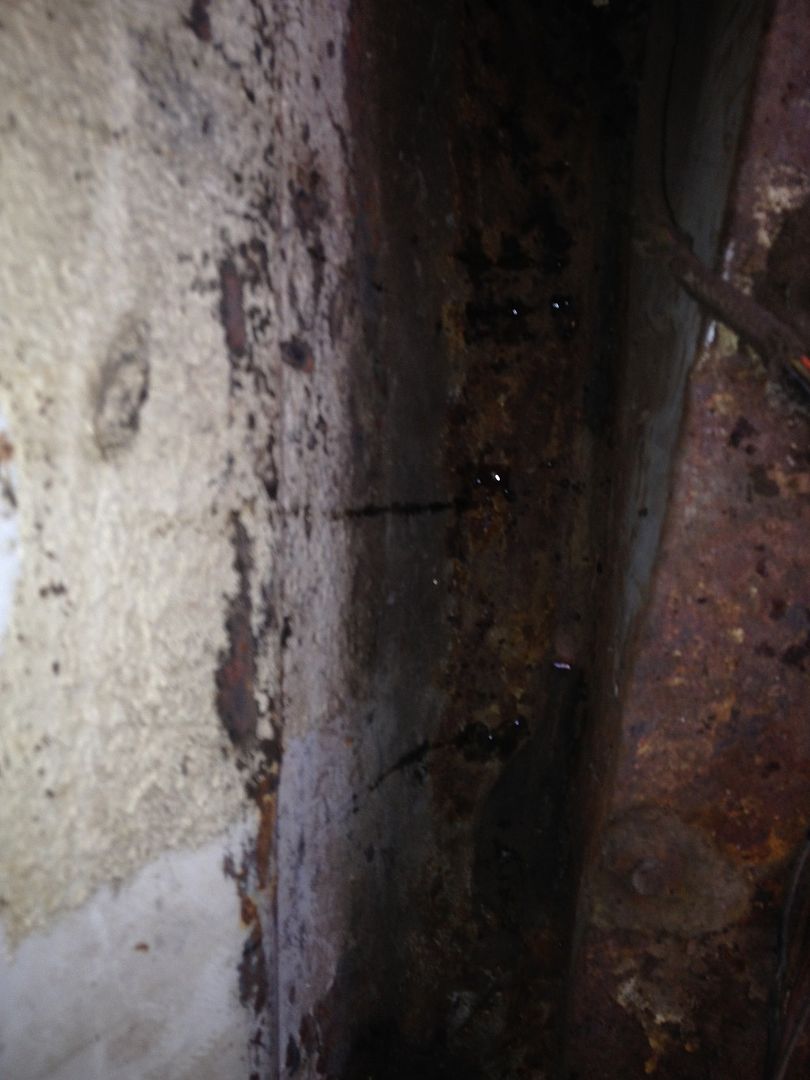
The passenger side isn't any better.
IMG_1612_zpszpbigtrl.jpg

IMG_1623_zpsw9wfp1fx.jpg


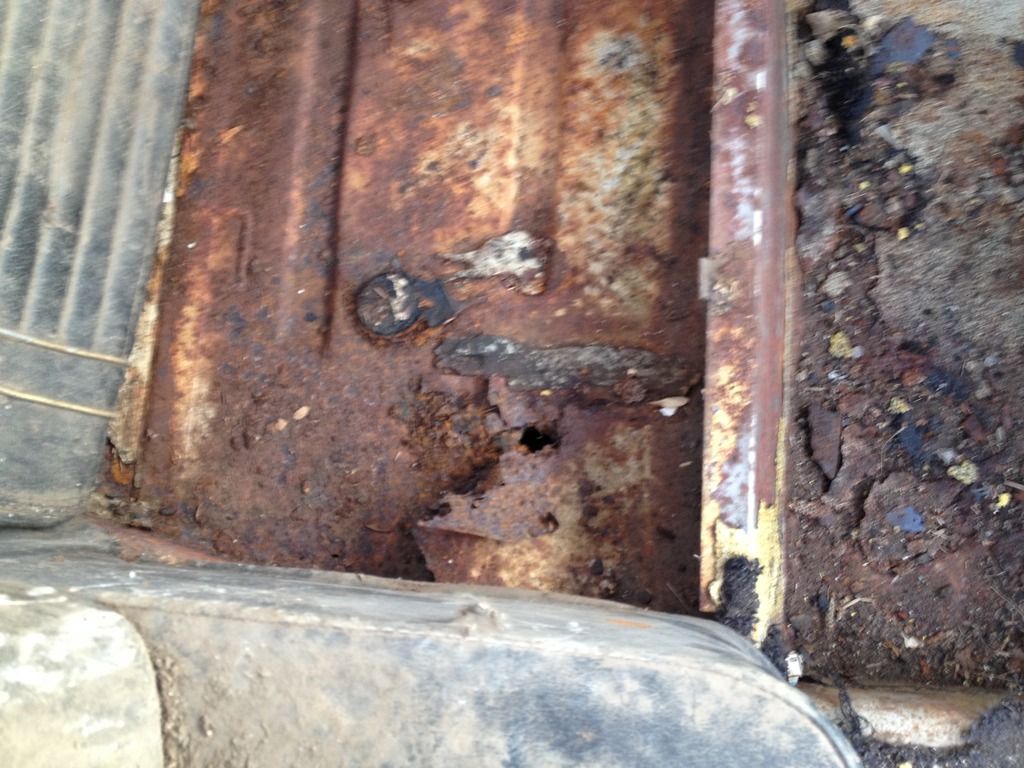
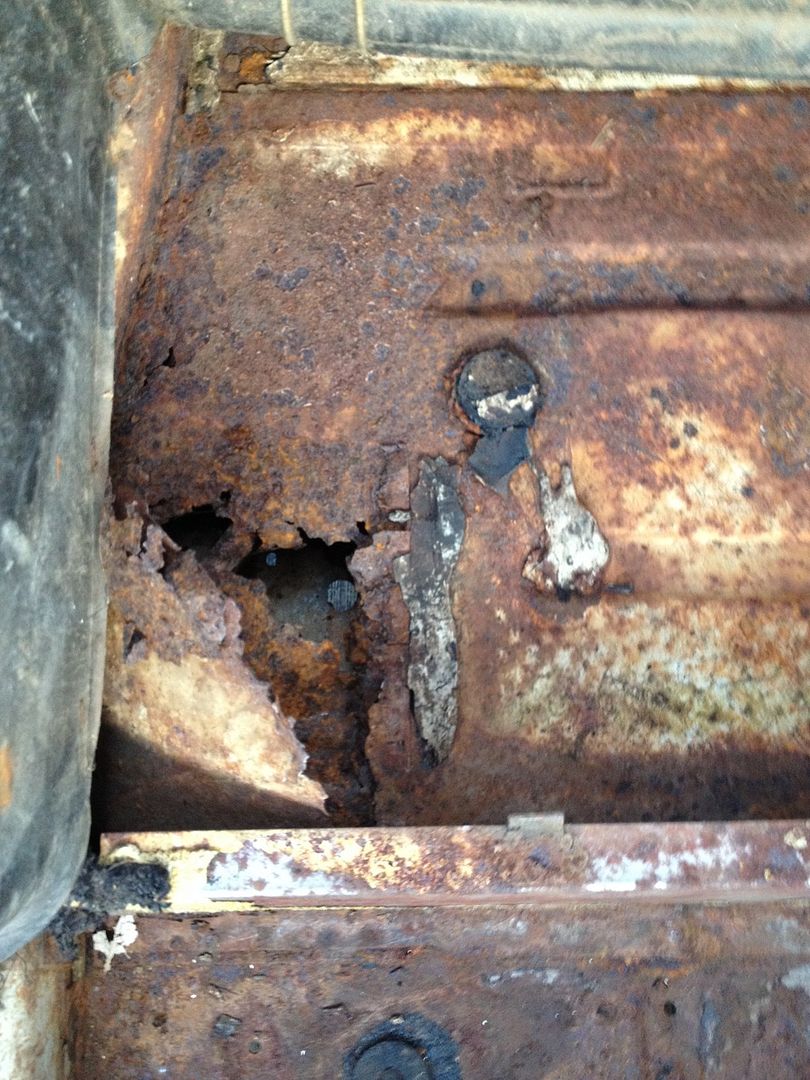
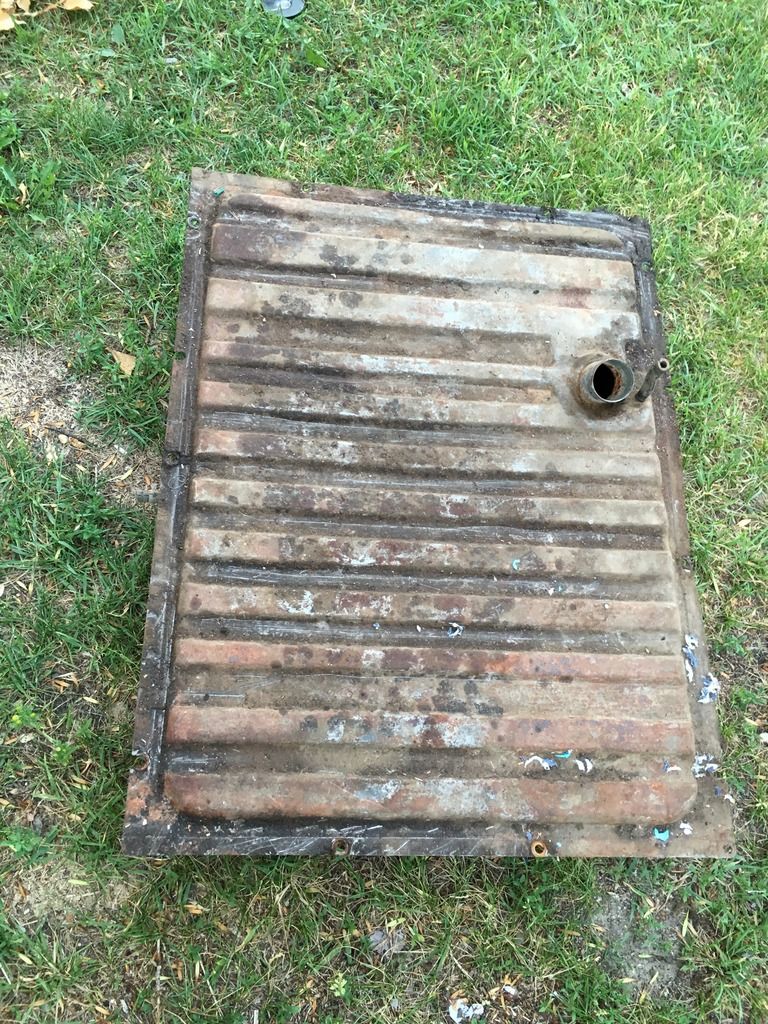
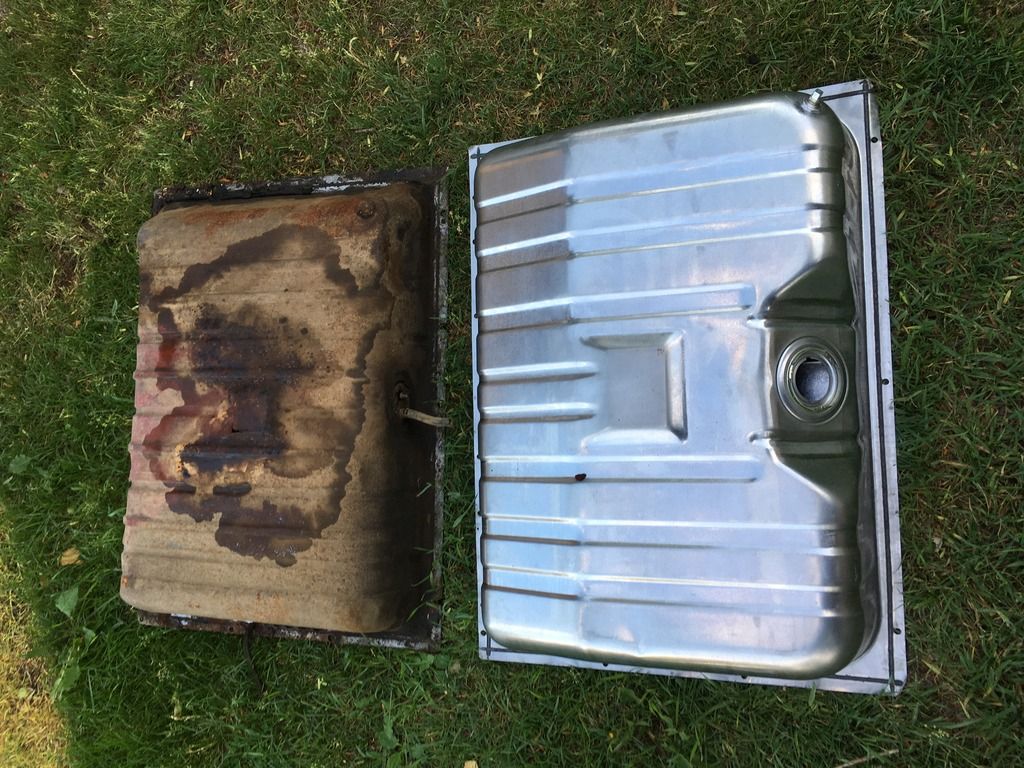
And the biggest issue. That divider that holds up the front of the rear seat. Ford in all their brilliance did not provide any drains behind or through the vertical support. Any moisture that accumulated behind the divider ran forward and sat in that trough, eventually rusted through in its 30 years of storage.
IMG_1624_zpsstaej4nt.jpg

IMG_1626_zpsepzqb2ds.jpg


Unfortunately, nobody makes replacement panels for a 1963 Falcon Convertible, so i will have to make my own.

Sadly other projects stacked up and I didn't make any progress on the Falcon over the winter until recently.

The Falcon was stored in the barn over winter, since there was no interior, I had no fear of mice or rodents.
IMG_1087_zpseqzvab59.jpg


Finally Spring had returned and out of storage the car came.
IMG_1080_zpsjxakhwng.jpg


In April, I pulled it back into the shop and put it up on jackstands in preparation for a brake job.

IMG_1365_zpsh7tjyiat.jpg

IMG_1364_zpstxhqpq7n.jpg


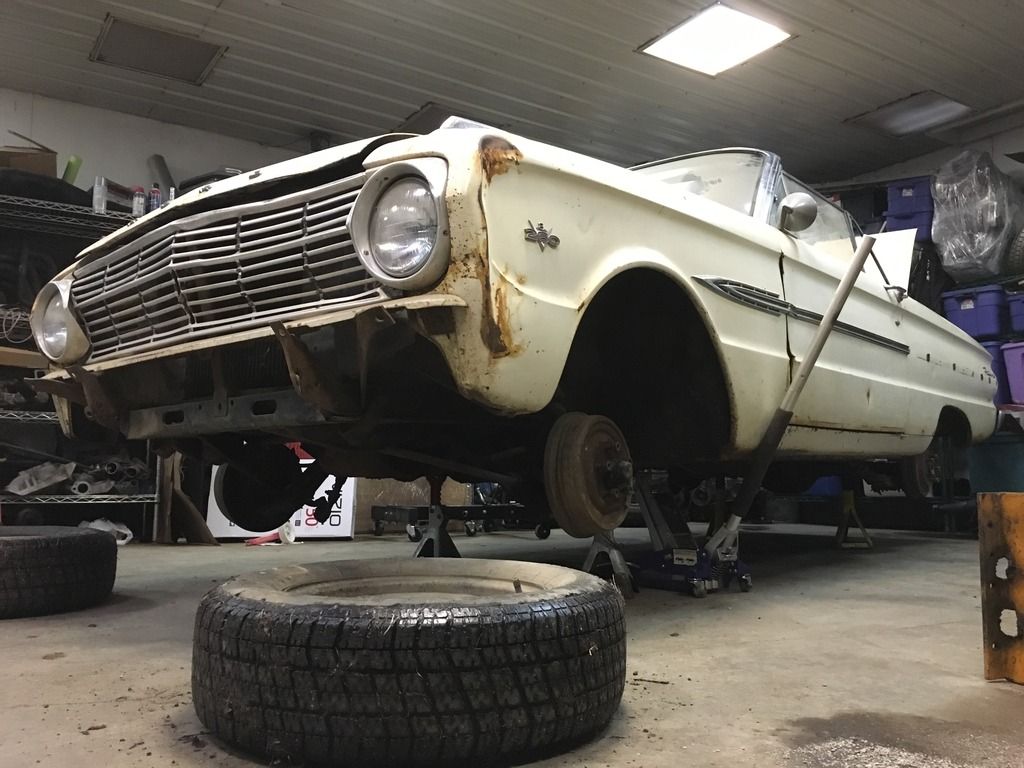
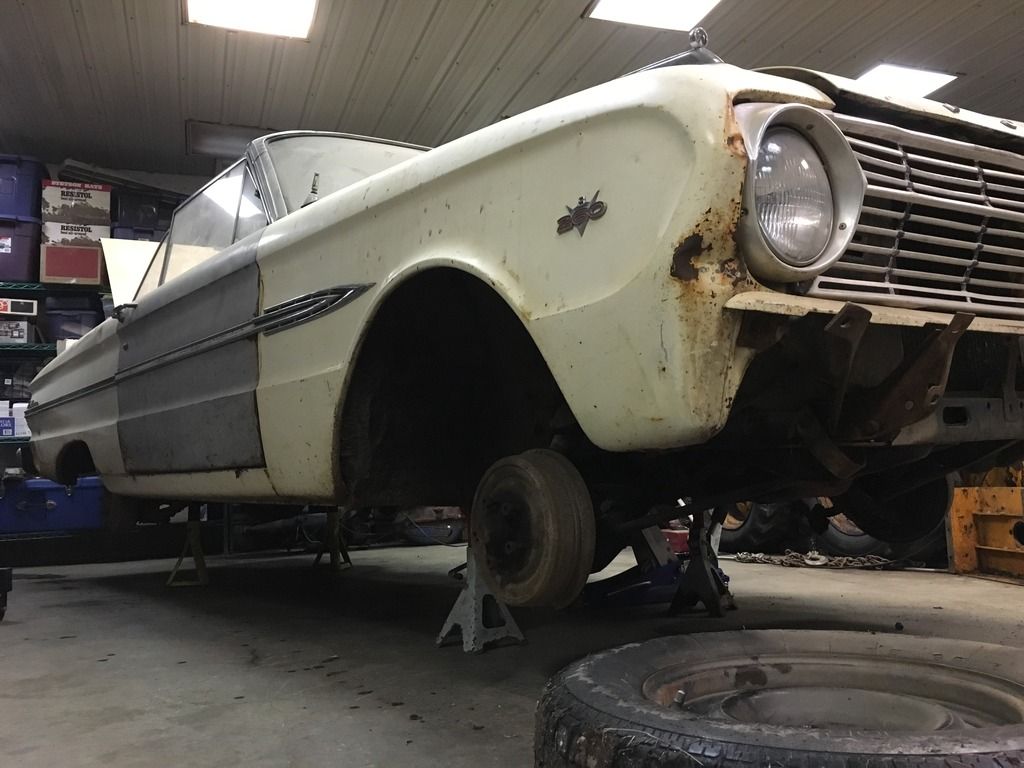
And that is where it sits today, I've installed a new master cylinder (original fruit jar style) and the rear wheel cylinders and brake hose have been replaced. I got stalled on the front wheel cylinders because the new ones have threaded bolt holes that are too small for my original wheel cylinder to backing plate bolts. Today I am off to get my core charge back from the MC and hopefully find some wheel cylinders with the right size bolt holes.

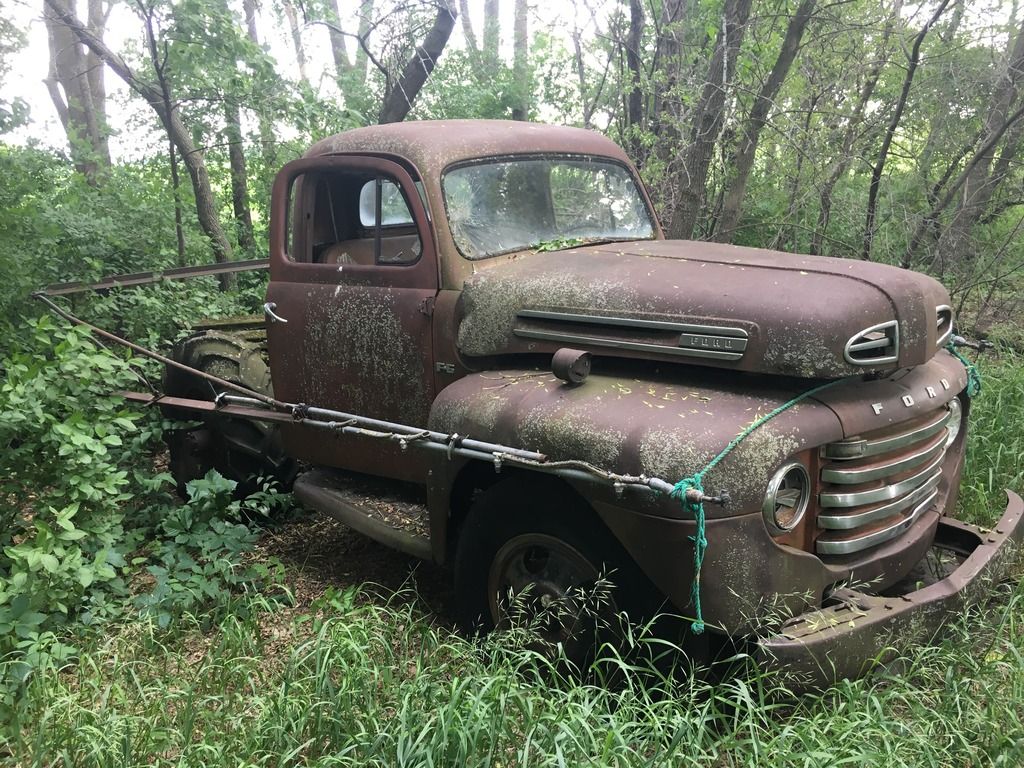
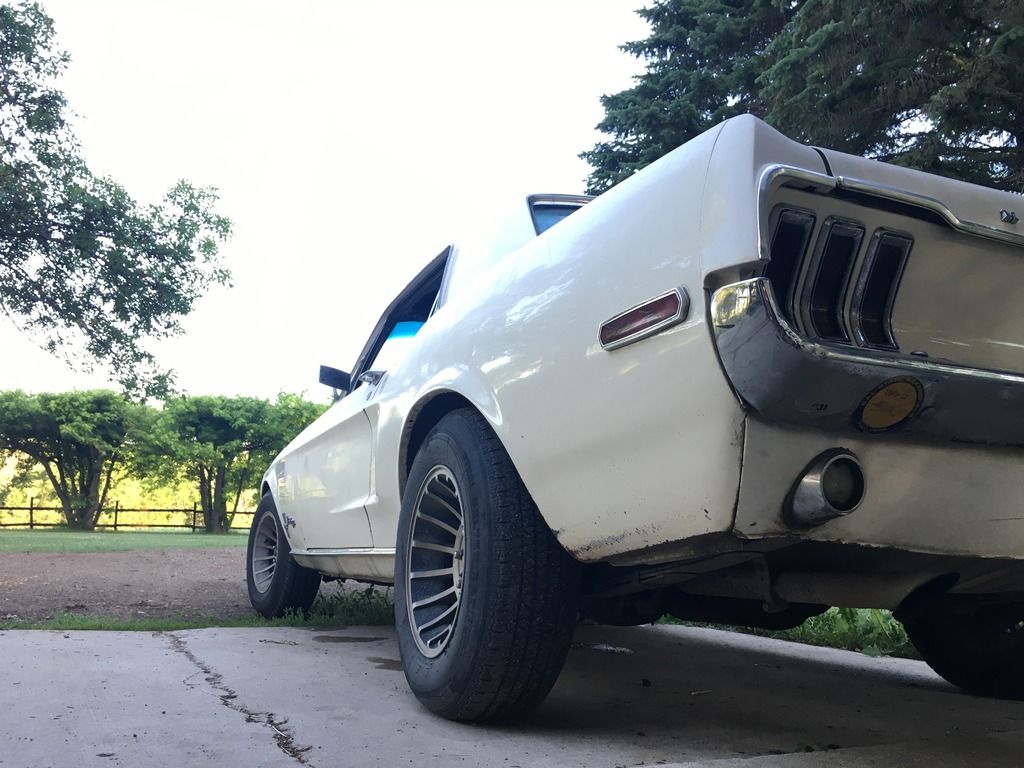
It may not be a Mustang, but it is the Mustang's Father...
 
Nice project to do a serious sleeper with. Had a couple of those old Falcons in my younger years.
 
These cars don't weigh anything compared to a new car, even a new 'econobox' weighs more than an old Falcon.
I have no idea what I am going to do with it, so for now, I will make it drivable and safe, plug up the holes, and slowly start repairing the body damage.
Then when winter returns, I will do more serious work, like figuring out what I actually want to do with it.
In the collection of stuff, I've got 302's, I've got a pair of old 289 (5 bolt) bellhousing blocks, and I could get a 351W.
For transmissions, I've got the t10 in it, a spare T10, an SROD, a 3.03, and I picked up a pair of rebuildable T5's a couple weeks ago.

This car is not to be built as a competitive car, I've got 2 more Mustangs ('65 and a '67) that I can build if that is my goal, as harsh as this may sound, it is far cheaper to modify and repair a Mustang than a low production number Falcon convertible (12,500 total, not broke out into i6/v8 or manual/auto).

I personally don't *need* a whole lot of power, the 289/C4 in my '68 Mustang (factory rated 185hp) seems to do just fine.
But that doesn't mean that if given the options, I won't increase hp/tq. I've got both an Edelbrock Performer 289 an Offenhauser 360 intake to chose from, and a Edelbrock 1406 4bbl, I've been looking into header options.

I haven't figured out what I will do for a final build, I'd like to put some miles on it, in the end I'd like to build it for longer distance driving, site seeing, long road trips, interstate speeds (65-80 MPH)

I've been struggling with the actual details of the suspension build, I'd like to stick with stock or modified stock parts (ala OpenTracker), but the CPP mini-subframe kit looks mighty tempting. And then there is part of me that thinks I should upgrade the front suspension to a McPherson strut (Fox or SN95 style). Then I have to decide steering, do I use Shelby quick-steer? Upgrade the steering box to a '67+ 2pc. I will NOT use stock Ford 60's power steering. I'd consider Borgeson steering box upgrade, or a R&P (manual or power), or even an electronic power steering upgrade using an Equinox or Saturn power motor/gear box.

But rather than get mired in details, I'm fixing the stock components and going to put some miles on it.

This car isn't going anywhere, either it is staying at my house, or its going back to Dad. Even my son has his eyes on it. It will never be sold.
 
A majority of my project working hours are between 5am-6:30am, so this morning I got up and went out to work on the car.
I repacked the front wheel bearings and replaced the seals.
I installed the new wheel cylinders, yesterday I ended up getting ones for a '66 Mustang 289 with front drum brakes to get the correct bolt hole sizes.
And I bled the brakes.
Everything was working great, I was about to toss a battery back in it and fire it up, just to hear it run; and I notice that the key is missing.

That key, the only ignition key I have for it, has been stuck in the ignition for over 30 years. I know it was in there on Saturday, but not today.
My 6yr old son claims he knows nothing about the missing key...

Before I left home this morning, I posted on my local Mustang club facebook page about the calamity, and one of the members responded that he has what I need, he said he probably knows where there are 30 old falcons total between his '63 Convertible and his 3 parts cars, he also knows a guy with his own private wrecking yard.

He gave me the location and the phone number of where his parts cars are stored, said I could take whatever I needed.
 
I know that I *should* have installed a dual reservoir master cylinder for safety reasons, one half of the brake system could fail and the other half would still work.

I've looked into it

Dual Master Cylinder for 1963 Falcon
http://fordsix.com/viewtopic.php?f=78&t=73085

But I also looked into

DIY Disk Brakes
http://fordsix.com/viewtopic.php?f=78&t=72747
CoupeBoy said:
A long while back I stumbled upon this article on a different forum.
Cheap Big Disk Brakes Mustang/Falcon -- FordMuscleForums
The guy did an excellent job documenting all the parts, and like him. I have 14" aftermarket aluminum rims that I will not be replacing soon, so no HUGE brakes, but disk should be better than drum.

His Parts List
(2) 75-80 Granada Rotors (plus associated bearings and seals)
(2) 75 Impala Calipers and matching Brake Pads
(6) 3/8" x 2" Grade 8 fine thread bolts
(6) 3/8" fine thread locking nuts
(4) Caliper bolts
(2) 3/16" inverted flare to #4 adapter fittings
(2) 18" long stainless steel braided hoses
(2) 7/16" -20 to #4 Banjo fittings
(2) Circle Track Weld on Brackets that use big GM Calipers, designed to be welded onto the rear axle (1/4" thick)
(6) 3/4" O.D. x 7/8" spacers
His total price listing added up to approx. $210

As y'all know.. I don't weld, but I have access to a CNC plasma.. so I set off to build my own brackets
First I called my neighbor who used to run a Midwest Modified Oval Dirt Track car, asked if he had any weld on plates.. he did.

The caliper has an air nipple on it because that is how he determined weld on location on the axle.
Load the spindles with pads, locate the pads on the rotor where you like for a good contact patch, turn on the air (hook it up) and then weld it in place.

I put the bracket on a piece of paper and took some measurements..

Without the plate

And now my line of thinking is that there are very few pieces of information that I still need.
1. Bolt pattern/spacing for the backing plate
2. Spindle Center line (it looks like I need 5" from center of spindle to center of the large hole in the bracket)
3. Determine best angle for the Caliper in relation to the spindle, (9-11 o'clock on the rear of the spindle, or 1-3 o'clock on the front of the spindle)

So I set out on the web searching for measurements since my car is still fully assembled (and drivable). I don't make it too far before realizing that I am not going to find it, but then buening again helps me out. He got pictures of somebody else's home grown DIY disk brake installation that has a hand drawn dimensional diagram.

Ta Da!

There is a lot of information missing in this diagram so I made some assumptions.
1. The backing plate bolt holes (4 of them) have the same center point as the spindle hole.
2. The backing plate mounting holes are parallel to the spindle centerline

I grabbed a blank sheet of paper out of the printer, and started drawing.
Start with the backing plate holes first, get those 5 squared away, then eyeball it and the cars in the garage looking for a good angle, somehow I initially decided on 37°.. damn near random if I say so myself.
I drew a line out from there and on that line marked the large hole center line at 5" and the bolt hole distance another 5/8" past that.

More scribbling and hand drawing a circle, marking the caliper mounting holes at 5.5" apart (centered on the line that extends from the spindle center line up through the big hole center line) grab a random 3/8" flat washer from the drawer to approximate the small bolt holes, I also used the outer edge, a flat ruler to approximate edges, and presto

First attempt


The first attempt looks somewhat decent given I don't own a protractor (hand drawn circles), but you notice I didn't orient it on the page very well, so I lost the top corner. The orientation also precludes me from being able to get measurements for the big hole center point and caliper mounting points, I could use geometry and get those, and I will, but I also want to measure to verify that my drawing doesn't suck.

The other thing I realized was that I neglected to measure the flat spots on the original borrowed bracket. The flat spots in the large (caliper) hole is were the caliper actually rides, when you press on the brakes the caliper will run into an edge, it doesn't put all that stress on the bolts. So I need to go back to the original bracket and caliper to determine the width.

Second Attempt
45° angle on the caliper angle in relation to the spindle center line
Measured the caliper and the flat spots are 3.75"
Measured the borrowed bracket flat spots and they are 3.8"
The flat spots are 5/8" long


I'll still need to finalize the measurements and see about getting this turned into a drawing to be cut, I am 100 % certain that there will be at least one more revision because the small circle may interfere with spindle casting on the backside, it may need more clearance on around the topside of the small hole, and if possible I'd like to close up the area between the vertical bolt holes so they are closer to the casting.

If you look at the ones from the original link you will see that he has a lot of clearance between the top two bolt holes.


And the last things I'll have to figure out is
1. how to attach the caliper to the bracket. The borrowed bracket had what looks like a 'nutsert' welded into the bracket
2. How thick to make the bracket, the borrowed one is 0.180". the nutsert is 0.368"
3. The spacers, listed above as (6) 3/4" O.D. x 7/8" spacers, will also require examination as the plate thickness will determine how far the mounting surface is away from the rotor.

As always thoughts, ideas, or criticism is welcomed.
-ron
It's still a work in progress.

Safety Concerns with a car of this vintage.
While underwhelming, the 4 wheel non-power drum brakes on my 1968 Mustang have been doing just fine for the last 17years.
1pc Steering Column, spear of death, I will be upgrading to a '67+ 2pc
Seatbelts, I will install 3pt
Single reservoir master cylinder
no top, I will be adding a roll bar, at least 4 points if not 6.
CoupeBoy said:
I found this thread over on the Vintage Mustang Forum
Roll bars in Verts........... VMF
A good looking '65 Mustang, the only thing it looks like he is missing is front door bars.

He set the main hoop to line up with the separation area between door and back seat windows (would be mostly obscured when the top and windows are up)

A picture looking into the seating area

Looking the other way
 
A milestone.
I popped the wheels back on it and the brakes worked great.
I took it for a drive, only about 1 mile round trip on the gravel road by my house, one of the benefits of living in the country, nobody to check if it is properly licensed and insured.
It up shifted through gears just fine, but when downshifting from 4th to 3rd. It popped out of gear.

And of course, a setback.
I put some gas in the tank and it ran straight through the bottom of the tank.
I thought about cleaning and re-sealing the tank, but I will look for a new one with sending unit.
Time for some research.

And the only light that works on the outside of the car is the driver side headlight.

Also I found a guy locally that has some old school Ford key blanks. And he also has 3 Falcons for parts that he is willing to let me dig through and get parts off. He gave me the number for his friend that stores them for him.

I bought 8sq ft of 18g steel to perform the floor repair. But before I touch anything on the Falcon, I'm going to learn/practice on the '65 Mustang C-code. Like I said before, Mustangs are way cheaper to learn on than a Falcon, and if I completely hose it up; on the Mustang I can keep trying until I get it right, or I can order up replacement panels to fix/bury any mistakes I make; NOBODY makes floor pan repair panels for a '63 Falcon Convertible for the rust I have. I made calls, lots of calls, no new, none from Falcon salvage yards, it was like trying to find new motor mounts for a 1969 mustang with a 250 (don't waste your time). I hope things go well and/or I am a quick learner.. I haven't done any body work to speak of in over 25 years... and the work I did then wasn't pretty.

I've got two more weeks before I want to take this car on a 200 mile round trip.
 
Try looking at Rare Spares in OZ for your falcon parts, specifically XK, XL, XM or XP.
They make a lot of repro sheetmetal patch panels
And those 250 engine mounts for the 69 would be XA parts here. :)
 
From what I've read, a gas tank shouldn't be too difficult to source stateside, I just wanted to verify fitment before ordering.

Sidebar regarding the 250 mounts..
A long time ago, I had a guy from Australia who sent me a pair of motor mounts for a Falcon 4.1L (cast iron 250), the motor side bolt spacing was correct for the two front bolts (horizontal) but the third bolt hole was not correct. And the frame side was closer to the configuration of a small block mount, but not quite the same.
IMG-20130109-00446_zps803887a3.jpg

IMG-20130109-00444_zpse3e7e8bc.jpg


FWIW, I have a set of '69 Mustang 250 motor mounts.
IMG-20130109-00452_zps21b8a070.jpg


If (when) I install a 250 into a Mustang or a Falcon, I will use the custom motor mounts that I designed a couple years ago.
IMG_1877_zpsfyrg3ubq.jpg


A stock mount on the left, my custom one on the right.
They use a Mustang shackle bushing for the bushing.
They have 2 slots so the motor can be lowered, and the slots allow a wider motor to be installed (250 vs 200)
And if a person needs a stiffer bushing rate, they should be able to swap in poly or even aluminum.
IMG_7304_zps0d526089.jpg
 
I've got a complete set of wiring for a 64 Falcon except for the tail-lights when you get around to your electrical stuff.
 
I ordered a 16 gallon Spectra tank and a new sending unit to go with it.
Fed Ex claims they should be here by the end of day Wednesday.
I also ordered a 'valve grind' gasket kit, according to Dad the passenger side head gasket is in backward.

The car runs ok as is, but there is a huge deadspot where the accelerator pump should be kicking in. This is going to be an excellent time for an induction upgrade. I've got a Performer 289 and an Offenhauser 360 SBF intakes sitting on the shelf next to a Carter AFB, an Edelbrock 1406, and a spreadbore Holley.

I have a bag full of light bulbs, for the front marker/blinker/tail light/dash/passenger headlight; and a new brake light switch.

Locally I found a guy who has a couple parts cars and he said I could pilfer parts. I need a driver fender, and he happens to have one. While I don't need a hood, I may grab this one just to have a spare.

IMG_3795_zpsknvk8jdk.jpg


I've been looking for something interesting to shove my Ford 300/4bbl/Header/ZF5 speed into.
IMG_1082_zps5mudc6dx.jpg

IMG_2105_zpsh8j12xai.jpg

At the same place, but owned by another guy, I saw this which could be an interesting tow vehicle. This one he is asking $350, but no title and the wheelbase is extremely short ruling out the option for adding a car hauler flatbed. And the leaf springs are directly under the frame, which is a very odd arrangement. But after adding a receiver and 5th wheel hitch with a flatbed, this should be a fun short hauler.
IMG_3796_zpsrszsuanh.jpg

IMG_3797_zps4olhanjw.jpg


This other one has a title and is only a couple hundred more (from a completely unrelated location) and could easily have a tilt bed or a roll-off installed.
IMG_2100_zpsvbxeqacc.jpg

IMG_2101_zpsm0wve14i.jpg


I may have automotive ADD...
 
Last week I had both of my animals out for a washing.
IMG_3838_zps0scoqjad.jpg


My wife took a few pictures and ran them through Instagram
IMG_3849_zpsno5klnst.jpg

IMG_3850_zpse0aev3aw.jpg

IMG_3851_zpswaibkhxq.jpg

IMG_3853_zpsp7uferky.jpg

IMG_3852_zpswihaz89a.jpg


I also scrubbed the interior
Before
IMG_3840_zpsyu09m0ql.jpg

IMG_3841_zpsyv3bssbp.jpg


Scrubbing away.
IMG_3842_zpshgfa4odg.jpg

Looking better
IMG_3845_zpsupqg42jf.jpg

I pulled the carpet last Spring, one of the first things I did when I started cleaning it.
Eventually the seats need new cushions and upholstery, but I'm not terribly interested in doing that until I get a new top on it.
IMG_3847_zpszl3ofquu.jpg

And I'm not putting on a new top until the bodywork has been mostly completed.

Not bad for the first car wash in 30 years.
IMG_3861_zpsbzbag8fn.jpg


The old gas tank had a bit of a rust problem.
IMG_4036_zpsqnm5wnvc.jpg


ouch, right in the sump!
IMG_4039_zps7fdnkdvz.jpg


I ordered up a new 16 gallon unit to replace the original 14 gallon tank.
IMG_4046_zpsddjvmhes.jpg


New Sending unit also.
IMG_4048_zpsmfyl8nli.jpg


Some new hose and clamps, then the replacement tank is buttoned up.
The 3/8" hose if fuel injection rated.
IMG_4052_zpsi8ottdmb.jpg


The price on the new filler tube hose seems excessive.. $1.46/inch
IMG_4056_zpswoqfmulo.jpg


Finish up with new hose up front
IMG_4057_zpskrrwdt6y.jpg


The tank hold fuel, the pump pulls fuel all the way to the motor, and the motor runs off the fuel provided through the system.
However, the fuel gauge does not read correctly, so I get to figure out where the signal is getting lost.

I have new light bulbs for the tail lights, front markers, and passenger head light. Along with the brake light switch and flasher.
I'm going to work on the bulb issues tomorrow morning, tonight

But tonight, I get to change the transmission on the '68 Mustang.
IMG_3857_zpst2quqxfa.jpg

Two weeks ago I drove the car for the first time in over a month and I noticed the transmission was slipping badly.
I changed the filter/screen and topped off the fluids. (no change)
I dropped the pan again and refilled with Lucas transmission 'fix' (mild change, but still has problems)

When I drove it last Thursday, the transmission puked fluid all over the parking lot at work.
This morning without checking fluid level, I dumped in some TransX, but the fluid level is so low that it isn't even registering on the dipstick.

FWIW, the symptoms are that it was slipping into gear, but once engaged into gear it worked just fine.. In that gear. When it upshifted it would slip into the next gear (2nd or 3rd) and then fully engage, and it would be fine with zero slipping so long as it had engaged into gear. This transmission has been relatively untouched for the last 16 years, and unknown mileage before that.

This comes as no surprise to me, the price you pay to play.
 
I pulled the transmission and then spent the next 2 weeks in Montana!
Back from vacation, I've got the transmission back into the Mustang, and then I rebuilt a carb for a 4 wheeler for my son.
I still need to get him a new battery and a couple tires need to be repaired, then finally I might be able to get back to work on the Falcon.

It is licensed and insured now, it goes and stops.
The next big problem is the lights, it currently has no tail, brake, or indicator lights.

I've bought a flasher, but the current one is playing hide-and-seek with me and I haven't been able to find it yet. Tonight I hope to pull the dash gauge pod, to replace the instrument panel lights and hopefully find the flasher.

If they still don't work after replacing the flasher, I plan on replacing the turn signal assembly in the steering column.

I can't believe its mid July already, I should have been able to put some miles on this car, and yet I have put on *maybe* 6 miles total in test drives.
 
The only thing I can say about the flasher is when you are not looking for it you will find it. :p

fd
 
But I have to find it.
This Falcon is frustrating to work on.
I tried to pull out the dash this evening, 5 screws and it pulls out 1".
Loosen the speedo connection and it pulls out another 1", but only on the right side. Based on a picture I saw of a 64 Falcon flasher.

It is on the right side connected to the light switch.

So I tug a little more on the gauge pod and it is stuck. Won't budge. There is a huge wire harness mess attached to the left side. It won't come out.

The boy has me put in a new battery for his 4wheeler. I have to figure out how the chickens got out. Then while mowing my wife runs over a dog cable and wraps it around the mower blades.

I'm calling it a night.
image.jpeg
 
Back
Top