• Hello there guest and Welcome to The #1 Classic Mustang forum!
    To gain full access you must Register. Registration is free and it takes only a few moments to complete.
    Already a member? Login here then!

'66 Coupe Resto

Hey guys, Just wanted to get on and start sharing my experience a bit. I bought a 66 coupe with an A code 289 in it a few years back and started working on it. My project has been stalled for a while (between school, $$$ and the rest of real life).

Now the exciting news, I'm ready to pull my engine and get some real work done. My buddy and my dad have been helping me and we've gotten all the peripherals off the engine and as soon as they're work schedules coincide, we'll be pulling the engine. Then it's time for some patch/body work along with an engine rebuild.

I just got a new camera so I'll start taking some pics and posting them here.
 
:RTFM Hurry up and get those pictures up, we dont have a lot of rules, but the first and most important one is:

:WOP
 
there is some good manuals on restoring a mustang. start reading up. pulling the engine and trans isn't that bad. do you have access to a engine stand and a cherry picker? shouldn't take that long, a couple nights after work and some beverages of choice and you are golden
 
Yeah, I have a stand, I figured I'd rent the hoist for a weekend. My dad and I are very good mechanically. The tough parts will be the body work. We've removed most of the peripherals from the engine and we're pretty much ready to pull. I think we'll pull the engine and tranny together. Where do I have to disconnect the transmission to pull both? (other than the little hoses and wires).


PS. I'm going over tonight and I promise I will get pics up soon. Right now all I have is pics of the engine components so I can remember how they go together, but I'll get more pics of the car tonight.
 
have you drained all of the fluids. make sure you have the plug to plug into the tail of the transmission or you will get a mess with all the fluid draining out of the. disconnect and remove the drive shaft . make sure all of the radiator hoses and fuel lines disconnected . check and recheck all the lines and everything before you get to pulling it. find out where you are going to hook up the tilter. (most cherry pickers that you rent can a engine tilt also) As soon as you make sure everything is disconnected start pulling the bolts for the mounts .. hopefully that helps and I am sure some others will join in and give good advice
 
Fun Fun, I was at the same exact place back in May. Thanks to all the folks here I was able to carry through with a smooth removal and got to spend some time with some great friends while we were at it.

Here is a link for one of the most complete engine/trans removal check list on a Vintage Mustang anywhere on the internet.

http://www.stangfix.com/testforum/index.php/topic,6429.0.html

Hit up any bolts that will be involved with some type of deep penetrating lubricant (KY doesn't count) like PB blast. Don't remove the bolts just yet but loosen them a bit to make sure that when the day comes you wont have to pull out the torch or anything. We skipped the intake manifold plate idea and just used a engine leveler and attached the chains to the 302's heads which made removing the engine with the transmission all at once a piece of cake.

Here is a link to all the good fun we had, browse through the thread and you will find a lot of pics of what you are in for and a lot more good information on other things to keep in mind while prepping for and performing the removal.

http://www.stangfix.com/testforum/index.php/topic,6393.0.html

Also something to keep in mind, I didn't have a transmission stand, so it is currently still using up my creeper. Might want to look into some sort of storage ideas for the tranny.

Some advice from a great friend of ours John (johnpro) may he rest in peace.

"johnpro" said:
Yank the radiator, tie up the tranny lines (if it's an automatic), and you may even want to pull off the pullies and water pump ... just makes it that much easier.

Also, disconnect the exhaust and get as much of it out of he way as you can. Same goes with the drive shaft (obviously).

While you're at it, disconnect any electrical wiring going to the engine, as well as all plug wires, etc.
 
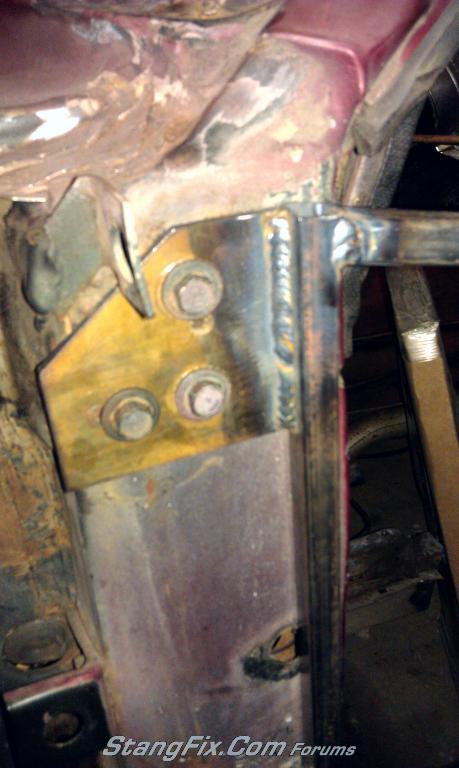
So, it's been a while. But, I took a welding class, got married, and got a motorcycle license. Anyway. I decided that, even though the rockers are pretty good and the roof is in decent condition, it wouldn't be a bad idea to make some braces for the doors. 1st, it'll take a good amount of weight off the car (those doors are heavy), and second, I don't have to open and close them every time I get in and out.

After a rather unsuccessful let's-build-a-brace-from-scrap night last week, I ordered some square tubing from MetalsDepot.com and last night my dad and I put these together. One more for the other side and maybe a cross brace in the engine compartment and then the cowl comes out.
 

Attachments

  • Brace - Completed.jpg
    1.7 MB · Views: 149
  • Brace.jpg
    1.6 MB · Views: 132
  • Brace - Lower Bracket.jpg
    525.6 KB · Views: 117
  • Brace - Upper Bracket.jpg
    434.5 KB · Views: 110
:thu

Looks like a pretty big project Rob. Speaking from personal experience, take measurements before cutting out sheet metal...even if you don't think you'll need them! That way you have something to reference when you go back together. Thank goodness I have another car available for the measurements I needed (but didn't take before finally learning!). Keep us up to date!
 
Yep, definitely a "bit off more than I could chew" scenario, but I've learned a hell of a lot already and I'm much more confident in my skills now. I did grab a little notebook to jot down notes and stuff, but my problem is I'm not sure what types of measurements I should be taking. Any insights?
 
Let the fun begin. Good call taking the course, welding is such a a great skill to have, comes in real handy working on our rust buckets.

The local CC here has a welding class I might take. Comes with some kind of cert. when completed.
 
"Robs66Coupe" said:
Yep, definitely a "bit off more than I could chew" scenario, but I've learned a hell of a lot already and I'm much more confident in my skills now. I did grab a little notebook to jot down notes and stuff, but my problem is I'm not sure what types of measurements I should be taking. Any insights?

Whether you "bit off more than you can chew" or not is personal opinion. Some folks wouldn't TOUCH that car. Others would be jumping at the chance, seeing the diamond in the rough side. I see it as a skill builder! ;)

Measure all of your widths, heights, opening dimensions, whatever. Better to have too much info then not enough. What you need to measure changes with every panel/piece. If you haven't figured it out yet, most repop sheetmetal needs to be fitted and massaged. Rarely is a pice gonna lay back in perfectly like the factory piece. Those measurements can certainly help determine where and what you need to adjust. Keep in mind it's like a big jigsaw puzzle on a lot of the stuff. What you tweak here, may affect over there later down the road. Keep those updates coming! :thu
 
Thanks for the advise. Let me clarify. It was a bit off more than I could chew scenario when I bought the car in high school. Since then I've gained a lot of knowledge and I'll be using what I've learned to move forward and improve processes in the future. Compared to some of what I've seen, I'm not in terrible shape. The challenge to this point has been gaining the knowledge and tools (meaning actual tools) to do the job. I feel fairly confident now, and I think this summer is going to be very productive.
 
So Wednesday, me and my buddy went up to his office where they have a Torchmate Plasma CNC machine. We drew up the brackets I'm going to use for the driver side brace and I have to say, it was 1000x easier than cutting with the cutoff wheel and drilling holes. I'll probably build the brace over the weekend. Pics to follow.
 
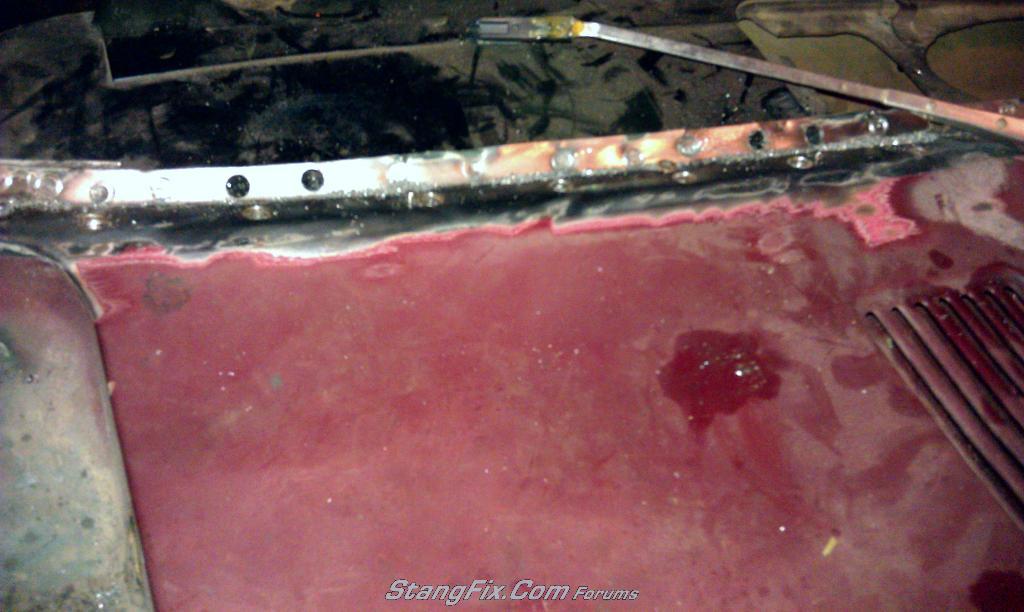
We built the brace for the driver side and started on the spot welds on the cowl. Hope to continue drilling this week and have the top off soon. I'm trying to attach pictures, but when I hit post, it takes me to the create a new topic page.
 
679-280611055232.jpeg

679-280611055023.jpeg

679-280611054941.jpeg

679-280611054842.jpeg
 
Last edited by a moderator:
Thanks. Any tips? I'm trying to save as much as I can, but we keep drilling through both panels. Is there a trick to only drilling through the top half?
 
I went really slow when drilling. Especially along the top window area. I'd drill a little bit, check, drill again, check, drill some more, check. I'd do 2 or 3 holes, see if I could pry them apart, if I couldn't, drill a little more until it came apart.
 
Back
Top