huskinhano
Member
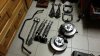
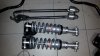
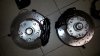
Recently I swapped out my old drums and 66 spindles for a set of 72 discs with stronger spindles. I wanted to check my camber since it looked like I gained a little more between different spindles and springs settling a bit since I did my suspension 2 years ago. In the middle of installing my Street or Track suspension when it hit me how helpful it would be doing my own alignment even though I never did one before. I spent about $125 on a gauge and did a successful alignment. At the time I set camber at 1 3/8*neg camber and 3.5* caster with 1/16" toe in. the car drove great but I did have a bump steer issue going over crests in roads or RR tracks. With the 72 discs, I installed a Baer bumpsteer kit. I didn't make any real attempt at setting bump steer which I plan on doing. I simply installed all the spacers and called it a day. It's a lot better! I plan on doing more on the bump steer later on, just mentioning it now.
So, here are all the photos! I checked camber on both sides before I started, it was just a tick over 1 3/4* neg on both sides. This is the left side.

This is the right side. As you can see, I had them pretty even. I'm pretty lucky as I have a section in my garage where the floor is dead flat.

First part of doing alignment, I had the wheels straight and needed a line on the floor parallel to the wheels. I used this piece of angle aluminum and drew a line on the floor with a pencil.


A little background info is helpful at this point.According to the Ford shop manual a 1/32" shim is worth approximately 1/2* of caster and 1/16" shim on both bolts is worth approximately 1/3* of camber. Armed with that info I went on. Previously my left upper control arm was installed with no shims. I had to add a 1/32" to each bolt on the upper control arm to make camber even with the left side or very close anyway. I ended up with a base line of 1 3/8* neg camber. I was now at 1 3/4* neg camber. I could have left it but I didn't really see a need for that much. I wanted to back down to around 1* neg camber. I also wanted to increase my caster a little bit. Why? because I can! So I set my shim packs up. On the right, 1/32" on both to equalized both sides. Then I added a 1/16" to bolt bolts on both sides to reduce camber a little bit and then added a 1/16" to the leading bolt for a little extra caster. I know, why didn't I just make the leading shim a 1/8" instead of 2, 1/16"? Now I can easily alter caster and camber equally on both sides. Everything is known. If I want a little more caster, just yank out the 1/16" on both sides and replace with 1/8" and caster will be equal. It'll add about 1/2* in my case with my set up.
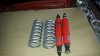
Right side shim pack.

Left side shim pack.

If you noticed, the end of the gauge is angled at 40*, this gives me 2, 20* angles needed for caster and hence the pencil line on the floor.
This is the left wheel. I turned the wheels 20* to the left and zeroed the caster at 0* and the bubble at the end is level as well.

Now I have turned the left wheel to the right 40*. You'll notice the bubble says 4* caster in the center.

Here's the right side, turned 20* to the right and gauge zeroed.

Now, the wheel turned 40* to the left and caster is 4* according to the bubble.

Here's a picture of the shims installed, right side shown.
I also adjusted the strut on the right side because when I check caster I was about 1/4* off in caster. I'm anal and I could adjust it so I did! It took a very minute adjustment of the rod, maybe 1/16th or less.

Here's the camber on the left side, reading about 1 3/8*, you'll notice 1 side of the bubble is on the 1* mark.

Here's the right side. Pretty good, huh?

Sorry no pictures on setting toe. Between being sick, roto tilling and slugs of beer I set the toe. I was at 5/16" toe in. I set it to 1/8". I had to turn the left sleeve towards the front about 1/16th of a turn and the right side the same amount except to the firewall. OK, so I set this all up in my garage. How does it compare to a laser alignment in a garage? I bet pretty good. Not that I'm a cocky SOB but simply because I put the attention into it. What good is a laser alignment by someone who doesn't give a crap and simply sets each side with in range even though they're at opposite ends of the spectrum? I like the spindle mount gauge with it's 40* angle. It's easy to install, easy to use. I took my TTD's off and put my old steel wheels on because I was too lazy to make an extension to thread on to the spindle threads but I will make one...one day. BTW, I'm not a professional mechanic, just a weekend warrior. It just takes the willingness to try and a couple hours, the results are well worth the effort. IMO a caster camber gauge should be part of your tool box. It'll pay for itself very shortly
I hope you enjoyed my write up. I forgot to mention I used 3 mil black plastic contractor garbage bags folded up for my turn tables, they work great for that! Oh, the car drives very nicely the short bit I drove it.Funny, the car steers very easy even with the 4* caster. Not sure if it's because of the rod ends in place of the tie rods or different angles of the tie rod arms since they're a little lower. Whatever it is, it's easier then when it was set at 3.5*with the stock spindles.
So, here are all the photos! I checked camber on both sides before I started, it was just a tick over 1 3/4* neg on both sides. This is the left side.

This is the right side. As you can see, I had them pretty even. I'm pretty lucky as I have a section in my garage where the floor is dead flat.

First part of doing alignment, I had the wheels straight and needed a line on the floor parallel to the wheels. I used this piece of angle aluminum and drew a line on the floor with a pencil.


A little background info is helpful at this point.According to the Ford shop manual a 1/32" shim is worth approximately 1/2* of caster and 1/16" shim on both bolts is worth approximately 1/3* of camber. Armed with that info I went on. Previously my left upper control arm was installed with no shims. I had to add a 1/32" to each bolt on the upper control arm to make camber even with the left side or very close anyway. I ended up with a base line of 1 3/8* neg camber. I was now at 1 3/4* neg camber. I could have left it but I didn't really see a need for that much. I wanted to back down to around 1* neg camber. I also wanted to increase my caster a little bit. Why? because I can! So I set my shim packs up. On the right, 1/32" on both to equalized both sides. Then I added a 1/16" to bolt bolts on both sides to reduce camber a little bit and then added a 1/16" to the leading bolt for a little extra caster. I know, why didn't I just make the leading shim a 1/8" instead of 2, 1/16"? Now I can easily alter caster and camber equally on both sides. Everything is known. If I want a little more caster, just yank out the 1/16" on both sides and replace with 1/8" and caster will be equal. It'll add about 1/2* in my case with my set up.
Right side shim pack.

Left side shim pack.

If you noticed, the end of the gauge is angled at 40*, this gives me 2, 20* angles needed for caster and hence the pencil line on the floor.
This is the left wheel. I turned the wheels 20* to the left and zeroed the caster at 0* and the bubble at the end is level as well.

Now I have turned the left wheel to the right 40*. You'll notice the bubble says 4* caster in the center.

Here's the right side, turned 20* to the right and gauge zeroed.

Now, the wheel turned 40* to the left and caster is 4* according to the bubble.

Here's a picture of the shims installed, right side shown.
I also adjusted the strut on the right side because when I check caster I was about 1/4* off in caster. I'm anal and I could adjust it
 so I did! It took a very minute adjustment of the rod, maybe 1/16th or less.
Here's the camber on the left side, reading about 1 3/8*, you'll notice 1 side of the bubble is on the 1* mark.

Here's the right side. Pretty good, huh?

Sorry no pictures on setting toe. Between being sick, roto tilling and slugs of beer I set the toe. I was at 5/16" toe in. I set it to 1/8". I had to turn the left sleeve towards the front about 1/16th of a turn and the right side the same amount except to the firewall. OK, so I set this all up in my garage. How does it compare to a laser alignment in a garage? I bet pretty good. Not that I'm a cocky SOB but simply because I put the attention into it. What good is a laser alignment by someone who doesn't give a crap and simply sets each side with in range even though they're at opposite ends of the spectrum? I like the spindle mount gauge with it's 40* angle. It's easy to install, easy to use. I took my TTD's off and put my old steel wheels on because I was too lazy to make an extension to thread on to the spindle threads but I will make one...one day. BTW, I'm not a professional mechanic, just a weekend warrior. It just takes the willingness to try and a couple hours, the results are well worth the effort. IMO a caster camber gauge should be part of your tool box. It'll pay for itself very shortly
I hope you enjoyed my write up. I forgot to mention I used 3 mil black plastic contractor garbage bags folded up for my turn tables, they work great for that! Oh, the car drives very nicely the short bit I drove it.Funny, the car steers very easy even with the 4* caster. Not sure if it's because of the rod ends in place of the tie rods or different angles of the tie rod arms since they're a little lower. Whatever it is, it's easier then when it was set at 3.5*with the stock spindles.