• Hello there guest and Welcome to The #1 Classic Mustang forum!
    To gain full access you must Register. Registration is free and it takes only a few moments to complete.
    Already a member? Login here then!

busted bumper bracket bolts

monkeystash

Active Member
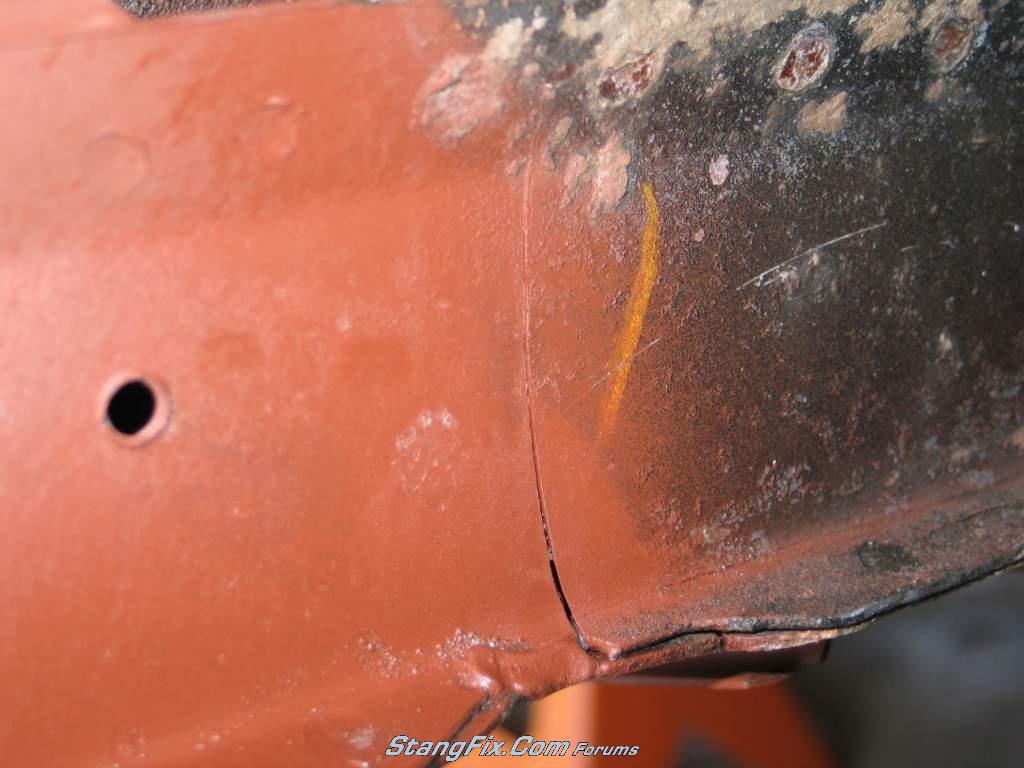
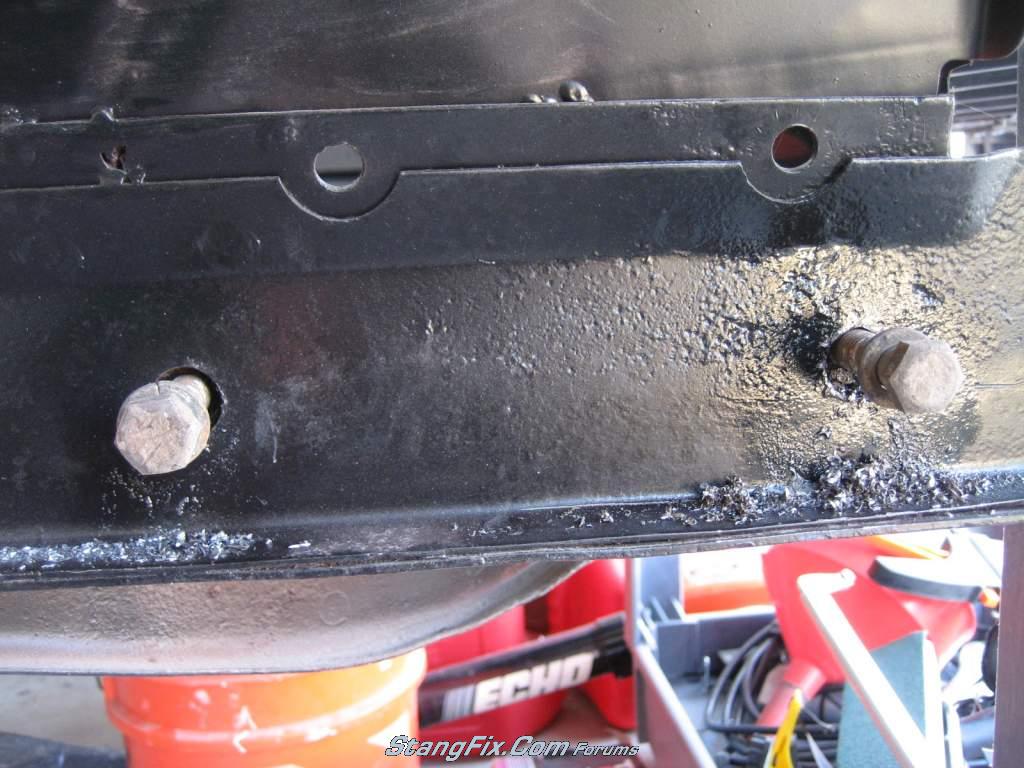
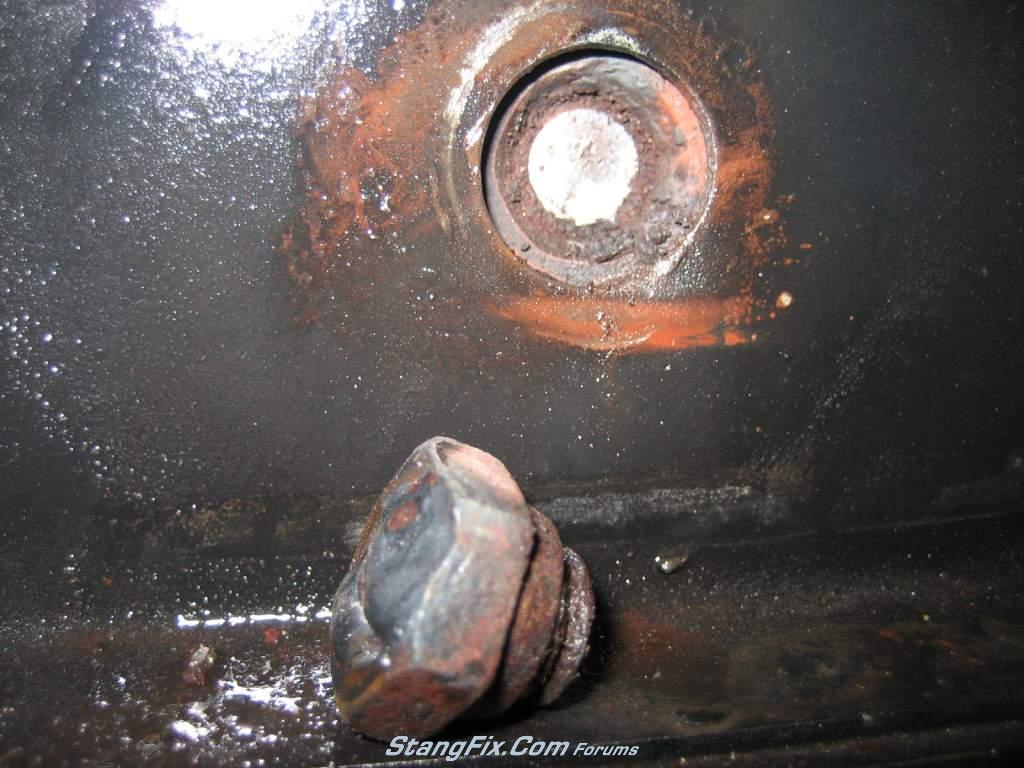
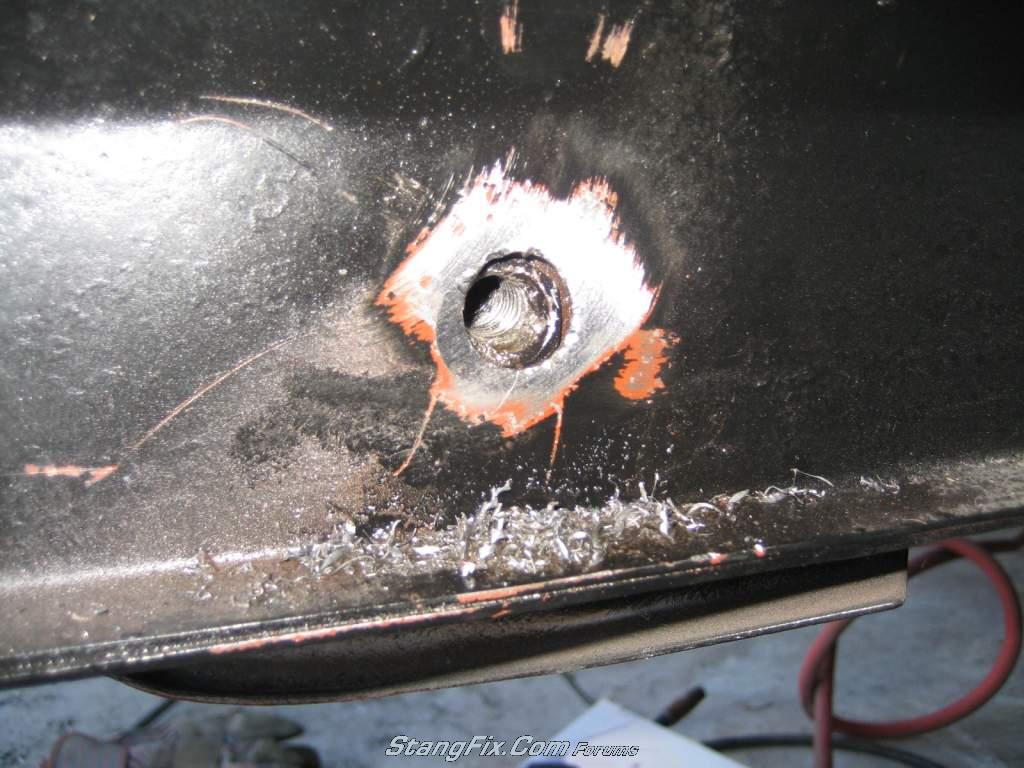
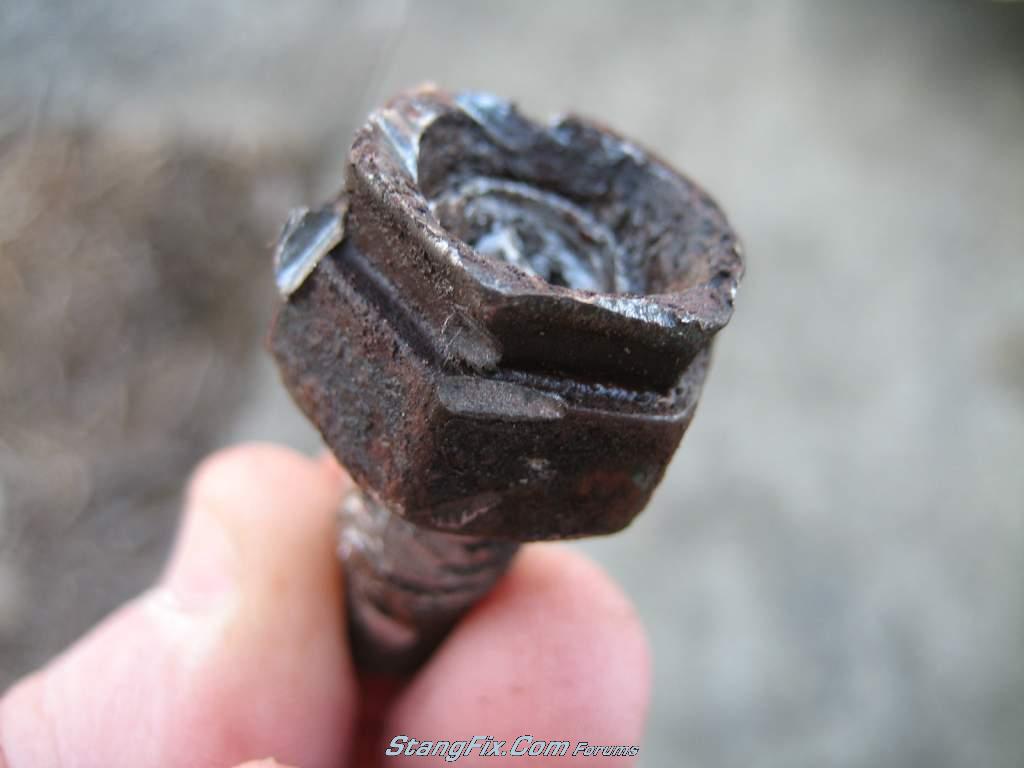
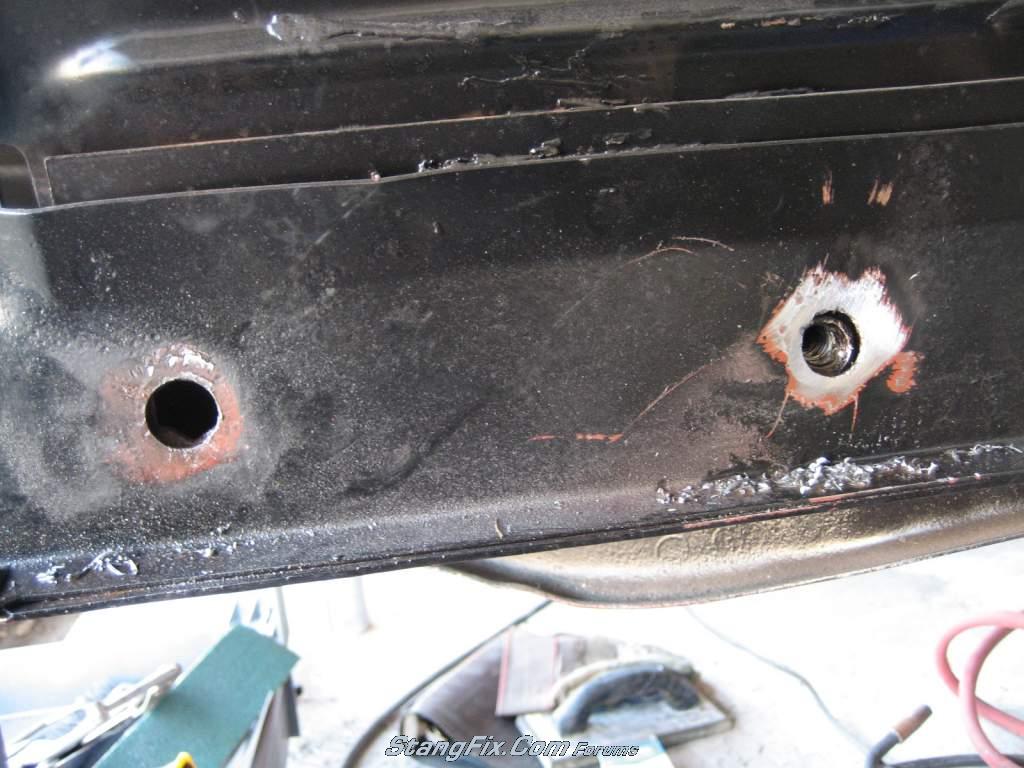
I'm going to tackle this tomorrow, and could use some guidance. All 4 front bumper bracket bolts are busted off (see pic.) I have a few options, but let me know if I missed one? First, I'm going to try to drill them out and retap the threads in the welded nut. This option could fail if I'm not dead center on bolt while drilling. My second option is to cut out that section of frame and replace it with a new repro piece that has the welded nuts on it. I'd like to avoid this. Third is to drill out the entire welded nut and weld a new nut in it's place. I would do this my enlarging the current hole, then inserting a new nut and welding it flush on the outside. BTW, they aren't going to unscrew out, they are rusted in there solid. What do you guys recommend? Also, what size are these bolts? Thanks.

53_24_02_10_9_29_54.jpg
 
Last edited by a moderator:
Ouch not much left to work with is there? Doesnt look like there is much material left to weld a nut on the end to turn the broken bolt out so lets move ahead...I would start with a small drill bit working up to the point where you get close to the threads. If you arent perfectly centered dont sweat it. The take a carbide bit and slowly hog out the hole until you get most of the old bolt out. You should then be able to take a punch and knock the rest out or maybe spin it out. This isnt going to be quick or easy so plan on the afternoon. Good luck and let us know how you do..
 
Wow, drilling can prove to be really difficult if they are grade 8 or something stronger then regular steel bolts. By the seam there in the middle of the frame rail, it looks like a replacement piece may have been put in already?

If drilling doesn't work out, i would just weld a nut on a piece of straight stock, and replace a square in the rail. Of course i had major cancer in that area. Sorry, i cant remember the thread size.

rust2.jpg


rust1.jpg
 
i would make new "well nuts" & replace the small sections where the messed up parts are. if you have access to a brake, you can make up some small boxes, take a square piece of 1/4 plate drilled & tapped the correct size & enclose them into the boxes with sheetmetal . cut out the bad sections & replace with the assembly. what i'm describing if i've lost you is a part similar to whats in the door jamb that the strikers attach to. do it this way & you have some adjustment if needed.
 
Before you completely accept that you cannot get them to turn out I would suggest you give it a solid effort. Soak them for a couple days with a good penetrating oil made for the task. Shock them with a good strong blow via a wide punch (don't want to expand the bolt diameter and make it even tighter). Get as large as feasible extractor bit and have at it. I recommend a square style not the spiral type. Don't try to drive the bit in with a lot of force as that isn't how it's done. Tap it in just enough to get it "fixed" in place. It will bite in as you turn it. Put a large tap handle on it...not a wrench. If you're contemplating drilling anyway, why not give it a shot?
 
:EB

Heat. I've had great luck heating broken fasteners - it tends to break the rust up, then I soak with pentrating oil, and extract. Works probably 80% of the time I've tried it.
 
Pat, I think I've picked your brain about this in the past. Thanks for the tips, I appreciate it.

Jake, good eye. Actually, the frame is all original, but that was a crack that I welded up.

53_25_02_10_8_06_18.jpg


I'm the one who busted the bolts off. Before I tried, I soaked them overnight, then put my MAPP torch to them. Unfortunately, they are in there solid. I'll update later with the results, success or failure. Thanks guys for the ideas. Now time to put them to work.
 
Last edited by a moderator:
I like the posts above about the various options, but I'll add one more. You could also drill some 2" or so holes (don't remember exact size) in the opposite side of the frame with a hole saw and have access to the other side of the nut to assist with getting the nut off and welding a new one on. 68s definitely have those holes from the factory and they might have started with 67. Once you are done, just plug the hole with a standard rubber plug that would come with the 67?-68 rubber plug kit or weld the hole back up. It may be more convenient to plug it though for future access to the inside of the frame there.
 
"sigtauenus" said:
I like the posts above about the various options, but I'll add one more. You could also drill some 2" or so holes (don't remember exact size) in the opposite side of the frame with a hole saw and have access to the other side of the nut to assist with getting the nut off and welding a new one on. 68s definitely have those holes from the factory and they might have started with 67. Once you are done, just plug the hole with a standard rubber plug that would come with the 67?-68 rubber plug kit or weld the hole back up. It may be more convenient to plug it though for future access to the inside of the frame there.

Or you could take the larger hole approach directly to the bolt side. Using a larger hole saw bit, drill out the old captured nuts. Then weld in new pieces with welded nuts in place.

However you go about it, it doesn't look like a fun job.

Good luck.
 
When i installed the R&C mustang II front-end i my car we noticed that the front frame rails had begun to rust out.
We replaced the front frame rails with boxed tubing and i had a similar problem with how to mount the brackets. I used c-clamps to locate the bumper and bracket assembly. Then drill the side frame rail holes and drill a hole directly under each of the openings(into the underside of the frame rail) for the bolt holes.
Insert the bolts from underneath and push them through the openings in the frame rails. you can then use grommets to plug the holes from underneath.
Even If you have only hand tools ,Fine thread bolts will tighten up no problem.
I had no holes at all in the frame rail and this worked out great .
 
Now that I think about it, since the ehat trick failed, I'd do what others have reccomended and cut out the nut & surreounding area. That gets rid of the rusted nut and lets you see whats inside. Welded back up, you know exactly what you've got holding the bumper.
 
All great ideas. I especially like the hole saw idea, and using a rubber plug when finished. However, I just read that during a lunch break, so here is where I stand now:

The passenger side is done. I drilled out the bolt centers, tried various extractors and plenty of heat. That was a failure. So I drilled the holes out completely and re-tapped the threads. I took an educated guess at 7/16-14, so please don't tell me different, lol. They came out well.

Now I'm working on the driver's side. There was enough bolt showing to try Pat's trick. So I welded a nut to the bolt but it just busted the bolt off again further down. That actually made it easier to drill out though. I'm still working on that hole.

There are factory access holes on the bottom of the rails for the 2 front nuts. If needed I think I could put new nuts up there via that hole. The rear bolts would need access holes drilled.

I did make a run up to HD for a new set of metal drill bits, so at least I got new tools out of this. Pics of all the above to follow after the day is done. Okay, back to work! Thanks again guys for the great ideas!
 
Okay, it's complete. Altogether not as horrible as I had thought. I've been putting this off for 5 years. I was able to re-thread 3 of the 4 holes. The front driver's side hole will require a new nut as I air-hammered the old out because an extractor broke off in the hole which I couldn't drill through. Here are some pics:
53_25_02_10_2_35_44_0.JPG

53_25_02_10_2_35_45_1.JPG

53_25_02_10_2_35_46_2.JPG

53_25_02_10_2_35_47_3.JPG

53_25_02_10_2_35_49_4.JPG

53_25_02_10_2_37_19_0.JPG

53_25_02_10_2_37_20_1.JPG
 
Last edited by a moderator:
Congrats!

It sure feels great to complete a job you've been putting off for a long time, doesn't it.

Now, I need to follow your lead and get motivated to drill holes in my new paint to mount my side mirrors.
 
"garner67" said:
Congrats!

It sure feels great to complete a job you've been putting off for a long time, doesn't it.

Now, I need to follow your lead and get motivated to drill holes in my new paint to mount my side mirrors.

Yes, I'm glad that is behind me. Thanks.

Maybe Stan will lend you a hand, he just drilled through his new paint too. Man, that would make me nervous!
 
"monkeystash" said:
Maybe Stan will lend you a hand, he just drilled through his new paint too. Man, that would make me nervous!
I'm glad I had completely assembled my car prior to paint, I had no holes to drill in fresh paint!

"sigtauenus" said:
...68s definitely have those holes from the factory and they might have started with 67.
must be a 68 thing, none of my 67's have/had holes in the frame.
 
Here is a picture of the factory access hole on my '65. It's on the bottom of the rail, and you can see the welded nut on the right. Same oval hole on both sides of the car.

53_25_02_10_6_47_35.JPG
 
Last edited by a moderator:
Ryan, whats the deal with the red / orange? Im assuming primer? Are you going with a concourse restoration with that beast of a motor your planning?
 
"lethal289" said:
Ryan, whats the deal with the red / orange? Im assuming primer? Are you going with a concourse restoration with that beast of a motor your planning?

It's red oxide primer, but looks orange from the camera flash. I like the look of the red oxide undercarriage, like the way it came from the factory, but I'm considering black bedliner too. No, I not going for a concours restoration, but I am going for stock appearing, with subtle upgrades under the skin.
 
Back
Top