• Hello there guest and Welcome to The #1 Classic Mustang forum!
    To gain full access you must Register. Registration is free and it takes only a few moments to complete.
    Already a member? Login here then!

Cool New Tool Thread

We share a very similar mindset. I prefer to do as much as I can myself. I always enjoy learning new skills, and like the idea that I "did it myself". On my Bronco build I will be tackling two new fronts.....1) rebuilding an automatic overdrive transmission and 2) taking on the paint process. I see it as a way to justify purchasing new tools.
 
My wife doesn't understand my need to have a project vehicle. She gives me grief over my current Cherokee project because I rarely drive it, I just like working on stuff.

It's what I enjoy. Wether it's a quick rebuild to resell, long term project or just a part out vehicle. I have to have something in the garage.


Sent from my motorola one 5G using Tapatalk
 
Getting prepared for my next project, so tools are starting to arrive. No the car on the lift is not the next one....

Transmission Jack.jpg
 
Too old and feeble to lift a transmission by hand, Ken? That is a pretty sweet jack

Too old to lower both a transmission and transfer case to the ground. I got the lift so I didn’t have to lay under cars and bench press transmissions into their place
 
I expected the old "transfer case" excuse. I'll admit I switched from C4's to T5's as I've gotten older to help manage those bench presses myself. So, is my jealously that obvious?
Funny thing is seeing your lift and jack reminded me I needed to find a solution to the old F1 truck transmission crossmember/mount dilemma. Woke up at three o'clock with a jolt having found the answer. Be cutting some plate and firing up the welder today.
 
While I didn't just buy this, I did buy this during 2021 and my son and I have been using it. Installed the new '69 seat risers. So far, lots of fun and learning. Going to fill some unneeded holes next.
p12011_9_2.jpg
 
While I didn't just buy this, I did buy this during 2021 and my son and I have been using it. Installed the new '69 seat risers. So far, lots of fun and learning. Going to fill some unneeded holes next.
p12011_9_2.jpg
I have the same unit and bought a 80 cu ft tank from Central Welding . Had it for 2 years and have yet to play with it . My son has used it several times for himself and his friends stuff.
 
Keeping things rolling. I bought a Chinese RivNut knock-off tool a while ago. I don't foresee me using this thing a ton (if ever) on a car build but have found some uses around the garage for which it is, frankly, just about the perfect solution. In the past, I would have used a traditional screw/nut to hold sheet metal parts together (think permanently affixing a shelf in a metal cabinet) sometimes struggling to reach into and around to hold and tighten things. Now, drill a hole, insert the nut and then its as simple as turning a screw to secure stuff. Sounds so simple...and it is but makes jobs like that so quick and its a more stable connection. Super easy to take apart and reinstall etc. Buy one. You'll find uses for it, I promise.

rivnut.jpg
 
Last edited:
I meant to add something pretty regularly to this thread but work has been absolutely crazy lately. Good news is I haven't stopped buying new stuff so I have quite a backlog of new stuff to share. Many of the things I've recently bought and used/tested/played with are not big dollar items but I have found some really task specific and/or game changing tools. That was kind of the point of this thread in my mind when I started it. Give us a place to share info on tools that maybe most had not seen or used.

Anyway, today's tools.

I've been doing a fair amount of metal fabrication lately and to do so required the need to measure, mark and align pieces and/or holes. So here are some of my favorite tools for such and a couple new finds that make such work easier and more accurate.

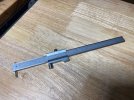
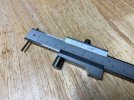
We've all been guilty of using a basic caliper to drag along an edge to make a parallel line on a piece. It works but not the best use of the caliper and it isn't always smooth and accurate. When I found this beauty it was a game changer. I give you the parallel caliper scribe.


calipermarkingtool.jpgcalipermarkingtool2.jpg

You can use the scale on the tool itself to set the location of the mark or do as I have and use another set of calipers to set the size and then transfer it to this scribe tool for exact placement. Having a roller act as the guide as opposed to dragging one edge of a caliper jaw along an edge is worlds better for smoothness and eliminates the jaw snagging or bouncing along.
 
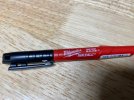
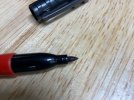
And last one for today. Not all things are created equal. This is the case with this next one. When doing metal work I use marking fluid and scribes quite a bit but there are times a marking pen is just as valuable. I had always used a sharp point Sharpie brand marker until I stumbled on these. I will NEVER go back. The tip on them is really sharp and durable but best of all is the ink. You can lay a line down through a puddle of cutting fluid and it acts as if it were not even there. Can't be beat for how it marks on oily or dirty metal.


inkzall.jpginkzall2.jpg
 
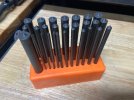
Here is a video that has an interesting use for the transfer punches above:
. Thanks for the links, I just bought all three of those items.
 
Last edited:
And last one for today. Not all things are created equal. This is the case with this next one. When doing metal work I use marking fluid and scribes quite a bit but there are times a marking pen is just as valuable. I had always used a sharp point Sharpie brand marker until I stumbled on these. I will NEVER go back. The tip on them is really sharp and durable but best of all is the ink. You can lay a line down through a puddle of cutting fluid and it acts as if it were not even there. Can't be beat for how it marks on oily or dirty metal.


View attachment 34185View attachment 34186
I found a set of these as well and they are amazing. I used them on the dirty floor pan when marking where the new risers would go. Excellent product.
 
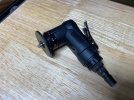
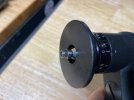
Here's a neat one. I stumbled across a similar tool about a year ago and was tempted but at the time prices were about $80 which seemed way too high for what it is so I waited it out a bit. Glad I did because a found this version I liked better. It's a pneumatic chamfering tool. Basically, a tiny little hand held router for finishing edges on stuff. It uses triangular tooling bits much like a lathe. The depth adjustment is fairly good in terms of movement and scaling so creating consistent pieces is easy.

So why did I want one? When boxing the truck frame there was lots of welding. LOTS. I used 7 gauge (3/16") steel plate. Cut to slip just into the "C" opening on the frame rails. I set it in about half it's thickness to give me a nice stepped edge to lay the weld bead into. Gave a good looking but more importantly, solid weld. Thing was I had to use multiple pieces down the length of the rails to reinforce areas I was boxing. This meant I had butt joints between the pieces. Standard practice is to bevel the two ends with a grinder or flap disc to give some area into which the weld can be made for better penetration, etc. This works fine but it is dirty (see grinding dust EVERYWHERE) and the depth and angle of the bevel is not perfectly consistent. Not a the end of the world but it does affect the quality and appearance of the welds. With this new tool one can easily bevel those edges perfectly and consistently time and time again. Plus, instead of grinding dust floating everywhere you get tiny little metal chips instead which are much more easy to corral and clean up. It's also great for producing nice beveled finish edges on anything you desire.


Here's a video of a similar tool


pneumaticchamferingtool.jpgpneumaticchamferingtool2.jpg
 
How does the bit hold up?


Mark
It's a three pointed insert so each one is essentially three bits, if you will. I haven't used it a ton but no signs of wear at all yet. You can buy replacement inserts in bulk very cheaply.
 
Back
Top