So I've spent the last couple months fighting RSV and then Covid shortly thereafter so wasn't really feeling like doing much in the garage. Still, to not do anything isn't going to help either so I focused on cleaning things up and trying to clear out and make room where I could. I've had the Model A offsite in a storage facility which doesn't sit well as I can't do any work on it and the rent is driving up the cost of the project. To correct that I decided I needed to bring it home to the garage. Problem being I have my mustang and the truck project in there already along with a new frame for the coupe. Plus a plethora of tool chests, benches, wheels and tires, engines and all kinds of metal working equipment. The place is PACKED. My solution aside from selling off some stuff and Tetris style organization of parts, etc. was to build a mobile body cart onto which I could place the frame and coupe body. This would allow me to move it around and against a wall or such when possible. Most importantly, it would get the coupe home and up at a height I could comfortably work on the lower sheet metal doing rust repair.
I had looked online and tried to source something existing to meet my needs or at least close that I could modify but everything I found was not up to par and pricey at that. So my own design it would be. So I ordered up a ton of steel tubing and went to work. The main cart is made of 2" x .125" wall square tubing. The telescoping legs are 1.75" x .125" wall tubing. I used 1/4" thick plate to make the caster decks.
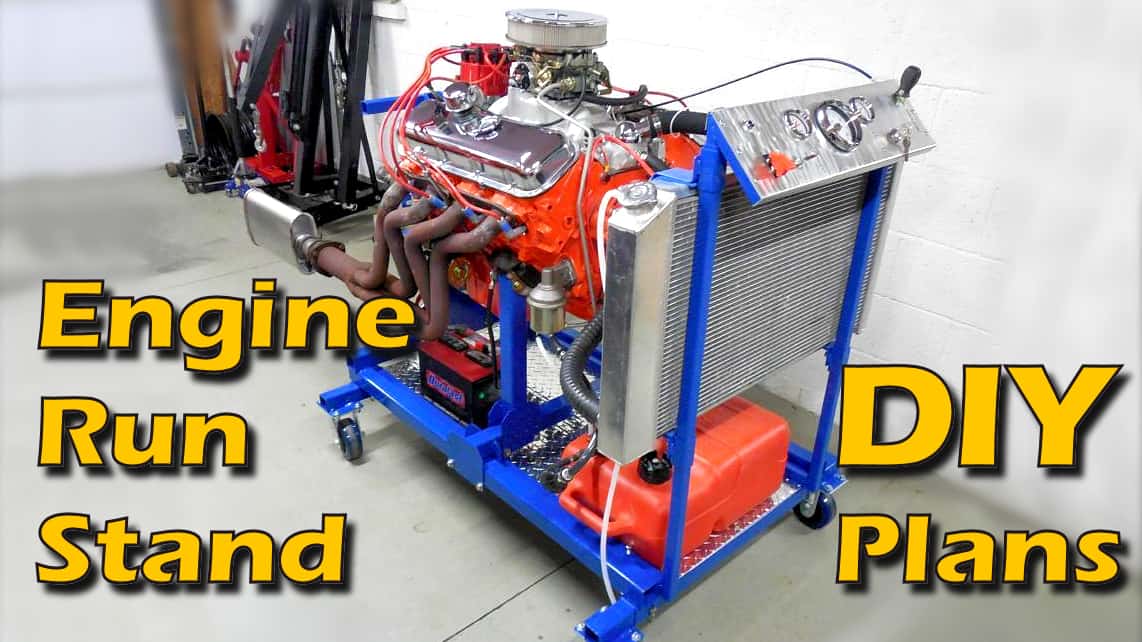
For now it will serve as a cart for the coupe as it gets built but later I plan to convert it to be an engine run stand. The design and dimensions keep all this in mind. Also, I wanted to incorporate some specific capabilities for the coupe build. Things like extensions off the back of the cart to support a rear end independently to allow fabrication of a custom link style suspension. More on this kind of stuff as it happens. For now just pics and details on the main cart build.
Since I do not yet have a large welding fixture table I had to find a way to build the frame square and true. Using the three point support method I knew I could do it on the garage floor provided I had the correct clamping fixtures. I bought some squares from a company called Fireball Tools. These made it possible to line things up and hold them perfectly for welding. Additionally, by using long lengths of the tubing as supports/guides, I was able to build the cart sides perfectly square. The Fireball Squares were again used to align things when time came to join the two sides and make the rectangular cart as a whole.
For the telescoping legs I wanted to maximize the height it could reach while still collapsing low enough that the coupe body would sit at the height I wanted while doing that work. So what that meant is when complete, the top surface would be at about 22". The legs can drop down at 2" increments to gain an additional 12" in height. Lastly, the threaded leg bolt can get you up to another couple inches if you need it. I guess longer bolts could yield even more. I used 1" diameter bolts so they are plenty stout.
last important point has to do with the adjustable leg pins. I didn't just want a pin that would slip through some holes and have the weight sitting on the pin body. That allows for failure due to sheer but also because of the necessary loose tolerance that lets the inner leg slide in and out a bit of "wobbliness" is kind of inherent in that design. To better that I used 5/8" diameter hardened shaft stock and turned one end down to 1/2" and bore into that end and added 5/16" x 18 threads. I also milled flats on the other end of the pin. These pins slide through the outer and inner legs via a 5/8" diameter hole on one side and out a 1/2" diameter hole on the other. I then can use a bolt and washer to tighten up and clamp the two legs together holding them fixed with the weigh on the pin but the force of the clamping relieving concern about any sheering occurring. Added a whole lot of work to the project but that's why I bought the table top lather and mill so I could pull this kind of thing off in the garage. Plus, its fun!
Anyway way too much typing and not enough pics. So...pics!!


I had looked online and tried to source something existing to meet my needs or at least close that I could modify but everything I found was not up to par and pricey at that. So my own design it would be. So I ordered up a ton of steel tubing and went to work. The main cart is made of 2" x .125" wall square tubing. The telescoping legs are 1.75" x .125" wall tubing. I used 1/4" thick plate to make the caster decks.
For now it will serve as a cart for the coupe as it gets built but later I plan to convert it to be an engine run stand. The design and dimensions keep all this in mind. Also, I wanted to incorporate some specific capabilities for the coupe build. Things like extensions off the back of the cart to support a rear end independently to allow fabrication of a custom link style suspension. More on this kind of stuff as it happens. For now just pics and details on the main cart build.
Since I do not yet have a large welding fixture table I had to find a way to build the frame square and true. Using the three point support method I knew I could do it on the garage floor provided I had the correct clamping fixtures. I bought some squares from a company called Fireball Tools. These made it possible to line things up and hold them perfectly for welding. Additionally, by using long lengths of the tubing as supports/guides, I was able to build the cart sides perfectly square. The Fireball Squares were again used to align things when time came to join the two sides and make the rectangular cart as a whole.
For the telescoping legs I wanted to maximize the height it could reach while still collapsing low enough that the coupe body would sit at the height I wanted while doing that work. So what that meant is when complete, the top surface would be at about 22". The legs can drop down at 2" increments to gain an additional 12" in height. Lastly, the threaded leg bolt can get you up to another couple inches if you need it. I guess longer bolts could yield even more. I used 1" diameter bolts so they are plenty stout.
last important point has to do with the adjustable leg pins. I didn't just want a pin that would slip through some holes and have the weight sitting on the pin body. That allows for failure due to sheer but also because of the necessary loose tolerance that lets the inner leg slide in and out a bit of "wobbliness" is kind of inherent in that design. To better that I used 5/8" diameter hardened shaft stock and turned one end down to 1/2" and bore into that end and added 5/16" x 18 threads. I also milled flats on the other end of the pin. These pins slide through the outer and inner legs via a 5/8" diameter hole on one side and out a 1/2" diameter hole on the other. I then can use a bolt and washer to tighten up and clamp the two legs together holding them fixed with the weigh on the pin but the force of the clamping relieving concern about any sheering occurring. Added a whole lot of work to the project but that's why I bought the table top lather and mill so I could pull this kind of thing off in the garage. Plus, its fun!
Anyway way too much typing and not enough pics. So...pics!!
Last edited: