Navigation
Install the app
How to install the app on iOS
Follow along with the video below to see how to install our site as a web app on your home screen.
Note: This feature may not be available in some browsers.
More options
-
Hello there guest and Welcome to The #1 Classic Mustang forum!
To gain full access you must Register. Registration is free and it takes only a few moments to complete.
Already a member? Login here then!
You are using an out of date browser. It may not display this or other websites correctly.
You should upgrade or use an alternative browser.
You should upgrade or use an alternative browser.
Quick questions on cowl removal
- Thread starter Kats66Pny
- Start date
AzPete
Well-Known Member
Put it in a drill.....then push.....see if that helps.
Dne'
Well-Known Member
IIRC, there's a screw on the end of the bit that adjusts the spring tension on the retractable guide tip. Righty tighty;left lucy Obviously, if you wear one side of the bit out or break a tooth, you can unscrew the blade and turn it around. I had to put mine in a vise and use vise grips to break it lose. Be careful not to drill through both panels, just the first panel. There will be a learning curve in using this unique bit. Also finding the center of the spot weld can be a little tendious, just when you think you drilled it correctly, it will be off just a tad making it difficult to separate the panels. To expose the welds, take your grinder and lightly go ever the area where you're working, and that will reveal the welds a tad better. Hope this helps.
Robs66Coupe
Member
I have that bit too. It works fine, but I wound up getting the blair type from amazon.com. I think its like this one here http://www.amazon.com/Industries-Cobalt ... 8-3.
The thing I like about the one from amazon is that there's really not much left after you're done, whereas with the one you have (which works fine, by the way), you're left with the middle part of the spot weld to grind down. Also, the one you have there is a lot cheaper from HF, and you can get just the saw part of it, I believe, so with a little patience, some cutting oil, and keeping the bit square, you can get a lot more for the $$. Preference thing, really.
Also, someone said cordless drill a few posts ago. I'd say corded, that way you have a reliable, consistent speed. In my experience, drilling of this nature really eats a battery quickly and you'll have to stop, switch batteries, and recharge more often. Just a thought. I'm going to remove my upper cowl on my '66 this week. Good luck.
Dne'
Well-Known Member
Rob has a great point here~ the lesser expensive bit leaves a round left over piece which needs to be ground down adding alot of time and frustration, it may not seem like much material to grind, but it is~! , whereas the blair type bit does not, kills two birds with one stone so to speak. You have a lot of holes to drill Kat~ Another thing I'd catch myself doing is drilling all the way through both panels, you don't want that to happen around your windshield.
"Robs66Coupe" said:I have that bit too. It works fine, but I wound up getting the blair type from amazon.com. I think its like this one here http://www.amazon.com/Industries-Cobalt ... 8-3.
The thing I like about the one from amazon is that there's really not much left after you're done, whereas with the one you have (which works fine, by the way), you're left with the middle part of the spot weld to grind down. Also, the one you have there is a lot cheaper from HF, and you can get just the saw part of it, I believe, so with a little patience, some cutting oil, and keeping the bit square, you can get a lot more for the $$. Preference thing, really.
Also, someone said cordless drill a few posts ago. I'd say corded, that way you have a reliable, consistent speed. In my experience, drilling of this nature really eats a battery quickly and you'll have to stop, switch batteries, and recharge more often. Just a thought. I'm going to remove my upper cowl on my '66 this week. Good luck.
"Robs66Coupe" said:Also, someone said cordless drill a few posts ago. I'd say corded, that way you have a reliable, consistent speed. In my experience, drilling of this nature really eats a battery quickly and you'll have to stop, switch batteries, and recharge more often. Just a thought. I'm going to remove my upper cowl on my '66 this week. Good luck.
Be careful with a corded drill ... most do not have a high / low setting so you ar forced to manually regulate the trigger. Since most corded drills max out about 2500-3000 rpm you can get into trouble real quick and shread one of those cutters Kat is using. I've used both, and with a good 14.4+ volt cordless drill running on low speed, you shouldn't be chewing through batteries all that quick. Run it too fast and you'll wear out the bit.
For a novice, a cordless drill would be a way better choice than a high speed corded drill.
tarafied1
Well-Known Member
if the bit binds with a corded drill it will rip right out of your hands too. be careful.
Robs66Coupe
Member
These guys do have good points about the drill. I guess I never thought of it, but I only pull the trigger about half way. I also put a bit of oil into an old laundry detergent cup and dip the bit in it before I start a new hole, I figure it helps to cut down the heat, which will kill the bits quicker as well.
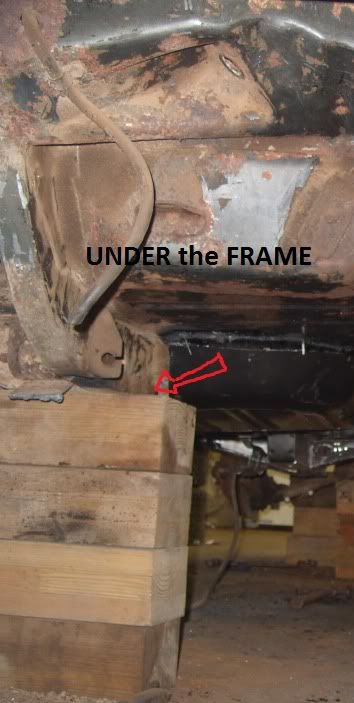
Another stupid question... Where do the jack stands go in the rear when the whole car will be on stands? I've found a few thing online that say put them on the frame rails & some say axle.. :shrug
...and I assume since Gert is already on stands in the front, in order to jack up the rear and not have her tip over, place the jack under a central part in the rear, like the pumpkin?
...and I assume since Gert is already on stands in the front, in order to jack up the rear and not have her tip over, place the jack under a central part in the rear, like the pumpkin?
AzPete
Well-Known Member
If you are going to remove the rear axle....put stands on the rear frame.
If you want the car solid while working on the cowl and front end..... put the stands on the rear frame.
Watch the front jack stands as you lift the rear. You can jack under the rear axle/pumpkin just fine but make sure the jack rolls a bit and the stands do not tip at the front rails.
If you want the car solid while working on the cowl and front end..... put the stands on the rear frame.
Watch the front jack stands as you lift the rear. You can jack under the rear axle/pumpkin just fine but make sure the jack rolls a bit and the stands do not tip at the front rails.
I would clean the part you are removing around the edges you can usually feel/see a spot weld better, I like to mark them all with a paint marker, on the ones that are flat/easy to get to i scribed with a center punch and hammer, the more difficult ones i used a 1/8'' drill bit, be careful of uneven surfaces the bit will walk all over the place take your time, you will get a feel for it after doing it a couple times, on my car a rust cloud would puff up when i was through the first piece as for the jack placement i agree with pete. under the frame rail/torque box in front of the leaf springs"Kats66Pny" said:Am I suppose to drill a little hole for the tip to fit in? If I do that... well that makes no sense because I was told not to go through all the metal, only one layer.
Last edited by a moderator:
"S8NS 289" said:
WOOD blocks looks scary :wth
Last edited by a moderator:
I got Gert on 4 jacks, all set to same height and her front is slightly higher than her rear. My garage floor is level btw. Is it suppose to be level or level like the way it rides normally?
The rear tires are still on the ground. :confu And I can't lift the front any higher because my jack doesn't go any higher. lol
The rear tires are still on the ground. :confu And I can't lift the front any higher because my jack doesn't go any higher. lol
Attachments
AzPete
Well-Known Member
"Kats66Pny" said:I got Gert on 4 jacks, all set to same height and her front is slightly higher than her rear. My garage floor is level btw. Is it suppose to be level or level like the way it rides normally?
The rear tires are still on the ground. :confu And I can't lift the front any higher because my jack doesn't go any higher. lol
One would normally set the car level I believe. The level of the ride would be based on the entire suspension. I am not sure if the frame rails would be level.....been a while since I had one that far down.
Also, what does not being able to lift the front have to do with getting the rear up higher...... You should have the rear tires off the ground....or remove them from the car to ensure you have all the weight on the stands.

AzPete
Well-Known Member
Looks perfect...... I would consider 4 more stands.....at the front and rear ends of the frame rails.....that way it cannot bend in the middle when you disassemble things.