This is how I upgraded my 65 to a 3G Alternator and still retain full normal use of my dummy lights. In fact I know it works because the Alt light came on when I fried it at start up because the connection was not tightened.
Get a lifetime 3G the first time and it will be the last time you pay for one.
The following is compilation of info I have found out on the internet as well as products I have applied that work perfectly.
I also have the dummy lights working by adding a dummy regulator kit from PA Performance
Lets get started.The reason for the 3G
'66-'85, 60 amp, = 15 amps at idle, peaks at 66 amps.
'85-'93, 75 amp, = 24 amps at idle, peaks at 81 amps.
95 amp alternator= 64 amps at idle, peaks at 122 amps.
The added electronics or piece of mind need the better charging Alt
The first pictures will be from other sources. Later I will post actual real pictures from my car showing visual application.
The 3G I bought was new from Autozone for a 1994-1995 Mustang. Just make sure it is the same mount as your old one and take the old one in with you to help match it. The mount hole spread should be the same, 7 inches if I remember right.
Parts needed:
3G Alt 1994-1995 Mustang (Lifetime) This has a serpentine pulley, you may need the v Pulley wheel. Use an impact wrench to remove and replace while holding wheel with gloved hand.

This one is 89.00 on Ebay
The Zone will have it for around 180.00 Lifetime (best route, I used 3 on one van I had for 4 years)
The Pa Regulator to keep the dummy lights working,26.00
3G Upgrade Kit (Retains Stock Wiring) #462802C (462802C)

This kit is made specifically for the installation of a Ford 3G alternator on any vehicle where the stock alternator was EXTERNALLY regulated
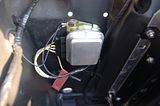
We incorporate a new replacement external regulator box (as shown) to capture the proper circuit and retain the stock wiring harness along with our own 3-wire (3G Series) regulator plug. This kit allows the customer to retain the OEM warning lights and shunt type ammeter **
Installation only requires the customer replace the stock external regulator with the one provided, install the alternator and our 3-wire plug, then make one crimp connection from the original wires at the alternator. All alternator upgrades require a large (#6 or #4 gauge) wire be run from the output of the alternator to the vehicle harness
** direct reading ammeter should not be used or should be bridged due to the significant increase in measured amperage with upgrade alternator
A 4 Gauge power link with fuse. This is from PA and HIGH Quality @ 45.00... I priced and could not make one for less, besides the quality was worth it and it comes with the black cord wrap

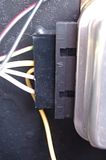
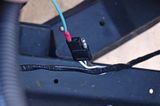
This Diagram was very helpful NOTE: The Green and red wire from the alternator will go to the white wire from the "F" terminal from the old regulator. This white wire dead ends to a female plug under the battery area (the extension plug bundle that used to go from here to the old alternator , will NOT be used. A bullet male plug will plug into the female hole at this location (the hole that is the wire that goes to the "F" terminal on the reg} and go to the new red and green wire for the new alternator. A 3g plug harness WILL come with that conversion regulator from PA to complete this wiring.

I will post actual pictures later today. Was this a good start?...punn
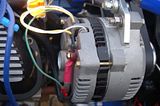
1995 Mustang 3G Alternator installed before wiring.
Click on thumb for larger photo.

Get a lifetime 3G the first time and it will be the last time you pay for one.
The following is compilation of info I have found out on the internet as well as products I have applied that work perfectly.
I also have the dummy lights working by adding a dummy regulator kit from PA Performance
Lets get started.The reason for the 3G
'66-'85, 60 amp, = 15 amps at idle, peaks at 66 amps.
'85-'93, 75 amp, = 24 amps at idle, peaks at 81 amps.
95 amp alternator= 64 amps at idle, peaks at 122 amps.
The added electronics or piece of mind need the better charging Alt
The first pictures will be from other sources. Later I will post actual real pictures from my car showing visual application.
The 3G I bought was new from Autozone for a 1994-1995 Mustang. Just make sure it is the same mount as your old one and take the old one in with you to help match it. The mount hole spread should be the same, 7 inches if I remember right.
Parts needed:
3G Alt 1994-1995 Mustang (Lifetime) This has a serpentine pulley, you may need the v Pulley wheel. Use an impact wrench to remove and replace while holding wheel with gloved hand.
This one is 89.00 on Ebay
The Zone will have it for around 180.00 Lifetime (best route, I used 3 on one van I had for 4 years)
The Pa Regulator to keep the dummy lights working,26.00
3G Upgrade Kit (Retains Stock Wiring) #462802C (462802C)
This kit is made specifically for the installation of a Ford 3G alternator on any vehicle where the stock alternator was EXTERNALLY regulated
We incorporate a new replacement external regulator box (as shown) to capture the proper circuit and retain the stock wiring harness along with our own 3-wire (3G Series) regulator plug. This kit allows the customer to retain the OEM warning lights and shunt type ammeter **
Installation only requires the customer replace the stock external regulator with the one provided, install the alternator and our 3-wire plug, then make one crimp connection from the original wires at the alternator. All alternator upgrades require a large (#6 or #4 gauge) wire be run from the output of the alternator to the vehicle harness
** direct reading ammeter should not be used or should be bridged due to the significant increase in measured amperage with upgrade alternator
A 4 Gauge power link with fuse. This is from PA and HIGH Quality @ 45.00... I priced and could not make one for less, besides the quality was worth it and it comes with the black cord wrap
This Diagram was very helpful NOTE: The Green and red wire from the alternator will go to the white wire from the "F" terminal from the old regulator. This white wire dead ends to a female plug under the battery area (the extension plug bundle that used to go from here to the old alternator , will NOT be used. A bullet male plug will plug into the female hole at this location (the hole that is the wire that goes to the "F" terminal on the reg} and go to the new red and green wire for the new alternator. A 3g plug harness WILL come with that conversion regulator from PA to complete this wiring.
I will post actual pictures later today. Was this a good start?...punn
1995 Mustang 3G Alternator installed before wiring.
Click on thumb for larger photo.


Last edited by a moderator: