• Hello there guest and Welcome to The #1 Classic Mustang forum!
    To gain full access you must Register. Registration is free and it takes only a few moments to complete.
    Already a member? Login here then!

69 Sportsroof "Mystique"

JRANGER

Active Member
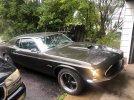
Yup, time to squirrel again, not really...Now the HRPT 2023 is all done im back to work on the 69 Mustang I've had for a couple years.
Originally was a 302/C4 car and i bought as the 3rd Owner a couple years ago. Unfortunately it had tons of hidden patch work from a 90s type resto.

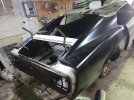
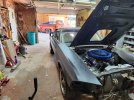
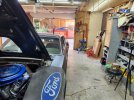
I have a mild built 351W with 89 AOD in it, and running as of July 4th. I have to shorten my Drive Shaft and DO a TON OF SHEET METAL.

120100360_10164013014210521_1577463123388129338_n.jpg
174583383_10164845134645521_8757753951471815091_n.jpg

241421946_10165341970725521_2897409425332622930_n.jpg

275271648_10165865639445521_5415206919796615211_n.jpg
Already Done::
Floor Patches
New B Pilalrs
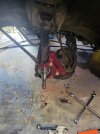
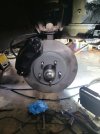
Big Front Break Upgrade
New Brake Lines
Willdwood Master
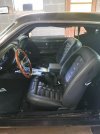
Custom Center Console
New Carpet
New Seat Upholstery
Paint Interior Black
New Steering Wheel
Custom Min Tach Pod
Fuse Panel Fix/Mini ATX Adapter
New Gauge Cluster Circuit Board
New Cluster Surround
New Hood
New Shaker Setup
70 Style Twist Locks
New Trunk Drop Downs
Torque Box Patches
Front Frame Rail Patch
Battery Tray Area Patch

TO DO:
Front Rocker Patch
Outside Cowl Patches
Weld on Rear Wheel Well Patches
Weld New Quarters on
Weld on rear filler plate
Weld on Everything in the rear
Fit/Fill New Doors
Fit New Fenders
Put it all back together
Paint
More Welding
Probably a ton more lol


Anyway, Here is my latest youtube video on putting the engine accessories on and firing it up:

There are quiet a few metal work videos from 2022 before i started fully on the torino:
 
Nice! Always awesome to see another build thread, with videos too!

What'd you end up going with for the big brake kit?
 
Nice! Always awesome to see another build thread, with videos too!

What'd you end up going with for the big brake kit?
Its a kit from MGChevyparts on Ebay that uses 2001 GT Brakes. So 12.5" Disc/Caliper Setup.191927497_10165008373475521_8022794553896489545_n (1).jpg193220401_10165008373660521_4765024508495454395_n (1).jpg
 
Last edited:
Looks similar to the MustangSteve kit I had on my coupe. Mounts the 13" 94-04 Cobra brakes.
 
You bought parts from an entity with Chevy in the name?! Are you sick? :p
I used the same kit on the 65 Mustang, it was a nicely designed part and when i first bought it didn't realize it was a chevy dealer. Plus it was way cheaper then other kits that i didnt like...But yes, im probably sick lol
 
Been a busy couple days and i need to start taking more pics

Been doing a lot of wiring
added a thermostatic switch
Reinstalled the shifter
Loomed/Cleaned up a lot of wiring
Bought and test fit a fiberglass big block shaker base
Installed a Low Rise Throttle/TV Bracket
adjusted the drivers side quart
cut an 1" off the drive shat yoke
Welded the driver side wheel well patches fully (Other then some inside welding)
and reinstalled the drive shaft
 
Lots a of good progress there. I wish I was close to the point where I could move my car under its own power.

Not alot of clearance between the shifter and that radio screen! Does the screen go back any more? I'd be worried about punching it when shifting into park lol.
 
Lots a of good progress there. I wish I was close to the point where I could move my car under its own power.

Not alot of clearance between the shifter and that radio screen! Does the screen go back any more? I'd be worried about punching it when shifting into park lol.
it doesnt go back any further but it fights just right. You cant push it forward enough to hit the screen
 
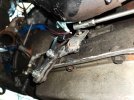
I spent all day getting my stock shifter linkage to work. Its not perfect and i may take the shifter back out because it has some slop in it...

THe problem was, the shifter lever on the AOD points down and for the Bar to work, its needs to point up....but damnit, this thing doesnt leak or anything and i dont want to remove the pan.

So i made a Z bar of sorts, With a oversized hole in the middle to go over the TV Cable spot and not cause interference.

At this point it will shift properly to all gears but the 1.

So i Have P R N O D

Its very tight as it sits so im not sure i can adjust it to get there or maybe if i fix the slop it will.

oh and yeah its ugly as can be
357738622_10167547277710521_5756833402327628411_n.jpg
 
I'm watching this one. Awesome car.

I had to do something similar with my 70 when I put in the AOD. I did drop the pan though and flip the lever. It's never really lined up right.

For the yoke, I switched to a t5 yoke and it fit perfectly.

Sent from my motorola one 5G using Tapatalk
 
While a valiant effort, it sure looks like it would have been easier to simply drop the pan and flip the arm as required to permit a straight forward linkage operation. I've learned through my own similar "re-engineering" efforts that it is better to do it "right" the first time. It avoids issues down the road. It also helps keep a guy from unnecessarily cutting corners, perhaps risking safety.
 
While a valiant effort, it sure looks like it would have been easier to simply drop the pan and flip the arm as required to permit a straight forward linkage operation. I've learned through my own similar "re-engineering" efforts that it is better to do it "right" the first time. It avoids issues down the road. It also helps keep a guy from unnecessarily cutting corners, perhaps risking safety.
Yeah, the only reason i didnt is because this is the 1st trans ive had that doesnt leak everywhere and the gasket looks to be PERMATEX lol...Thats also why i made it removable...
 
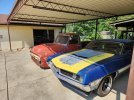
Well I spent all day cleaning the garage and getting things moved aorund to go pick up the 66 and put it in the garage so that meant Kicking the 71 Torino out and putting it under the carport with the 53 F250. The other side of the garage is a little more spacious so i decided to put 4 more quarts of Dextron V in the AOD and see if she would move.....Surprisingly, I shifted into gear and nothing...No jolt forward...Kinda freaked me out being so used to that but then i hit the gas and off i went. Drove to the front of the house and parked for a little video and then moved it over to the restoration bay :)


20230723_152154.jpg20230723_152216.jpg20230723_152222.jpg
 
i noticed the rear is a half inch lower on the drivers side rear.....

Now the suspension is brand new and doesnt have any miles on it....and i didnt tighten it down till after all the weight was back on the car....But i decided to measure and it does appear the frame rail from the ground up is 1/2" lower........which has the whole rear end lower on one side...

So that being said.....Is this common..The rail doesnt seem to be bent....It was totally rusted out other then the rails themselves so most of the rear is new metal but im not going to compensate the rear metal to try to fix this because it wont line up with the rest of the body...

Only thing i can think of is get a 1/2" longer shackle on that side to compensate........Granted i suppose i can let it settle once i start driving to see if they level out at all but the fact the rail is lower on one side then the other is concerning me.....

Thoughts?
 
Suspensions settle when driven. Having the car parked on unlevel ground can affect stance as well. You should be able to take some measurements of the rail dimensions relative to other locations on the floor sheet metal, etc. to establish if something is "wonky". These cars are old. They were never close to perfect when originally assembled. Fairly common to have to correct stuff when rebuilding. And it is REBUILDING. You shouldn't expect to just bolt parts on and expect things to be perfect. Or even right, honestly. My approach is to get stuff as close to a clean slate as possible and start fresh from there.

Back to your situation, I would also take some measurements of the arch of both springs. Not unheard of to have one with a softer arch than the other when first installed.
 
Back
Top