I was just messing around. I appreciate the feedback. I could very easily make a simple mechanical adjustment which would allow the seat base to elevate at the front a bit. Could be as simple as a spacer of varying height or maybe use a large threaded rod which could be turned in or out to raise or lower the front mounting point. Honestly though, the seat is very comfortable as it sits now. I built the base to be 2" taller at the front. Came to this measurement by, well, measuring the seat positions in the three cars we have that I drive. If I could have laid the seat back a few more degrees it would have been perfect. That's why I want to move it forward more to allow the back to recline just a tad more. I'll do that and call it done for now. This wasn't supposed to be about the seat now anyway. I just needed it in there to check the position of all the other stuff. I am so easily distracted. No wonder it takes me forever to get stuff done!
Navigation
Install the app
How to install the app on iOS
Follow along with the video below to see how to install our site as a web app on your home screen.
Note: This feature may not be available in some browsers.
More options
-
Hello there guest and Welcome to The #1 Classic Mustang forum!
To gain full access you must Register. Registration is free and it takes only a few moments to complete.
Already a member? Login here then!
You are using an out of date browser. It may not display this or other websites correctly.
You should upgrade or use an alternative browser.
You should upgrade or use an alternative browser.
1952 F1: The Garage Roommate
- Thread starter Horseplay
- Start date
JRANGER
Active Member
Haven't visted this is awhile and dang man. You went all in, looks good
Hopefully soon I will get some updates posted on this one. I'm really bad about remembering to take pics as I go. Plus a lot of what takes up my available work time on it is doing stuff that is not that exciting or even interesting. Getting closer to the point stuff starts to get bolted on for good which will make for much better pics.
“Plus, most of my time is spent buying new stuff, selling old stuff, changing the plans, remaking parts and keeping it all hidden from SWMBO”
Mark
Mark
That pretty much sums it up“Plus, most of my time is spent buying new stuff, selling old stuff, changing the plans, remaking parts and keeping it all hidden from SWMBO”
Mark
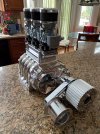
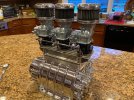
Been a busy month. Not much time for garage work. I have managed to keep buying stuff though! Finally got in the bits needed to mock up enough of the completed engine to get some accurate measurements for blower position relative to the crankshaft end. This allowed me to get the balance of parts ordered for the blower drive set-up. This was a years long journey to reach this point. So in celebration I give you some Christmas eye-candy


One other look from yesterday. The blower snout and stuff came this morning but yesterday I decided to go ahead and do some work to the new 97s. Swapped out the stock, plain brass fittings and some hardware for chrome and polished SS. This was also to facilitate the use of a larger 5/16" hard SS line for fuel feed. I installed detent pins in the fore and aft carbs as well to lock the butterflies wide open so they wouldn't get sucked closed when I step on it and the blower winds up. Also assembled the carb linkage. Fuel lines are up next


B67FSTB
The NorCal dude from Belgium
NICE !! [emoji41]
Verstuurd vanaf mijn SM-A605FN met Tapatalk
Verstuurd vanaf mijn SM-A605FN met Tapatalk
kb3
Well-Known Member
Good thing you don't live closer to  he would have a fit seeing your engine parts all over his cookie making counter!
Nice looking set up, I would be afraid to put fuel to it, way to pretty to use.
 he would have a fit seeing your engine parts all over his cookie making counter!
Nice looking set up, I would be afraid to put fuel to it, way to pretty to use.
Grabber70Mach
Well-Known Member
Nice eye candy.
Aussie67
Well-Known Member
Tuning those carbs will be interesting.
Tuning can always be an issue but I'm doing all I can to make it easier starting with using brand new, genuine Stromberg carbs not the cheap Chinese imitations. I have the specialty tool used to "sync" the carbs as well. I'll also have an AFR gauge hooked up to help get the mix right. I'm a lot more confident with these simple carbs than some of the other stuff I've had to tinker with over the years. We will see...but not until spring now.Tuning those carbs will be interesting.
Aussie67
Well-Known Member
Agree Strombergs are a good choice. Triple SU's always gave me grief. Good when on song but hard to keep em there.
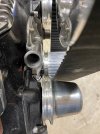
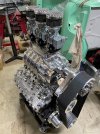
Put the new mini-lathe to work today. Had to trim off some meat on the rear of the crank hub to allow the v-belt pulleys to align better. Removed about .100" let the crank pulley sit back a bit. Still need to dig out my laser tool to verify the exact alignment but I think I got it. If I need anymore I'll need to fab up some spacers to shift the water pump pulleys forward. I want it as close to perfect as I can get. Don't need belts flying off!
Oh, yeah. I scored an original Ford aluminum timing cover that had been polished sometime in the last 70 years or so. So I swapped out the cast piece for the new shiny bit. Installed the pumps and thermostats/housings too.

Oh, yeah. I scored an original Ford aluminum timing cover that had been polished sometime in the last 70 years or so. So I swapped out the cast piece for the new shiny bit. Installed the pumps and thermostats/housings too.

kb3
Well-Known Member
Wow, that thing will turn heads at the Cars and Coffee meets!
B67FSTB
The NorCal dude from Belgium
Quite a tower [emoji857][emoji857].
I always questioned the combination of carbs above a compressor and how well the gas of fuel and air is , after passing a compressor. ???
Not to brake down your built , its very nostalgic.
Verstuurd vanaf mijn SM-A605FN met Tapatalk
I always questioned the combination of carbs above a compressor and how well the gas of fuel and air is , after passing a compressor. ???
Not to brake down your built , its very nostalgic.
Verstuurd vanaf mijn SM-A605FN met Tapatalk
Yes, the build is all about nostalgia but I'm making it as efficient as possible with today's tech. For example (and to your point), the rotors in the blower are of the most advanced non-helix design to maximize air volume while also lowering the heat generation of conventional units. Goal being to maintain some of the fuel density benefits of compression while limiting the losses as temperatures rise. The power gains recorded in such systems clearly show it works. Numbers compared to blower builds of similar scope just years ago are significant. Would port injection be better? Sure. Would it look anywhere as good? Hell, no! 
Will you have to hang your head out the window like a dog while you’re driving to see past that monstrosity of an engine?
Mark
Mark

