• Hello there guest and Welcome to The #1 Classic Mustang forum!
    To gain full access you must Register. Registration is free and it takes only a few moments to complete.
    Already a member? Login here then!

1952 F1: The Garage Roommate

Select from the following six options, derived from two basic designs w/ colors and options.

  • A

    Votes: 1 7.7%
  • B

    Votes: 7 53.8%
  • C

    Votes: 2 15.4%
  • D

    Votes: 0 0.0%
  • E

    Votes: 3 23.1%
  • F

    Votes: 0 0.0%

  • Total voters
    13
  • Poll closed .
Things sure are quiet around here...I mean the Fix in general. I've got a lot going on that's keeping me busy and away from the garage more than I'd like. Making good progress just not documenting a lot of it. Sorry. Things go together and come apart a lot on a build like this so I'll try and show more of the stuff I've been working on when it gets put back in place again.
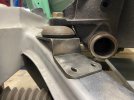
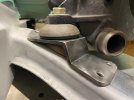
Still battling to get things situated the way I want. Main challenge remains stuffing that mountain of an engine under the stock hood. Anyway, here's a few pics of some custom engine mounts I made up. A good amount of effort to get just right for only gaining just over an inch of clearance. I like 'em. 3/16" cold rolled steel with a double gusset structure on the underside on either side of the bushing bore. She's a heavy motha, ya know!
IMG_1274.jpgIMG_1268.jpgIMG_1269.jpg

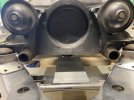
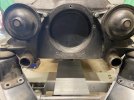
The next couple pics show the "engine" in place with the new mounts compared to the original. You can see how much lower it drops. Notice how tight things get around the lower water pump inlets. There's just over 3/8" gap which is just enough for hose clearance and a little bit of "torque wobble".
IMG_1270.jpgIMG_1273.jpg
 
Very nice work. A lot of work for sure for a small gain, but isn’t that hotrodding…


Sent from my iPhone using Tapatalk
 
Nice !! Alot of work for an inch or 2 ?
An engine is mounted under a curtain angel ( tilted backwards a bit ) . Keep that in mind..as you probably know.
Good job !
 
Nice !! Alot of work for an inch or 2 ?
An engine is mounted under a curtain angel ( tilted backwards a bit ) . Keep that in mind..as you probably know.
Good job !
I'm targeting about a 2-2.5" angle which would be a bit more than stock. I've made the new trans mount with that in mind as well. I think maybe I'll feature it next here. It is not just some fabbed up bar shooting straight across from one rail to the other, unfortunately. Situation and layout demands made the creation of that one fun.
 
Things sure are quiet around here...I mean the Fix in general. I've got a lot going on that's keeping me busy and away from the garage more than I'd like. Making good progress just not documenting a lot of it. Sorry. Things go together and come apart a lot on a build like this so I'll try and show more of the stuff I've been working on when it gets put back in place again.
Still battling to get things situated the way I want. Main challenge remains stuffing that mountain of an engine under the stock hood. Anyway, here's a few pics of some custom engine mounts I made up. A good amount of effort to get just right for only gaining just over an inch of clearance. I like 'em. 3/16" cold rolled steel with a double gusset structure on the underside on either side of the bushing bore. She's a heavy motha, ya know!
View attachment 34466View attachment 34467View attachment 34468

The next couple pics show the "engine" in place with the new mounts compared to the original. You can see how much lower it drops. Notice how tight things get around the lower water pump inlets. There's just over 3/8" gap which is just enough for hose clearance and a little bit of "torque wobble".
View attachment 34469View attachment 34470
I like what you did.
That area is very tight and a PITA to get the factory lower hoses on.... I just did this job last week installing my new flathead.
And that water pump design, with the one bolt inside the hose connection. :mad:
 

Attachments

  • IMG_11.jpg
    IMG_11.jpg
    143.6 KB · Views: 21
Any update?
Life... more accurately, work, has gotten in the way. Been on the road for work at a crazy rate the last couple months. This weekend will be the first in a long time I should be able to sneak in some garage time. Only good news in this is that when I get stuck in hotels all week I tend to spend my nights scouring the Web for more parts. I've bought a lot of parts! lol

My custom Dakota Digital gauges finally arrived. They had quoted me six months (heavy back-log of orders) but came in under at just over 5 months. That was the last main item on the electrical/electronic parts list. Still searching for the perfect door lock switches but have pretty much everything needed to wire up the truck now.

Latest focus has been on the interior. The dash in particular. I cut out a perfectly completed stock piece and roughly grafted in the face of a '49 Ford Coupe. Well, the face after having major reconstructive surgery so that it fit within the necessary confines of the smaller truck cab. That whole project has taken on a life of its own. I got this vision in my head of how things should look as well. That has snowballed naturally. Loyal Fixers should recall I collected/bought/built all kinds of metal working equipment. That stuff has been seeing lots of use. I have been mangling my share of 18 ga as I learned how to shape, form, bend and otherwise coax the stuff into the bits in my head. One of the most challenging yet rewarding things I have ever done in a car build is to create a panel in metal exactly as needed and then to be able to make the same piece again in a mirror image for the other side. Sounds so simple but OMG can it be a struggle.

I need to get the dash and door work (replacing stock weenie door latches with bear claw style) done asap. Part of the dash work is/was welding in new bracing and bracketry to mount things like the AC/Heat air box and electrical controls. Much of that gets burned into the inner firewall which tends to do nasty things to the finish on the other side! Need that wrapped up so I can put a finish paint coat on the firewall before I can drop in the engine. I WANT TO DROP IN THE ENGINE!!!

I'll cut it off here for now. I know I need to get some pics posted to go along with all this rambling. I didn't take a ton the last few weeks as I tend to get more focused on the actual work and forget. I do have some and will try and remember to take more as things progress. Expect a long post very soon on the dash work.
 
Always good to get the parts together before attacking it.

Looking forward to seeing this one finished. Should be good
 
I tried to contact Terry by pm but I didn't get any answer from him. Hope he is all well .

Verstuurd vanaf mijn SM-A605FN met Tapatalk
 
Last edited:
Back
Top