• Hello there guest and Welcome to The #1 Classic Mustang forum!
    To gain full access you must Register. Registration is free and it takes only a few moments to complete.
    Already a member? Login here then!

Lincoln Aviator 4.6 swap into 99GT

Ready to start parting that thing out yet? I need a passenger side tail light. My mother backed her aviator into my fathers explorer....
oh no! Is her tail light totally busted? Our plan is to get it running and my son drive it for the winter, then in the spring we will strip it. However, we might make a deal including a "core" so my son can still drive this one. he's not too worried about how it looks as long as it's legal
 
After three months of wild weather and another semester kick starting, there is some progress made.

I have gotten the opposite head off of the Aviator and it looks okay, I am going to have it looked over when I take the block in. It, as we saw, has visible cross hatches but I am going to have it honed and dunked before I put it back together. I purchased a set of forged rods and pistons as well as a forged crankshaft, so the motor should be prepped for anything down the road. I also have a Mach intake and shaker assembly plus hood to put on, and all kinds of other junk. Here are some pics of the progress

HhOsG1F.jpg
THE FOLLOWING PICTURE IS THE OLD STUFF
IbJICik.jpg
THE FOLLOWING TWO PICTURES ARE THE FORGED GOODIES
lC3eKgu.jpg
DRttj9l.jpg
This is just one of my rods but I have all eight and all eight pistons.

I have also, since removing the aviator from my garage, have started work on the Mustang. I pulled it into the garage around 5 and had the exhaust and intake off before I quit for the night. I plan on having it ready to come out of the top by the end of Sunday, fingers crossed!

0pbZ7MC.jpg

As soon as I do something else exciting, I will let you all know. keep your fingers crossed.
 
I assume you have to change the computer for the engine swap? Keep posting your progress.
I don't want to steel his thunder but he may not post again for a while. The engines both share all the same sensors so the computer itself can be used. It will need a "tune" since the cams are different, throttle body is bigger, etc. but the computer can be taught (so to speak) to deal with those changes.
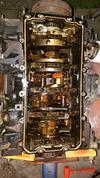
He did get the engine out tonight. He went to go eat but he wants to get the pan off to confirm our theory that it broke a piston skirt
IMG_7485.jpg
 
I assume you have to change the computer for the engine swap? Keep posting your progress.

To continue what my dad said, the onboard security in the car unfortunately requires that I use my original computer. According to some other forum posts I read, the PATS system requires a matching cluster, key, and computer in order to inject fuel and fire the engine, so the GT computer stays. I will have to modify the harness but it will otherwise have no extraordinary issues running the 4cam engine. All the sensors are the same!

SO!

We had previously thought that my original engine had broken a piston skirt or two. After getting the engine to my friends house, who is rebuilding it for his car, we decided to tear into it a little. First, we pulled the oil pan. Everything looked mint, no metal shavings, no plastic broken stuff, nothing. Weird! So we flipped the motor back up and popped a valve cover off. It looked fantastic too, but there was a tiny bit of slop on the passenger side timing chain. Nothing to be worried about though, it definitely wasn't the problem.

We turned the motor back upside-down and started shaking the connecting rods. No slop. So we took the rod caps off of the two pistons that I suspected my noise was coming from. Bam! There it was, I had spun a rod bearing. I suppose I am fortunate that it hasn't seized up and come apart yet!

I decided to mock up all of my parts so far and have a few pictures. The cylinder head that needs to find its way to a machine shop leaks water so it definitely needs to be looked at, but this thing looks pretty great all mocked up. Once that head comes back, the motor will be 100% present and ready to be bolted together. 104 days until the twenty five hundred (2,500!) mile road trip!

H8IhxoL.jpg

11Jevu8.jpg

PWA8Zmi.jpg

fYJFM4L.jpg

5ladnBI.jpg

nLL0o5u.jpg

JLpEFof.jpg
 
In the picture of the engine bay, you can see that I managed to leave a sealed AC compressor and power steering pump behind when I yanked the 2v out. Those should bolt right back onto my 4v block no problem, and will save me some money having to recharge the AC and redo the power steering unit. I am looking at getting an aftermarket steering rack though, we will have to see!
 
Thanks for the source, I will definitely be sending him an email if I can't get an answer @Grabber70Mach

The head was delivered to my machine shop yesterday and the guys there think that it could be just a bunch of carbon build up on the heads causing the leakage. Probably going to give it a thorough clean and new seals and it'll be back home.

I have almost everything now that I should need, and after checking the tolerances on the crank, I believe we will be ready to put it back together. Fingers crossed that it's smooth sailing from here!

Sent from my SAMSUNG-SM-G935A using Tapatalk
 
While waiting for the head to come back, I have been working on some other things.

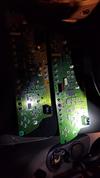
I started with my gauge cluster swap. The 4v 4.6 can spin up to 7000rpm within factory specs and the 2v that was originally in the car maxed at a little under 6k, so my redline would have been incorrect following the install and retune of the computer. To remedy this, I acquired a 2004 Mach 1 gauge cluster and followed a guide I read online to swap the circuit board over. It looks pretty cool, has vintage font to the numbers and a silver backing. Took about 25 minutes to install!

ORIGINAL (not mine, forgot to take a picture)

1999_00002_10.jpg

NEW

o14ZYNj.jpg

fmj0rtS.jpg

uwtdlBP.jpg

eGwFOu5.jpg

I just popped the GT board onto the back of the Mach cluster and bolted it back together and back into the car, simple as three dimensional calculus.

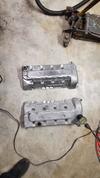
I also started some wirebrushing on my valve covers. They were pretty gross looking, but they clean up okay. I would rather have new ones but I'm a broke college student ;)

fBILsjN.jpg

oCKeGGF.jpg

XawvMPz.jpg

Once these are all tidied up, I am going to wrinkle coat them in black and then paint that Ford Blue. Fingers crossed that it doesn't look bad! The timing cover and the intake will also be getting some TLC and paint, everything you can see under the hood will be painted. Any tips for painting engines?
 
Tips on painting engines? Get everything clean. And once you have it all clean...clean it some more. Your plans for painting those covers sounds good. I suggest finding something to practice the technique on. It may be better to apply the top color when the wrinkle is still fresh or it may not. I would experiment a bit before doing it on the actual parts. Hate to have to go back and strip and try a second time, ya know?
 
Tips on painting engines? Get everything clean. And once you have it all clean...clean it some more. Your plans for painting those covers sounds good. I suggest finding something to practice the technique on. It may be better to apply the top color when the wrinkle is still fresh or it may not. I would experiment a bit before doing it on the actual parts. Hate to have to go back and strip and try a second time, ya know?
That's what @tarafied1 said too. Thanks Horseplay! I'm sure my dad already found the cardboard I sprayed in the garage!

Sent from my SAMSUNG-SM-G935A using Tapatalk
 
the boy used the dingleberry to cross-hatch the cylinders. We measured some ring gaps and he pressure washed the block again to get ready for assembly. Going to plasti-gauge the mains and the rod journals and start assembly soon. In the mean time we bought him some SVT COP covers for his birthday.
IMG_7542.jpg IMG_7543.jpg IMG_7550.jpg
 
That's going to be a good looking motor. I can't wait to watch the install. It is a tight fit! I'm having to pull the valve covers on the boy's 2003 Mach to fix blown spark plug holes. Not looking forward to that job! Hopefully the heads on your motor have better threads!!!
 
Back
Top