• Hello there guest and Welcome to The #1 Classic Mustang forum!
    To gain full access you must Register. Registration is free and it takes only a few moments to complete.
    Already a member? Login here then!

1952 F1: The Garage Roommate

Select from the following six options, derived from two basic designs w/ colors and options.

  • A

    Votes: 1 7.7%
  • B

    Votes: 7 53.8%
  • C

    Votes: 2 15.4%
  • D

    Votes: 0 0.0%
  • E

    Votes: 3 23.1%
  • F

    Votes: 0 0.0%

  • Total voters
    13
  • Poll closed .
Well, that took a bit of nerve. Destroying a perfect 70 year old dash. Oh well. What's done is done. Time to move forward. Actually I was super anxious to cut into it to see how my measurements and handiwork on the even older donor dash worked out. Would it fit as planned?

Well, pictures tell the story they say.
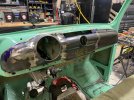
dashtackedin.jpg

Have to say I am quite pleased with the fit.
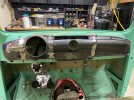
dashtackedin2.jpg

The way I cut it across the top worked out very well. I need to make that filler piece in the center which is fairly straight forward with just a slight curve to it both horizontally and vertically. Not too difficult at all. I think I can simply persuade the narrow panel above the glovebox to raise up just a bit to be in line with the existing dash and not even have to make a piece to marry that area. I was able to get the upper gauge pod to flow in really nice. Under the new dash section where I left most of the old dash lower edge is going to work out well too. I have something special planned for there and and additional lower section under it. That will come later.
 
Last edited:
The real challenge(s) will be at either end of the dash. I need to fabricate pieces to bring the old and new together. These will require some rather complex curves and shaping to get right. I've got a plan for that too. I added some more tools to my collection this week just for this project. I picked up an English wheel and a planishing hammer as well as a mallet and bag so I can take out some frustrations on metal sheet! Probably won't use the wheel for these parts but down the road I will be making some larger panels that will need shaping.

Anyway, here are a few pics showing how the dash ends currently sit. You can see just how far apart they sit from the stock metal. Knew that would be the case from the start. I'll be making sections which will have the new dash ends flow into the old closer to the A pillars. They will have a form to them that will flow into custom door panels I will be making too. It all looks awesome...in my head. Now I just need to make all that into reality. Should be fun. I hope.

dashdriversidegap.jpg

dashpasssidegap2.jpg
 
Takes some balls to do that kind of work when you never have done it in the past.
Thumbs up!

But .......I would cut the orignal dash on both sides and tilted it on the lower side up , so the front faces more to the driver .??
Too late for that ??? :p :p
 
Takes some balls to do that kind of work when you never have done it in the past.
Thumbs up!

But .......I would cut the orignal dash on both sides and tilted it on the lower side up , so the front faces more to the driver .??
Too late for that ??? :p :p
Good thought, Bruno, and one I had myself.

I guess the pics don't do a good job of showing the face angle of the main gauge opening. Making the gauges more viewable was one of the primary reasons I wanted to modify the dash. The stock gauges were on the small side and sat basically perfectly vertical, perpendicular to the floor. Not good line of sight. The new gauge is much bigger and it's face sits at roughly 65-70 degrees compared to vertical at 90. It matches the angle of the wheel which I set after measuring that of a couple other cars which felt "right" to me.
I also had to be concerned about the location of the gauge relative to the steering wheel. If you go back a bit in this thread and look at the wheel I am planning to use (B) you can see how the upper half of the inner wheel is wide open. The full gauge will be visible through it as I have the dash set and the column aligned.
I'm traveling for work right now but will be home later this week. I'll try to remember to take a pic with an angle gauge on the gauge face to better show how it sits.

There is always so much more to consider in everything you do when making modifications like this. That's why it takes me a while to get stuff done. I spend 100x more time thinking and planning than the actual work involved!
 
I also had to be concerned about the location of the gauge relative to the steering wheel. If you go back a bit in this thread and look at the wheel I am planning to use (B) you can see how the upper half of the inner wheel is wide open. The full gauge will be visible through it as I have the dash set and the column aligned.
I'm traveling for work right now but will be home later this week. I'll try to remember to take a pic with an angle gauge on the gauge face to better show how it sits.

That was my point . Visibility of the gauges.
 
Great start Terry! Always have to enjoy coming up with a reason to buy new tools. Most of us would take small steps into the sheet metal fabrication world, you jumped out of the plane without a parachute....brave man. I can't wait to see how it progresses. I understand your vision, but my it will take quite a bit of metal work to make it happen!
 
You're gonna have to show us pictures of your new machines when you get them set-up.
Nothing super fancy. When it comes to English wheels you either buy the Chinese version from Harbor Freight or you spend a bazillion dollars on some behemoth monster a pro metal shop would own. I found an older version of the HF unit (the one with the curved upper section) on Marketplace. I think it better than the new square model and this one had a full set of lower anvils included. I intend to do a few of the common upgrades to it but nothing crazy. I'm not planning on making aluminum Cobra bodies anytime soon. In all likelihood, it's primary use will be to pre-stretch panels prior to bead rolling. So I'll check/correct the anvils and polish them up, install better bearings and get it ready for use.

Did I mention I got a bead roller too? Another Chinese piece. Woodward Fab brand. This thing will get extensive reworking. You basically buy one for the dies and rework the body framework quite a bit. This tool will see a lot of use so I will be spending a good amount of time and money altering it to improve the performance. It's getting a foot pedal operated, variable DC drive from bits cobbled together off Amazon and Harbor Freight.

I'll be sure to post up pics of all the new stuff this weekend.
 
So much for posting pics of the new tools as promised. Sorry about that. Time keeps getting away from me. I'll get there soon. Lots going on and I needed to spend what little garage time I had cleaning up, sorting out and just generally making room out there. Winter is coming fast and I need to make sure I have things squared away so I have space to work on the truck.

A bonus of all this cleaning was the collection of a HUGE amount of stuff I will be selling off. More room and some cash coming back into the wallet will be a nice change.

So anyway, here's a little teaser of a project I have been working on that is getting close to completion. A couple more accessories to fab up and I can get it all painted and put into use. Any guesses?

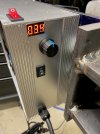
DCcontrol1.jpgDCcontrol2.jpg
 
220 with DC controls and good size wire. It wouldn't be a welder, since you've already got that. Something for plating or cleaning
 
220 with DC controls and good size wire. It wouldn't be a welder, since you've already got that. Something for plating or cleaning
Actually, it's powered by 110vac. The DC power supply can be fed either but to keep its use simple I wired it for simple outlet use. The tool itself won't pull 15 amps but I used heavy insulated 12 ga stranded wire on the motor connections since I had it and the components are rated up to 20. Overkill is kind of my thing! I used to design and build industrial stuff (more like cobble together) so this was a nod to my past. It's over done for sure with the fusing and a cooling fan and even the enclosure is a little more than necessary but shouldn't all projects be fun too?

I should finish it up today before the game. Just need to clean up the bare metal and paint it.

For anyone still trying to figure it out, a hint. I bought a bunch of equipment/tools recently for metalwork. This falls into that arena. Pics and the reveal later today. I hope.
 
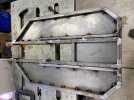
Behind schedule as usual but here's a pic of the first accessory I made for the main machine. It's not done yet but close. Needs some finishing and another option added before paint.
This should help out a lot in identifying what I'm doing. I think anyway...

table1.jpgTable2.jpg
 
Back
Top