• Hello there guest and Welcome to The #1 Classic Mustang forum!
    To gain full access you must Register. Registration is free and it takes only a few moments to complete.
    Already a member? Login here then!

"Phoenix" 65 Coupe to FB

JRANGER

Active Member
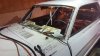
Well im officially starting on my 65 project. I hope to make this an Eleanor so i should add a lot of MTF stuff to her once i get into that phase

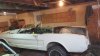
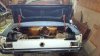
Coupe is solid, will prob need front floor panels and some trunk metal. Rear already converted to 5 lug and a 8" With new leafs. Has sub frame connectors and torque boxes to install

Have all parts for v8 swap front, granda spindles/disc setup, and new front suspension to install as well as manual steering v8 parts (The front suspension will prob change as im thinking about some form of coil over and EPS)

Anyway, ive torn the whole interior out, removed the qtr windows, pulled the tank, railights, and qtr extensions out.

Now to start bracing her up from cutting

15781029_10157953772185521_2168758297149780804_n.jpg 15698276_10157953772155521_1563111153437447718_n.jpg 15726997_10157953772060521_3638454879434119089_n.jpg 15741160_10157953772065521_4235842493011417894_n.jpg 15740918_10157953772045521_8373030926174009142_n.jpg
 
Started measuring and marking where to cut the pillars. 9" looked like a good mark. Between the clips and should allow me room to work. Planning to put a bar on the inside to weld too and for extra strength
 
Started measuring and marking where to cut the pillars. 9" looked like a good mark. Between the clips and should allow me room to work. Planning to put a bar on the inside to weld too and for extra strength
sounds like a great plan
 
Started measuring and marking where to cut the pillars. 9" looked like a good mark. Between the clips and should allow me room to work. Planning to put a bar on the inside to weld too and for extra strength

IMO, there is a better way... Since the pillar is comprised of an inner and outer skin, you would be better off with offset cuts spaced far apart. A series of plug welds in conjunction with the lap joint is going to be way stronger than a butt joint. I know just about everyone does a butt joint, but that isn't the best way to do it.

For what it's worth, when I did mine left the coupe's windshield frame intact and attached the fastback side rails into the original piece where the side rail meets the windshield header and A pillar. In my case it was easy to do since I had to replace the roof skin. If I was to do another, I'd be tempted to carefully remove the forward corners of the roof, attach the rails as Ford did, then re attach the roof corners with butt welds. Aside from the strength advantage, you should be able to see any witness marks between the brace and roof rails. When you fit the pieces up, those witness marks come in handy to validate alignment.
 
Did some more measuring and markings. Re-measured everything inly to realize i only measured 8" on the fastback A pillar...Weird but fixed everything and made the new lines. Used tape to make sure my lines were straight and welded in a few small pieces in the windshield area to help with allignment
 

Attachments

  • 20170102_131822.jpg
    20170102_131822.jpg
    237.4 KB · Views: 29
I respect your enthusiasm but would caution you to slow down a bit and make sure of your approach and complete process plan. The roof structure is very important to overall strength of the entire vehicle. Not too mention how critical alignment is for glass installation, door alignment and so many other aspects of assembly. I haven't ever looked for online examples or build threads but i am sure there must be stuff out there. I'd make sure I had the full plan, step-by-step, worked out before I jumped into it.

Then there is the welding. Just because a weld may look good to your untrained eye doesn't mean it is truly well done. Ask me how I know! lol Is it your plan to do all the welding yourself or just to tack stuff in place and have a more qualified person do the actual final welding. I ask because I have spent a long time trying to learn on my own and after months of practice and cutting through welds to inspect the actual penetration, etc. I learned I have more to learn. I can tell you that a weld I made a year ago that I thought "adequate" wasn't by a long shot. After a year or so with my new, better machine I can tell you I would still be hesitant to think I could do a job like you are attempting without some more experienced help. At least to look things over. Stangg is an engineer (I think I recall) who basically built his whole chassis from scratch. I'd give serious consideration to his suggestions. His ideas make very logical sense. Not too mention he has done this before.
 
Well i am defiently following specifics that others have done before me. MTF does there conversions the way i am doing it. Youtube videos show the entire process as well about doing it this way. I am just doing a little bit at a time and making sure i have speicifc ways to make sure things are alligned properly. There will be a nicee inner structure into the Pillar and holes will be drilled to hold said structure in place. I am defiently not rushing the process but sense i have been off work i have been trying to get things started. Measureing, Measuring, Measuring and also doing research. Talking to multiple people that have done so and asking about the gotchas
 
Well i will do some more measuring this weekend and may start cutting if im satisfied. I have about 12 cut off wheels for my angle grinder and another 50 on the way so enough to get started i hope. Plan to make a windshield template with cardboard as well before i start cutting
 
Well its been a fun night...Chopped the fastback and got.l in place and then started finding the binding points. Have the one side fitted pretty well but at some point the passenger side had a qtr replaced ment that was flanged under it. Then topped with bondo so there are 2 layers of metal and a good amount of bondo so i need to wire wheel and see if they welded it up or hope i find screws...i doubt it though lol20170120_200024.jpg 20170120_195844.jpg
 
found out i was a half inch off on the drivers side so.i have adjusted. Then i started getting lined up.
 

Attachments

  • 20170126_183337.jpg
    20170126_183337.jpg
    250.4 KB · Views: 30
put a gasket on my windhsield and actually just laid it on the pinch weld. Gaps are pretty even and looks like it will fit nicely
 

Attachments

  • 20170128_084506.jpg
    20170128_084506.jpg
    216.7 KB · Views: 24
Well i started to tack weld it together but.....i ran out of gas, so i am going to call my.local welding supply tomorrow to see if they have a decent 80cu ft tank.. So i did find a nice little grove full of fiberglass and bondo. Def not stock20170129_124141.jpg 20170129_135843.jpg 20170129_140238.jpg
 
Back
Top