• Hello there guest and Welcome to The #1 Classic Mustang forum!
    To gain full access you must Register. Registration is free and it takes only a few moments to complete.
    Already a member? Login here then!

1952 F1: The Garage Roommate

Select from the following six options, derived from two basic designs w/ colors and options.

  • A

    Votes: 1 7.7%
  • B

    Votes: 7 53.8%
  • C

    Votes: 2 15.4%
  • D

    Votes: 0 0.0%
  • E

    Votes: 3 23.1%
  • F

    Votes: 0 0.0%

  • Total voters
    13
  • Poll closed .
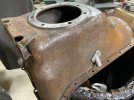
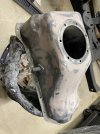
So I do everything right and manage a garage day for myself. They are rare anymore so I'm pretty excited about getting stuff done. As posted in another thread I have been cleaning up out there in anticipation of getting back at it. Today was kick-off, so to speak. While not exciting, one thing I needed to get done was prepping the old oil pan I snagged a while back for paint. It was already painted in black primer but it wasn't a great job and may even have been nothing more than a spray to make it look better for sale.

NOTE TO EVERYONE: Don't do that. Sell the part as is or fully restored. In between hack jobs only make it harder for the next guy.

So I pull the pan down from up on high where I stashed it and notice right away its not as nice as I remembered. The excitement of the find must have clouded my vision as this was clearly a hack job. No bother. Been there done that. Broke out the Acetone and rags and off came the spray bomb primer. Ugh! Didn't even bother to knock off the rust first. Day just got dirtier. Couple hours later and she's almost down to 100% bare metal. I did notice a few dings here and there that I probably should fix. Take it over to the bench for better light to see what I'm dealing with and...wait. Is that? Yep. A pin hole. And another. There's one in that corner too.

SOB. Seems at some point it sat upright with a bit of water in it and these random little rust cavities ate straight through. This is some thick metal too. Like 18-19 ga. Fortunately, none of the bad rust was in the removable ring cover area. Just all around it.

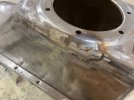
Countless hours (and wire and gas) later it's all buttoned up. No patches really made any sense so just lots of metal melting to build up the thin areas and then grinding things back. Repeat over and over all around the ring.
pan 1.jpgpan 2.jpgSince I've gone this far, I'll be bodyworking it to make it perfect before it gets sprayed.

That was my much anticipated garage day. :(
 
Last edited:
An oil pan with a open ring on the bottom? What's the ring for? Changing oil?
 
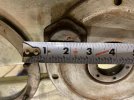
These pans were used in the big trucks (commercial). I'll post up some more pics of it all later so you can see how it goes together. There is a drain plug in the center section that bolts onto that open area. The plug itself is huge too. Like 1.5" in diameter. The reason that big section can be removed is to allow inspection of the bottom-end. You can also do an oil pump replacement without pulling the engine or even dropping the pan. I just thought it was really cool and it will fit in my truck set-up so I bought it.
 
That’s some ugly welding. Still haven’t figured out TIG huh?


Mark
I don’t know, let me be clear.
 
That’s some ugly welding. Still haven’t figured out TIG huh?


Mark
I don’t know, let me be clear.
Guess you missed the part where I explained I was simply melting on metal on top of metal to build back some thickness, huh? The pics don't really show how some areas were pretty much paper thin swiss cheese! MIG is the right tool for this one as for once a few "caterpillars" are pretty much just what is needed.
 
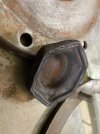
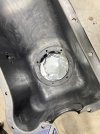
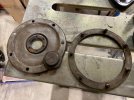
As promised, a couple more pics to show the other parts of the oil pan. The stud ring sits inside the pan and the cover plate is secured to it with nuts, sandwiching the pan between the two (gasket on the outside under the cover). The drain plug is huge. Intend to put a good strong magnet in the outside recessed area and then use my kids 3D printer to make an insert pieces to glue in over the top and fill that whole inset area. It's face will be large enough to get creative with the surface design. Maybe an old style Ford script "F") or something. Be a good project for him to come up with a winner.

pan 3.jpgpan 4.jpgpan 5.jpg
 
So mentioned the truck engine in another thread which prompted me to pop in here to see how bad I've been about updates. Pretty much what I figured. So let's get this up to date.

First I can say the oil pan was completed. That turned out to be an enormous amount of work. Had I known what I was getting into at the start I would have searched out another pan. Lots of thin metal all throughout the bottom thanks to water and rust. Way too much welding and patching and welding and grinding and sanding later, I was able to make it useable. Then lots of bodywork to smooth it all out and ready for paint. Ended up using Eastwood 2K rattle can epoxy primer followed by their 2K gloss black engine paint. New polished stainless hardware to secure that awesome inspection plate. I have to apologize I do not have a pic of it in paint as I was rushing to ship it out and simply forgot! Ship it out?? I will explain that in a bit.

the pics...
pan done.jpgpan bondo.jpg
 
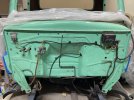
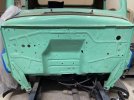
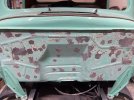
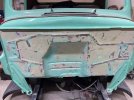
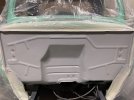
Another project I dove into and completed was the firewall. You'll recall this truck was a running and driving project so it was completely wired up, etc. I have a thing for "less is more" and clean lines so it required the firewall to be stripped clean of everything and all the holes filled and the panel smoothed over. I think I counted in total 73 holes that required filling. Lots of filler patches had to be made. Then there was 70 years worth of minor dings and dents and such to hammer out and smooth over. There were also a few areas where the stamping stretched the metal creating creases and the like. Those had to be addresses too. Anyone who has ever had the pleasure of such an adventure can relate, I'm sure. What many likely think simple ended up taking up all my garage time for the better part of two weeks to get it to where it is today. Worth the effort.

the pics...
fw.jpgfw1.jpgfw2.jpgfw4.jpgfw6.jpg
 
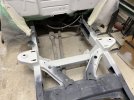
So quite a while ago in the thread I showed I had welded in the new front suspension crossmember and associated bits. Well, much like the firewall, Some of this area will be visible when the truck is completed and I wanted it to be show quality in appearance as well. So I went about smoothing out all the weld joints where the crossmember and upper arm mounts affixed to the frame. This meant more welding to build up enough metal to allow the grinding of it back off to create a smooth look. Then some minor bodywork to finish it up.

I will eventually spray the frame rails and crossmembers and underside of the cab with bedliner just as I did my mustang. It adds a terrific level of protection to the underside and makes keeping it clean very easy. And it looks great too. That will be one of the very last things I do, however, as there will be quite a few brackets that I will need to fab and weld to the frame as things come together. Things like rod end mounts for the steer shaft(s), etc.

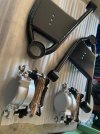
I also painted the control arms and brake calipers. No Wilwood this time around. Simple, basic factory GM single piston calipers at all four corners. The truck will be sporting gloss black "steelie" wheels with chrome moons. Can't see the brakes if you tried!

anyway, pics...crossmember.jpgcrossmember2.jpgpowder coat.jpg
 
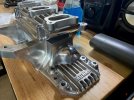
You may recall I bought an intake and an adapter to put a trio of carbs on top the blower. Well, I wanted to have those professionally polished but found out that it would cost over a grand to have them done as I wanted. Yeah. Not doing that so I bought a bunch of stuff to do it myself. I'm not done with the intake itself just yet but getting closer. It is a dirty job, no way around it. When the polishing is finally done to my satisfaction I will be painting the valleys between the fins on both pieces, likely gloss black. The contrast looks great.

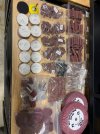
I used a number of different tools in the process so far. Die grinder. Orbital sander. Couple other small air tools and my Dremel. All kinds of media for the actual abrasives. Started at 80 grit and hit every single grade between there and 2000 before I even thought about breaking out the buffer and compounds. I found a place called Gesswein online that sells stuff for jewelers. They provide some really great sanding wheels that are sheets of sandpaper backed by a material like Scotchbrite. I bought a lot of those too in grits from like 180 all the way up. Mounted in my Dremel I could really get into the nooks and crannies on the intake. All told, I spent something north of $500 on sanding materials. As I tend to do I over-bought but nothing wrong with having supplies on hand. By the time I'm done I will have done the intake, the carb adapter, an aluminum bracket to mount the alternator, an aluminum spacer for on the blower and another intake and set of finned heads for another flathead. Yeah, did I mention I am going to have two?

More pics,
sanding stuff.jpgintake polishing.jpg
 
No heater- I thought you lived in a cold state! Whose bedliner do you use?
I will be putting a heater in. Mainly for the defrost function for those cool mornings or nights its needed. I have one picked out. It's a small aftermarket piece that I can hide up in the dash neatly. It will allow me to route the necessary hoses out down lower on the firewall, out of sight. It will pain me to drill those holes when the time comes, let me tell you!

I used Raptor on the mustang and love it. I will use it on this one too.
 
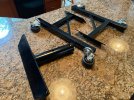
I also finally bought the correct adaptor to hang a flathead on an engine stand. It bolts up to the side of the block using the exhaust bolt holes. Mounts 90 degrees to what everyone is used to. A flathead block is HEAVY. Hanging one off the end of the block is not advised as the metal is not as strong back there the way the flange and holes are cast.

Also got a flathead engine cradle. You see, even after I put the engine in the truck I will still have one sitting around the garage.:oops:

pics...
stand and cart.jpg
 
So here's the deal. I am still building the flathead that was in the truck. In the midst of it right now along with everything else. Instead of it going back in the truck, it will serve another purpose. As some may recall I have a tendency to change course from time to time. You may also recall I like to do everything myself including building the engines I use. Well, when it comes to a flathead that gets a bit trickier. As the valvetrain is in the block, and the machine work that needs done has to be done by a specialized shop (especially when you are building an engine that will be making almost 4 times the power it did from Ford) it gets really expensive and cumbersome (not too mention dragging out the timeline) to ship the block off for work. I have a really good machinist nearby who wanted to do the build with me. Problem being is not an expert on these things. He's only built one. His tooling is not correct for the jobs but he finds ways to make it work. For what this will cost I wanted better. So I elected to reach out to the guy most consider THE flathead expert in the world. Mike Herman, owner of H&H Flatheads out in CA. If you ever peruse a street rod style mag or go to a high end show you can bet the best cars there have an H&H engine in them.

So first thing to know about a flathead is that it only has three main bearings. Not 5 like a normal V8. That's an issue. That's a REAL issue when you start putting boost on it. Best way to deal with it is to upgrade the main supports. Some guys literally bolts a metal strap over the center cap to help prevent it from walking and breaking. Better is to make a bigger stronger center cap. In the case of my engine, all three caps will be replaced with custom made billet steel pieces made by H&H. To do this means the block needs to be line bored with the new caps. That means my block needs to go to California. While there Mike would also sonic test every inch of every cylinder to make sure there is no significant core shift, etc. that would make it questionable for the build. He also pressure checks a block and then puts sealer in and pressurizes it again, effectively sealing off the pores in the steel of the entire waterways in the block.

At this point, I am spending significant cash just to see if I have a valid starting point. If it checks out, it can be bored to size and all the other fun stuff commences. Now remember, H&H is in LA, I'm in Chicago. Freight on the block is hundreds of dollars each way. Plus, with the valvetrain in the block it really needs assembled with the rotating assembly. It is rapidly becoming obvious it simply makes no sense to have the work that NEEDS to be done by him get done and not let him just build it out. So that's what's happening. H&H will be building the longblock for the truck. Using a block he sources. Again, financially it made sense to let him find a block rather than pay to ship mine there and run the risk he doesn't deem it useable to his standards. It will be a full tilt build. Best of everything. Fully ported and relieved block. Big, under-cut valves. Big bore and stroke. Custom ground cam. Only live once, right?

So that is going on as I type. In fact, it should be done before too long. Meanwhile, I had already bought so much for the engine build I had planned I decided to go ahead and build the one that was in the truck. So a quick re-hone. New pistons, rings and bearings. Since this one won't be getting a blower the stock crank, rods and main caps are more than adequate. Have a wicked cam for it along with all the other goodies. It will be fully dressed out in polished heads and dual carb intake. Should make a stout 175 hp or so. In the flathead world, it will be a high end, high power goodie. in the end it will either find it's way into that 30/31 coupe I want to build next or (more likely) get sold to finance a Godzilla down the road.

Anyway, that about brings it all up to date. Need to get busting on finishing up the rear suspension and the full chassis. She should be drivable before the end of summer. At least to tool about the neighborhood. Paint to come later.
 
Another project I dove into and completed was the firewall. You'll recall this truck was a running and driving project so it was completely wired up, etc. I have a thing for "less is more" and clean lines so it required the firewall to be stripped clean of everything and all the holes filled and the panel smoothed over. I think I counted in total 73 holes that required filling. Lots of filler patches had to be made. Then there was 70 years worth of minor dings and dents and such to hammer out and smooth over. There were also a few areas where the stamping stretched the metal creating creases and the like. Those had to be addresses too. Anyone who has ever had the pleasure of such an adventure can relate, I'm sure. What many likely think simple ended up taking up all my garage time for the better part of two weeks to get it to where it is today. Worth the effort.

the pics...
View attachment 33696View attachment 33697View attachment 33698View attachment 33699View attachment 33700

I’m not seeing the difference.


Mark
 
Wow…..you seemed to hit the jackpot when it comes to finding free time! Great work on the firewall, just the way I like them. The intake polish is a bit more work than I would want to tackle.
 
Back
Top