Turn them into large toggle switches: one for ignition, and one for wipers!
Navigation
Install the app
How to install the app on iOS
Follow along with the video below to see how to install our site as a web app on your home screen.
Note: This feature may not be available in some browsers.
More options
-
Hello there guest and Welcome to The #1 Classic Mustang forum!
To gain full access you must Register. Registration is free and it takes only a few moments to complete.
Already a member? Login here then!
You are using an out of date browser. It may not display this or other websites correctly.
You should upgrade or use an alternative browser.
You should upgrade or use an alternative browser.
70_Fastback: RAT ROD - 193x Ford / 1942 GMC Truck
- Thread starter 70_Fastback
- Start date
A
Anonymous
Guest
Ejection seat levers.
SELLERSRODSHOP
Well-Known Member
i just found the thread on this. looks like a great job so far. if you run across anything you can't figure out or any parts you need let me know. in my business i have alot of parts contacts & experience in the "fabricate what you need to get it right" stuff. i've been planning a rat rod p/u for a while now with a WWII aircraft theme (another hobby of mine) but have to finish my 36 p/u & a 36 REO flying cloud first. i want to base mine on a 32-34 ford p/u cab
70_Fastback
Hell Bent for Speed
I'm thinking door handles as well Skip. But are those live?
The shell casings/primers have been fired.
I will have to check the numbers on the actual shells to make sure that they are inert.
They are probably just made out of depleted uranium so the radioactive half life is under 4.5 billion years. So you have that going for you.
You could go nuclear powered.
I will have to check the numbers on the actual shells to make sure that they are inert.
They are probably just made out of depleted uranium so the radioactive half life is under 4.5 billion years. So you have that going for you.
You could go nuclear powered.
The shell/bullet on the 20MMs is an M55A2 which is for target practice and is inert.
Target practice M55A2. M55A2 TP ammunition is used for gunnery training and test firing in lieu of the service round. It has a hollow cavity projectile body without a fuze (inert). The nose of the round is constructed of aluminum and is swaged to the projectile body.
Of course there are incendiary and high explose shells but they have a different number designation on them.
70_Fastback
Hell Bent for Speed
Got the top chopped 5" this weekend. Was not too terrible of a task. The doors will be the most work for sure.
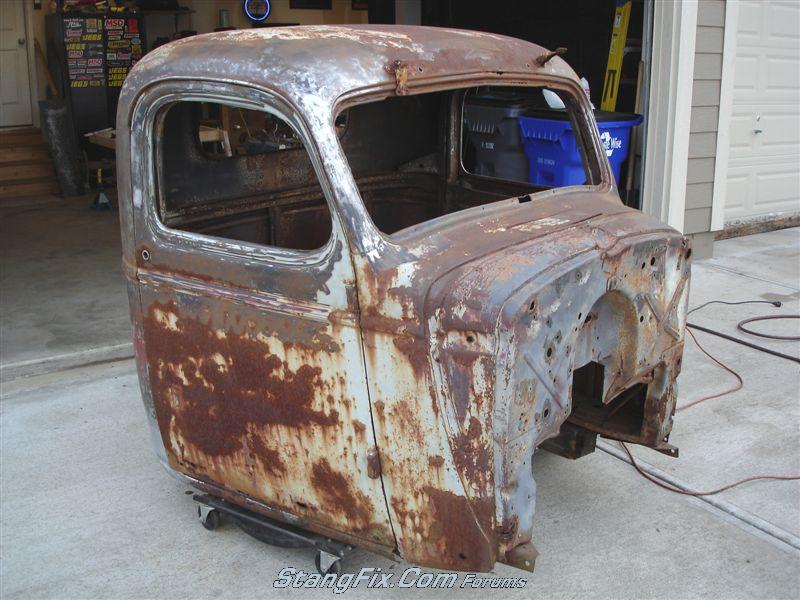
Rolled the cab out and took it to bare metal where I'd be cutting and welding
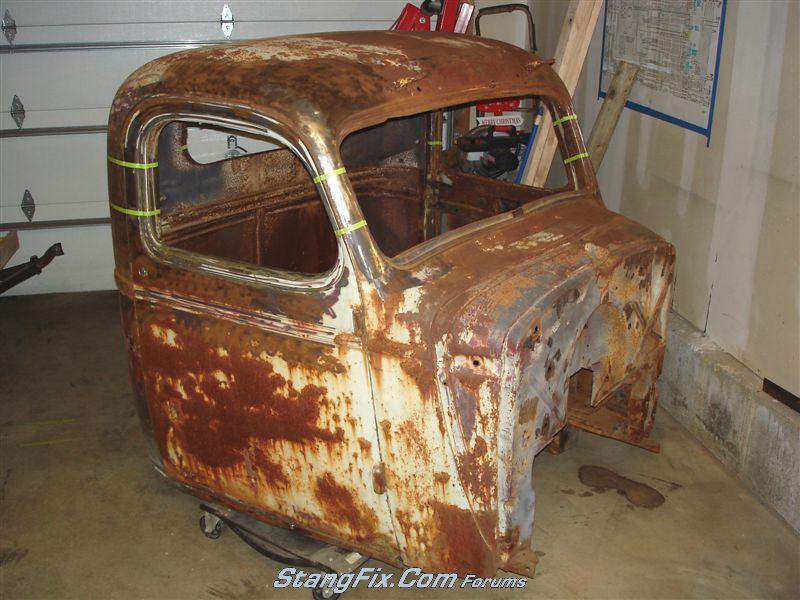
Got it back in and started measuring and laying out my cuts and taping lines off.
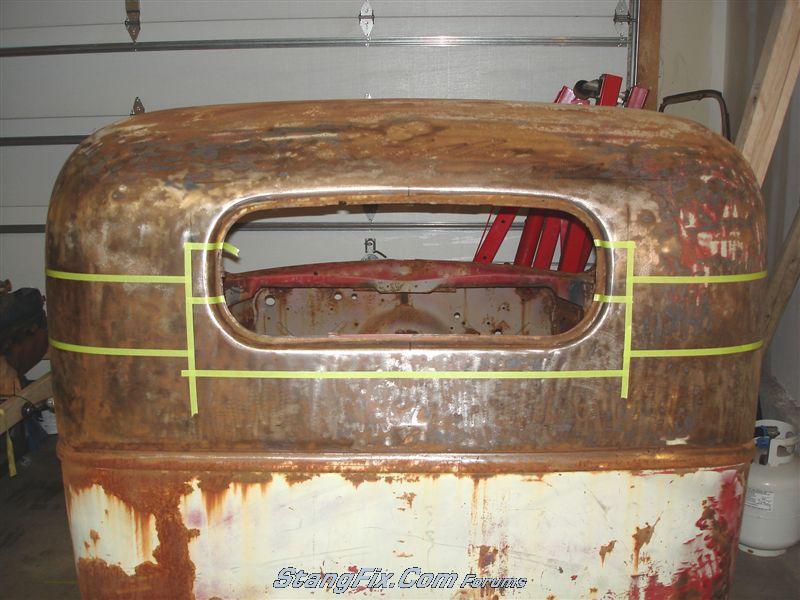
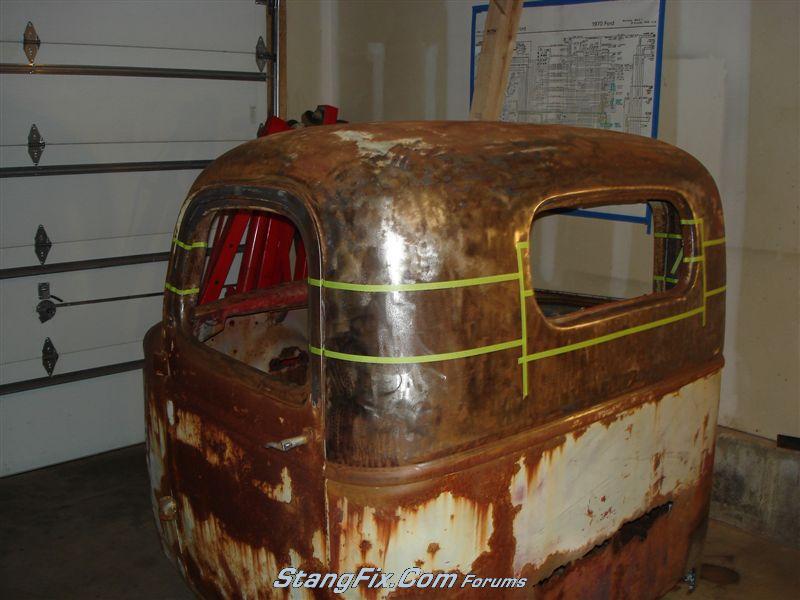
I decided to only chop the rear glass 3-1/2". So I layed those lines out and cut out the window first.
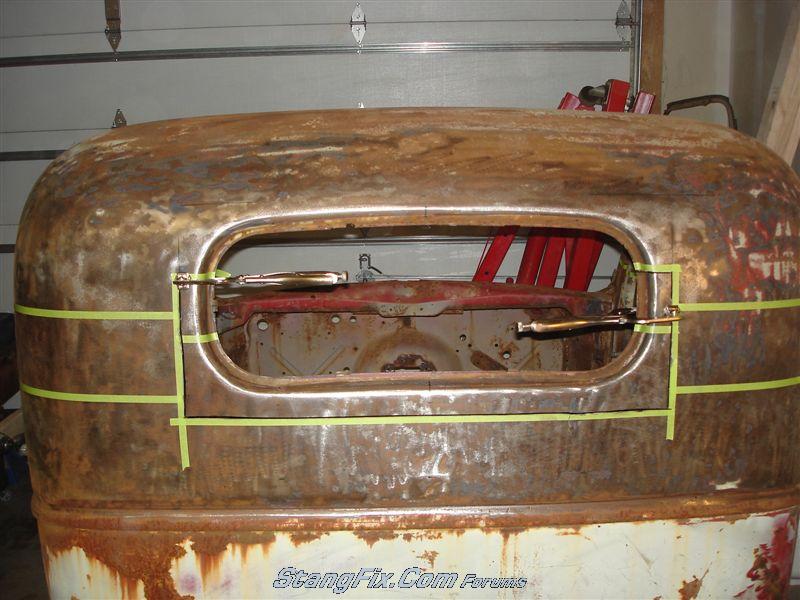
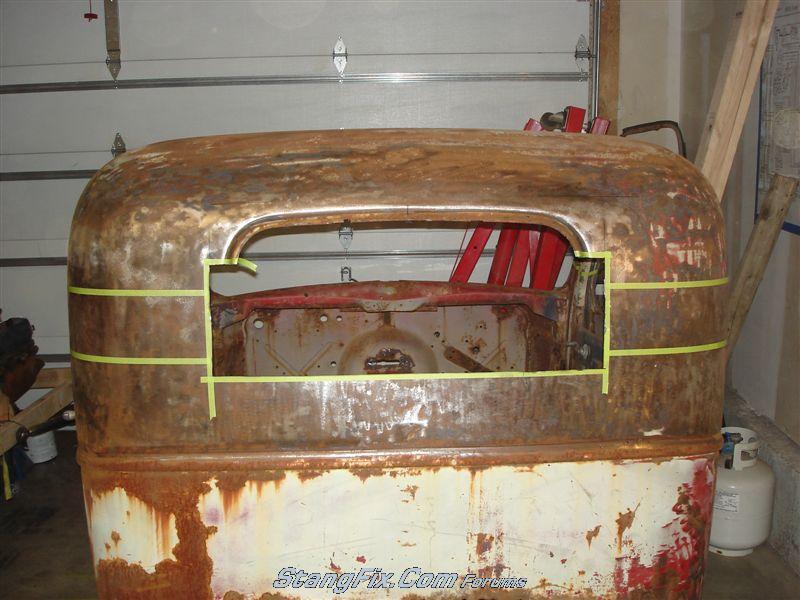
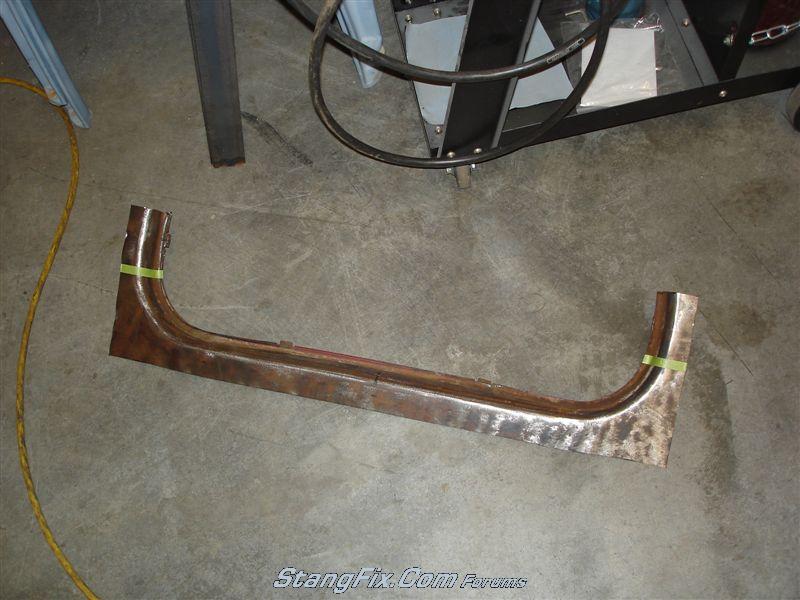
I THEN remembered - shart! I hadn't braced the cab yet. So I snagged some available angle iron and did a quick cross brace from corner to corner and then commenced with the cutting.

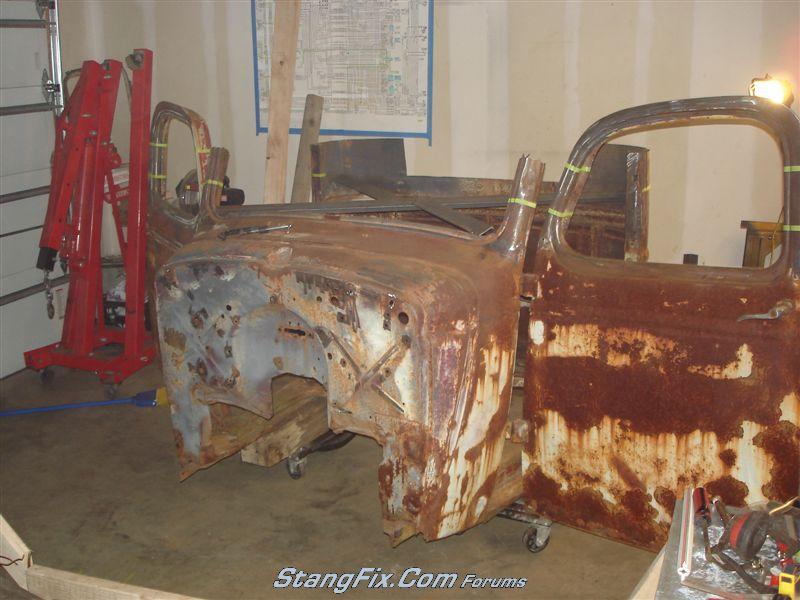
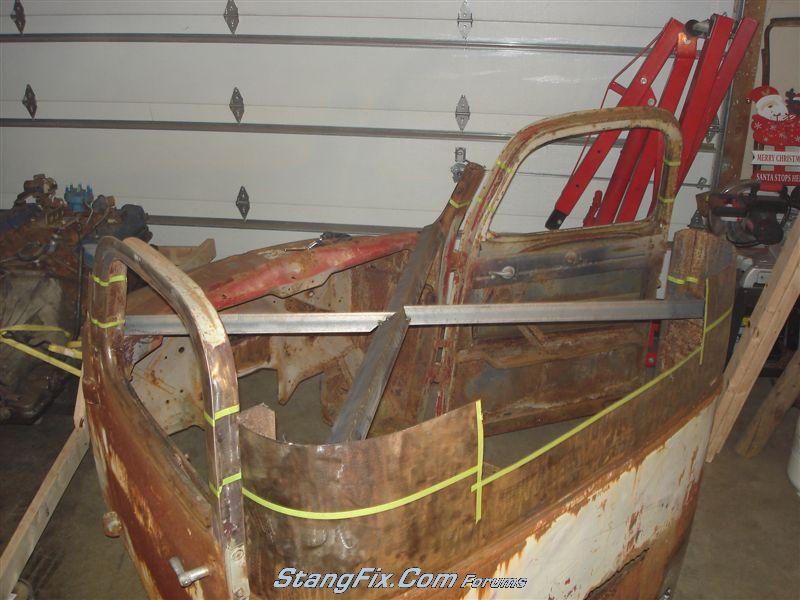
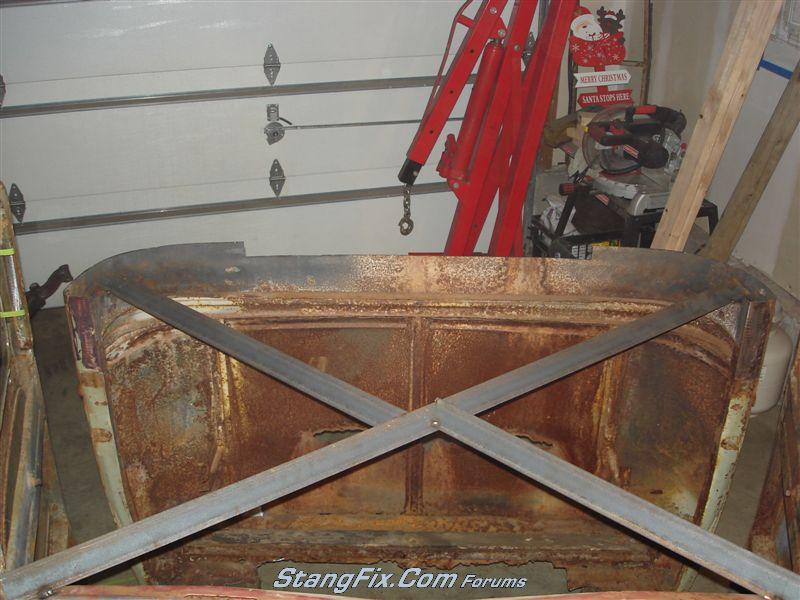
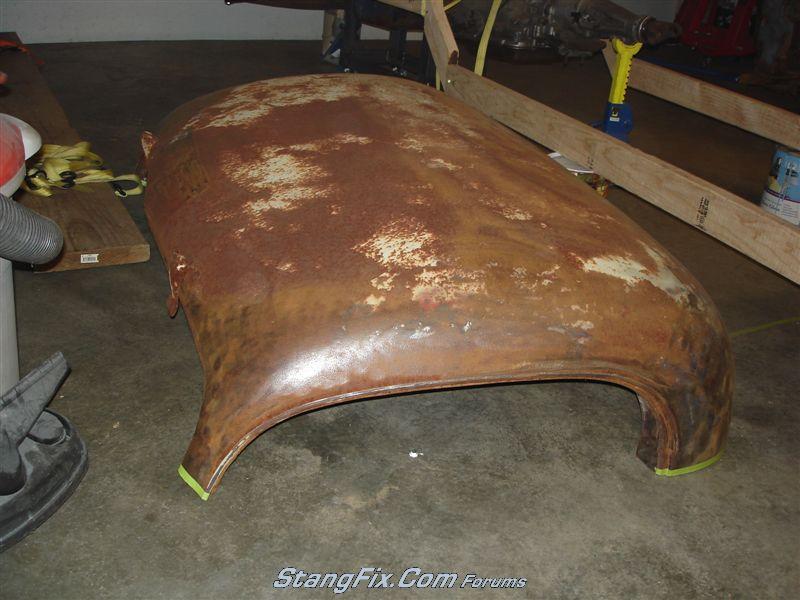
Here is the cut off top laid back on directly. You can see how far off the A pillars are off. The top wil get sectioned.
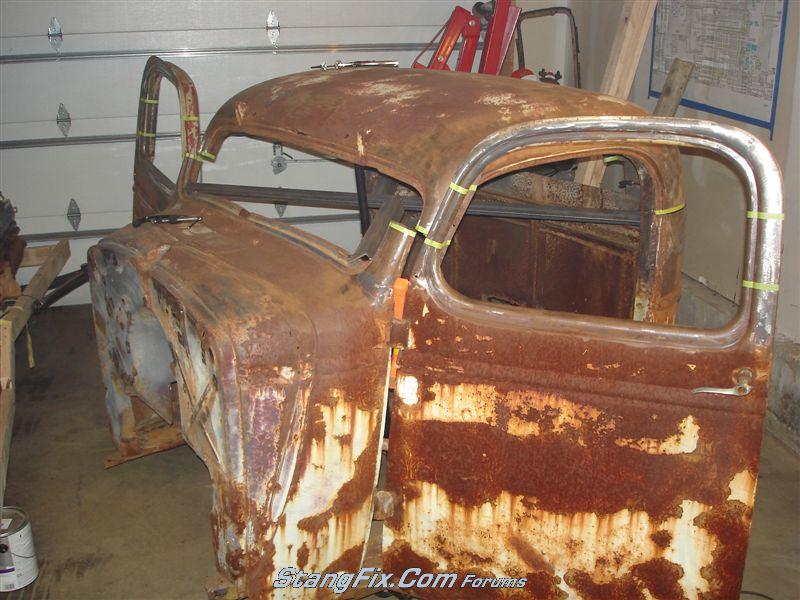
Once the top is sectioned, I tacked in the lower window portion.

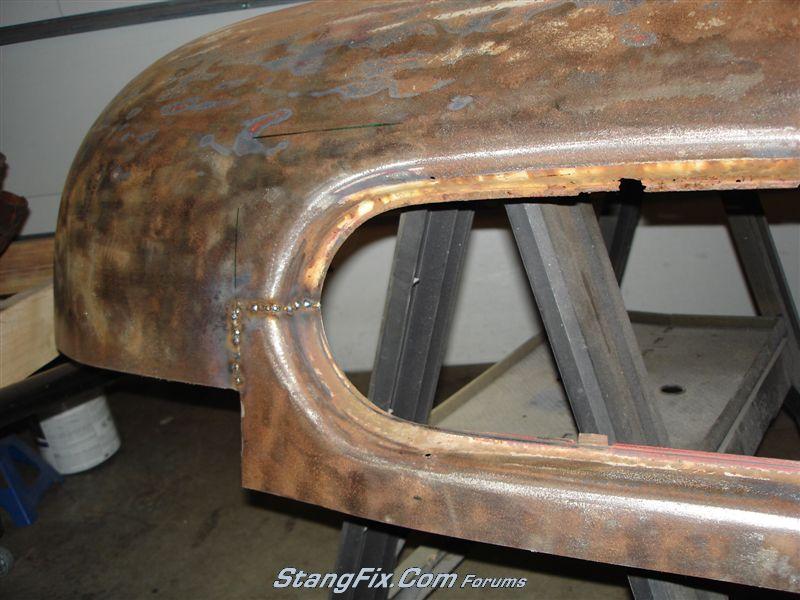
Overlaying the rear portion
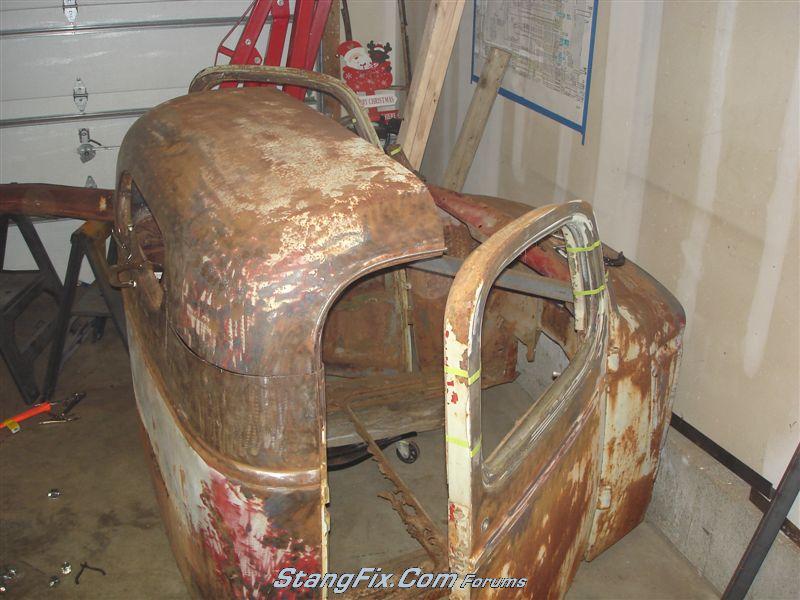
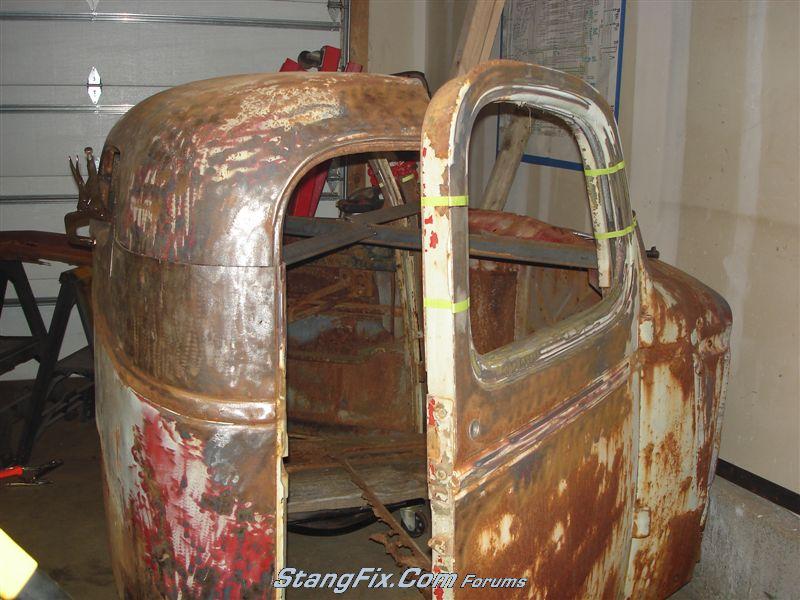
Was happy with it so I started tacking it in place a bit more. Started on the driver side and worked towards the window from the B pillar.
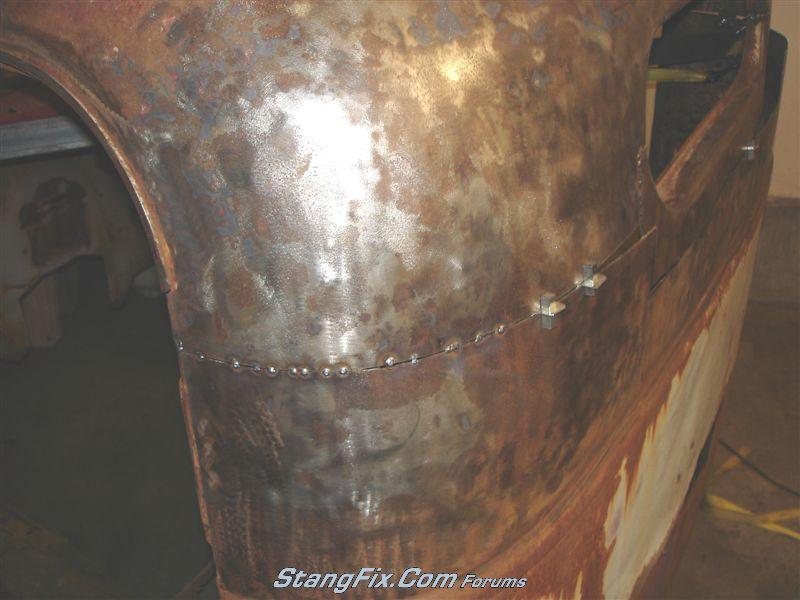

BUT... something was "off" somehow on the passenger side. The lower cab metal seemed to be bigger, maybe it was dented and/or stretched - I don't know for sure. But stuff would not line up like I wanted it to. I had to cut one stress relief in the lower part and one pie cut in the upper cab part to massage the metals to go where I wanted them to. I'm still not sure what happened here... but I think I remedied it. I'll just chalk it up to 70+ year old metal...!
(You can see the additional vertical welds in these pics)
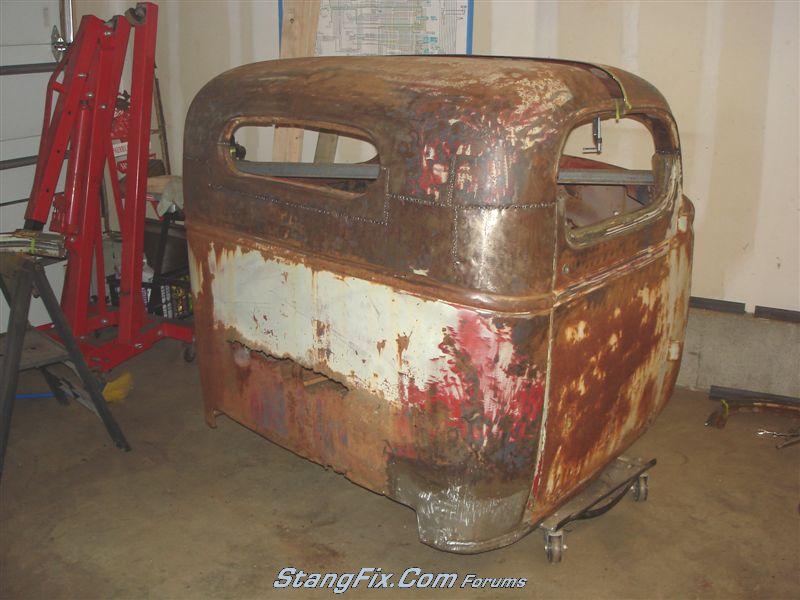
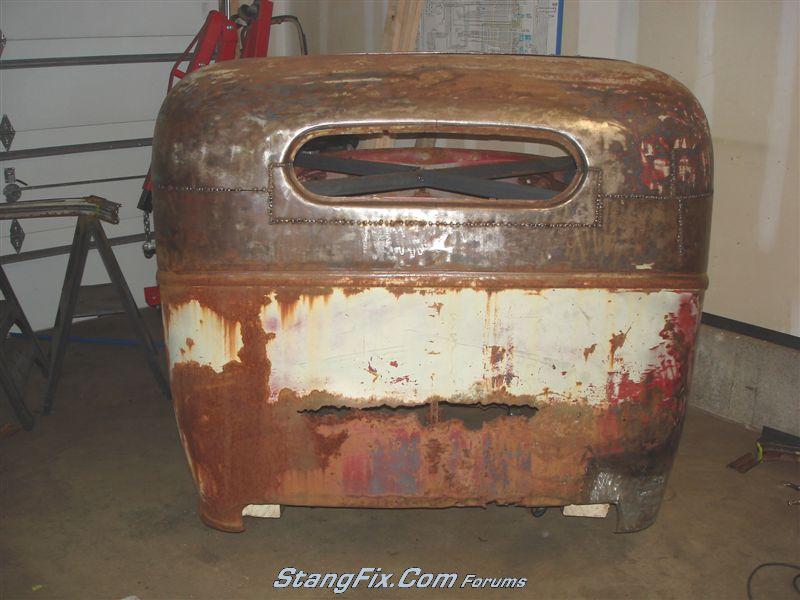
Next up was the sectioned front half.
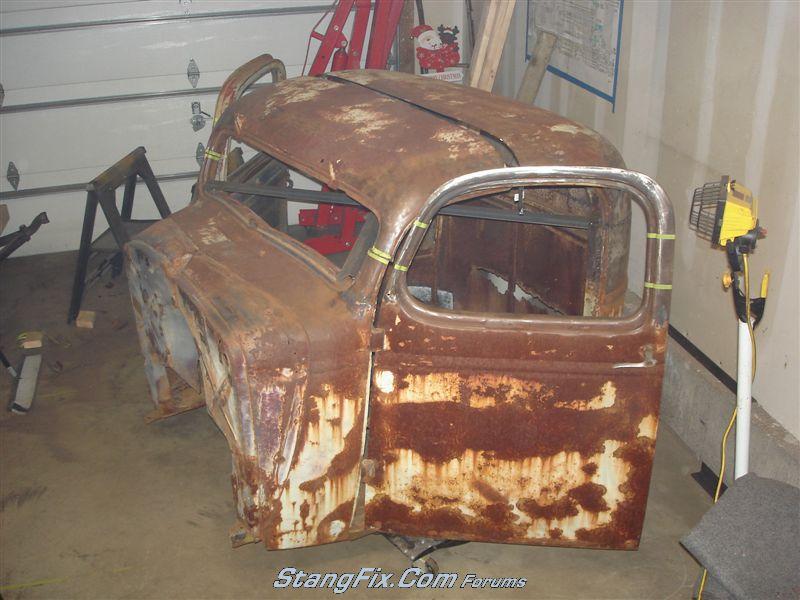
I had to make some relief cuts at each windsield top corner so I can "pull" the posts in a bit to make them line up with the lower posts

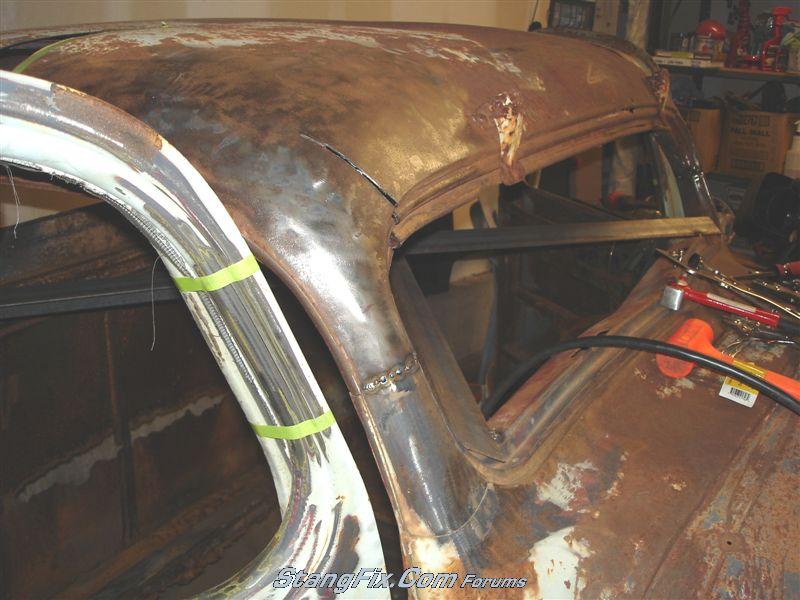
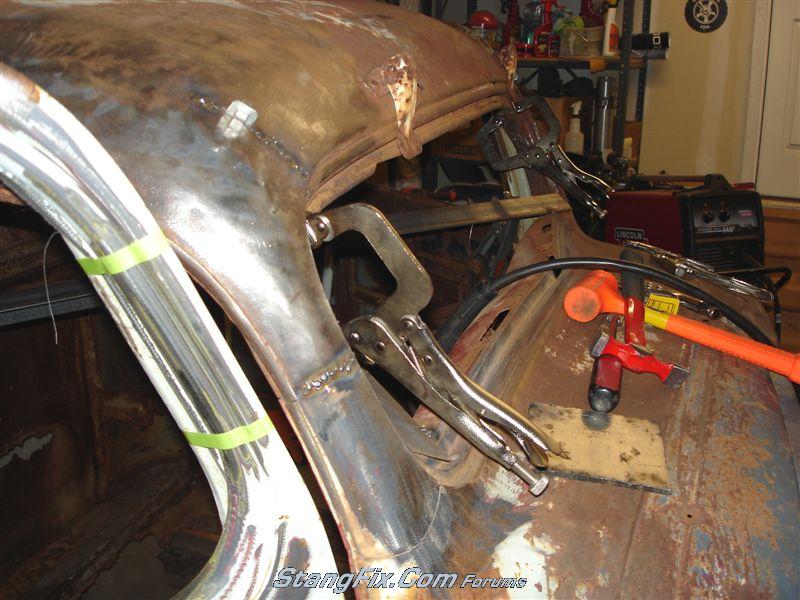
Pretty well all tacked and cleane up some. (You can see the missing sectioned piece. I need to cut a donor piece and fab up the two missing drip rail pieces that I need to scab in)
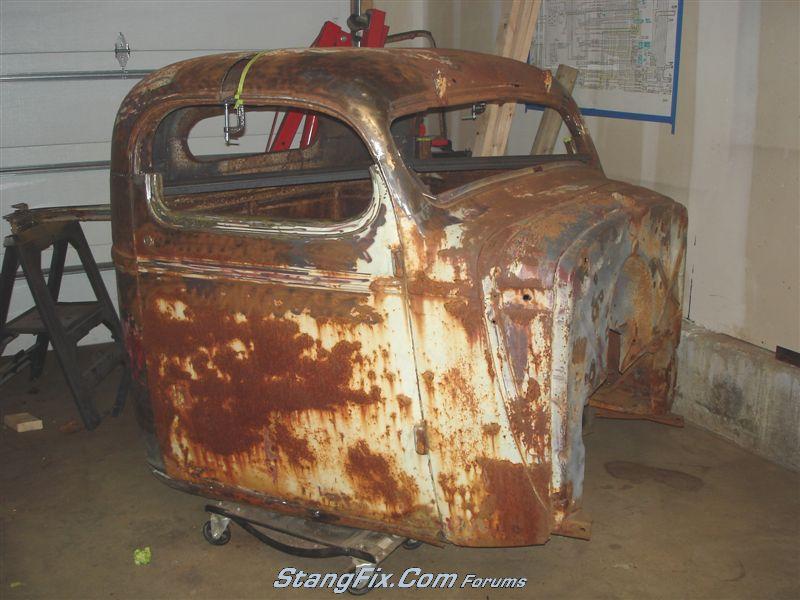
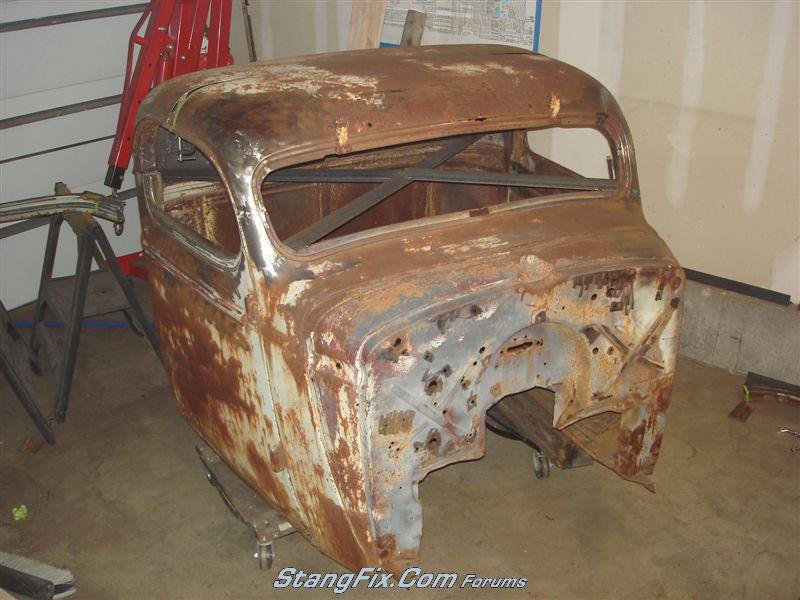

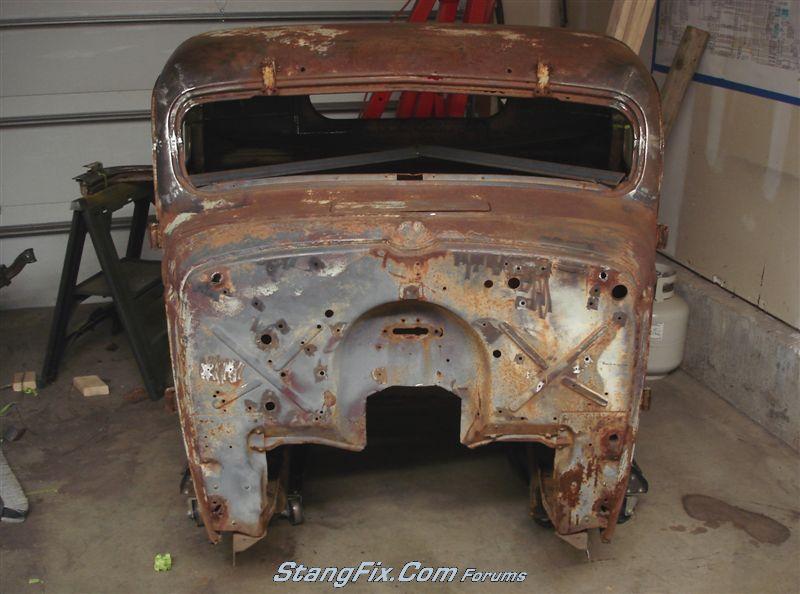
Up next will be the doors. There will be a lot of fab work on them. I'll take some detailed pics of that process.
Rolled the cab out and took it to bare metal where I'd be cutting and welding
Got it back in and started measuring and laying out my cuts and taping lines off.
I decided to only chop the rear glass 3-1/2". So I layed those lines out and cut out the window first.
I THEN remembered - shart! I hadn't braced the cab yet. So I snagged some available angle iron and did a quick cross brace from corner to corner and then commenced with the cutting.
Here is the cut off top laid back on directly. You can see how far off the A pillars are off. The top wil get sectioned.
Once the top is sectioned, I tacked in the lower window portion.
Overlaying the rear portion
Was happy with it so I started tacking it in place a bit more. Started on the driver side and worked towards the window from the B pillar.
BUT... something was "off" somehow on the passenger side. The lower cab metal seemed to be bigger, maybe it was dented and/or stretched - I don't know for sure. But stuff would not line up like I wanted it to. I had to cut one stress relief in the lower part and one pie cut in the upper cab part to massage the metals to go where I wanted them to. I'm still not sure what happened here... but I think I remedied it. I'll just chalk it up to 70+ year old metal...!
(You can see the additional vertical welds in these pics)
Next up was the sectioned front half.
I had to make some relief cuts at each windsield top corner so I can "pull" the posts in a bit to make them line up with the lower posts
Pretty well all tacked and cleane up some. (You can see the missing sectioned piece. I need to cut a donor piece and fab up the two missing drip rail pieces that I need to scab in)
Up next will be the doors. There will be a lot of fab work on them. I'll take some detailed pics of that process.
AtlantaSteve
Active Member
really nice!!! The chop changed the look so dramatically. You were right to go 5". Thanks for posting all the pics! More skill than I have, for sure.
monkeystash
Active Member
Damn dude, you got skillz! Very nice work, looks awesome.
70_Fastback
Hell Bent for Speed
Thanks guys!
janschutz
Corn Hauler
Man, this makes me want to take a saws all to my Dad's old truck.
70_Fastback
Hell Bent for Speed
"Mach1ne" said:Holy crap. Great job. All of this over the weekend?
I really feel bad about laying on the couch all day yesterday doing nothing.
Yup. Saturday and Sunday. I called you. You didn't answer.
Just kidding. I didn't call. But thanks.
tarafied1
Well-Known Member
sweet! That took some guts I bet, it looks a little scary! You do have some skills, have you done this before? Very well thought out. I'm impressed!
70_Fastback
Hell Bent for Speed
"tarafied1" said:sweet! That took some guts I bet, it looks a little scary! You do have some skills, have you done this before? Very well thought out. I'm impressed!
Nope, never chopped anything in my life - hell, I've never really worked on anything this old in my life!
In reality this is only my 3rd build. My '70 was my 2nd, but the first real, deep, endeavor on a restoration. I replaced all of the metal on that... that was my "learning curve".
I just REALLY love doing this kind of work. I get it from my Dad.
tarafied1
Well-Known Member
sounds familiar. Well you look like a pro! Be proud!
"70_Fastback" said:Nope, never chopped anything in my life - hell, I've never really worked on anything this old in my life!
In reality this is only my 3rd build. My '70 was my 2nd, but the first real, deep, endeavor on a restoration. I replaced all of the metal on that... that was my "learning curve".
I just REALLY love doing this kind of work. I get it from my Dad.
I also love doing this kind of work! I've not done anything this involved, but tackling that kind of project wouldn't bother me in the least.
Nice work, sir!
PS: I hope you didn't chop it so much that you'll hit your head on the roof while going over a pothole.
