• Hello there guest and Welcome to The #1 Classic Mustang forum!
    To gain full access you must Register. Registration is free and it takes only a few moments to complete.
    Already a member? Login here then!

70_Fastback: RAT ROD - 193x Ford / 1942 GMC Truck

J, that's some sweet a$$ work buddy!! The small pics you sent don't do the work justice, you gots some made skilzs yo.
 
J, I'd appreciate it if you could have it done and on the road by the end of June so I can go for a ride in that bad MoFo.
 
very nice!! for someone who jumped in on something that difficult & not be "skeered" of it. i wish you were around here close, i'd put you work & really teach you some neat stuff.
 
"SELLERSRODSHOP" said:
very nice!! for someone who jumped in on something that difficult & not be "skeered" of it. i wish you were around here close, i'd put you work & really teach you some neat stuff.


Yeah, I can relocate for a certain salary... :)
 
Just thinking out of the box here, but do you tack / weld the inside of the roof? I would think that it would help the structural rigidity once the outside welds are ground smooth. Very impressive j.
 
I actually plan on tacking a strip in place, on the inside, on top of the seam to additional strength. The seam get's hidden by the inside rear metal cab filler panel piece.

Crap. I have to chop THAT also.
 
Tackled some tougher parts this weekend on the Rat. I connected the two upper cab halves. What a PITA! Took most of the weekend to do it. Wish I would have taken more pics... but I was rolling, so I didn't stop. Sorry.

The sectioned top. It was a 2-1/8" gap to seem/fill together. The tricky part was the inner rail structure support and the drip rail... The truck ALMOST became driprail-less for a bit... :)

26_07_02_10_8_02_03_0.JPG


It's a rat, so I use what I have in house. This happened to be from an old bed frame. I will ALWAYS pick those up. Nice angle iron! And usually free or dirt cheap.

Took two pieces to form the 2" C channel for the top cab support:
26_07_02_10_8_02_03_1.JPG


Welded those puppies together -you'll notice opposite of each other - one side being taller then the other to match the existing C channel
26_07_02_10_8_02_04_2.JPG


Top center is where the filler C channel went in (and don't mind the sharty piller spot welds. Those have been cleaned up and rewelded now) you can see it in the middel of the green (under neath side)

26_07_02_10_8_02_43_0.JPG


Here is the side view:
26_07_02_10_8_02_04_3.JPG


I had to form the roof sheet metal to have 2 small stair steps in it (seen up in picture 2) to form the drip rail mounting channel and to wrap down over the new C channel piece to match the existing bends of the 2 adjacent sides. Again - a PITA.

View down the side - drip rail still 100% intact.
26_07_02_10_8_02_04_4.JPG


Next up I have to tackel that bad area on the top of the windshield - I THINK I can use the 5" pices that I cut from the A pillers - skin them open and use the stepped side to match the top windshield step. And then to the doors tops. Lots of work on those doors too.

26_07_02_10_8_02_43_1.JPG
 
"beach pony" said:
You got some mad skilz bro! That is gonna be a sweet ride! Can't wait to see it roll!

Try having a 5 year old ask you everyday "Dad, when is your rat rod going to be done?". He wants to ride in it worse than I do I think. :vic
 
"70_Fastback" said:
Try having a 5 year old ask you everyday "Dad, when is your rat rod going to be done?". He wants to ride in it worse than I do I think. :vic

Motivation Big J, Motivation!
 
Got to finish a door today. Took quitet a while to do, but I think it turned out pretty good.

You can see the chopped door in the previous posts above. I sectioned the top of the door into 2 pieces and aligned and welded the individual pieces to the lower door. Which leave a nice 2" gap again.

26_21_02_10_9_39_20_0.JPG


I thought I would be able to use a piece of the 5" part that I cut from the back of the door -seen here:
26_21_02_10_9_39_20_2.JPG


But it was the wrong shape. The top channel was way different.

So I took a piece of scrap metal and formed it to match the top door channel.
26_21_02_10_9_39_20_1.JPG


...Again I kind skipped ahead and didn't get many in between pics. Here is the top channel in and skinned. I was able to use some of that old cut out piece - but I had to section the skin horizontally and make it taller and re-wrap the top edge. Much like a typical door skin, only smaller version here:
26_21_02_10_9_39_20_3.JPG


Just misc. pics of the inside door posts. I had to split and bend the outer posts, hence the weird "jog" in the back. But the inner metal interior panel covers it - so it's not seen.

26_21_02_10_9_39_20_4.JPG


26_21_02_10_9_40_35_0.JPG


26_21_02_10_9_40_35_1.JPG


Better shot of the top where the formed channel was sectioned in and the skin wrapped over.

26_21_02_10_9_40_35_2.JPG


That "jog"
26_21_02_10_9_40_35_3.JPG


More gratuitous pics:

26_21_02_10_9_40_35_4.JPG


26_21_02_10_9_42_59_0.JPG


That area above the door handle opening is Lead. Not sure why there was lead there - but it melted and ran when the grinder got it hot :scar I need to get that stuff gone and fix that blemish.

26_21_02_10_9_43_00_1.JPG


26_21_02_10_9_43_00_2.JPG


26_21_02_10_9_43_00_3.JPG


26_21_02_10_9_43_00_4.JPG


26_21_02_10_9_44_06_0.JPG


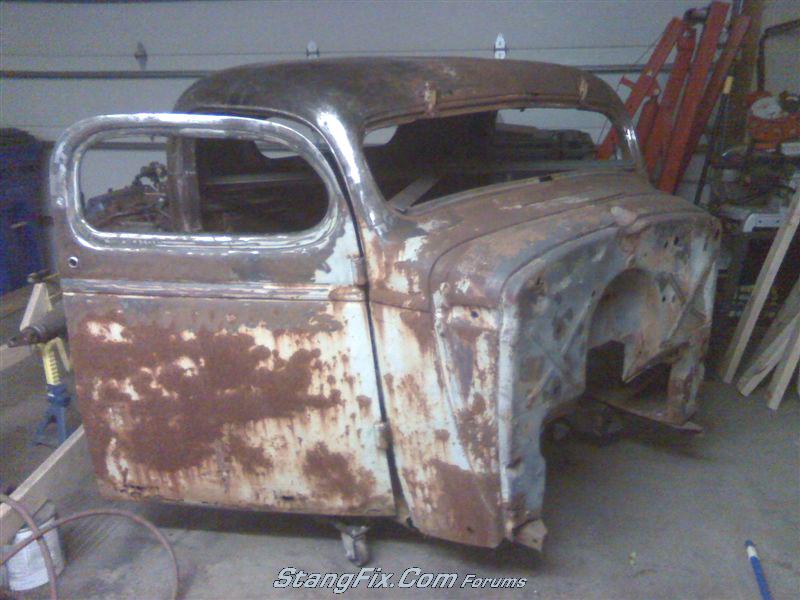
Overall shot (via cell phone):
26_21_02_10_9_44_06_2.jpg
 
Back
Top