• Hello there guest and Welcome to The #1 Classic Mustang forum!
    To gain full access you must Register. Registration is free and it takes only a few moments to complete.
    Already a member? Login here then!

70_Fastback: RAT ROD - 193x Ford / 1942 GMC Truck

How the heck do you adjust caster/camber with that?


BTW, way cool brutha!!
 
Caster is set to at a baseline of appx 8degree postive. The caster will change slightly though as the radius arms articulate from their pivot point when the suspension travels up and down.

As far as camber.... you've got me. The kingpin places the spindel centered on the axle boss. No adjustment there...
 
That will get boxed in also. Basically it will be a more "decorative" fish place that will cover the open tube ends and then taper with concaved curves to a point headed towards the center of the frame and then will get welded solid. It will help with any twisting caused from the spring perch point at those two ends.
 
"70_Fastback" said:
Caster is set to at a baseline of appx 8degree postive. The caster will change slightly though as the radius arms articulate from their pivot point when the suspension travels up and down.

As far as camber.... you've got me. The kingpin places the spindel centered on the axle boss. No adjustment there...


You'll really wear the tires when you bring it to the track :naug
 
"70_Fastback" said:
As far as camber.... you've got me. The kingpin places the spindel centered on the axle boss. No adjustment there...

The axle has to be bent to adjust this. It was the same on the older trucks, even with the twin I beam Ford suspension. Not many shops can do that today. You can also adjust the way the spring sets but there is very little room for this before the travel path is effected.

This is really looking good.
 
"AzPete" said:
The axle has to be bent to adjust this. It was the same on the older trucks, even with the twin I beam Ford suspension. Not many shops can do that today. You can also adjust the way the spring sets but there is very little room for this before the travel path is effected.

I'm not going to really worry about it (right now).


"AzPete" said:
This is really looking good.

And thanks Pete.
 
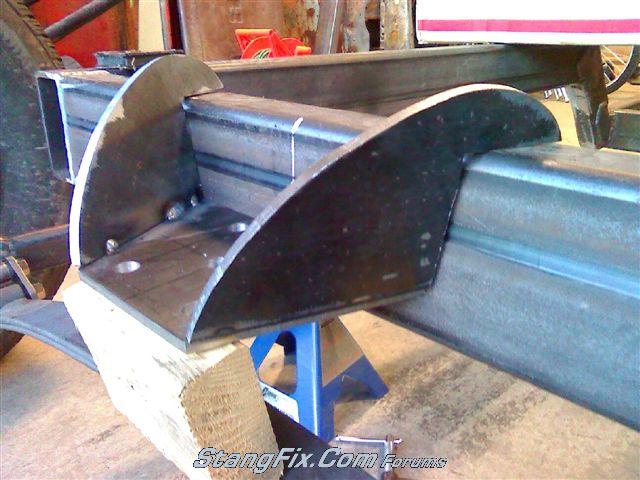
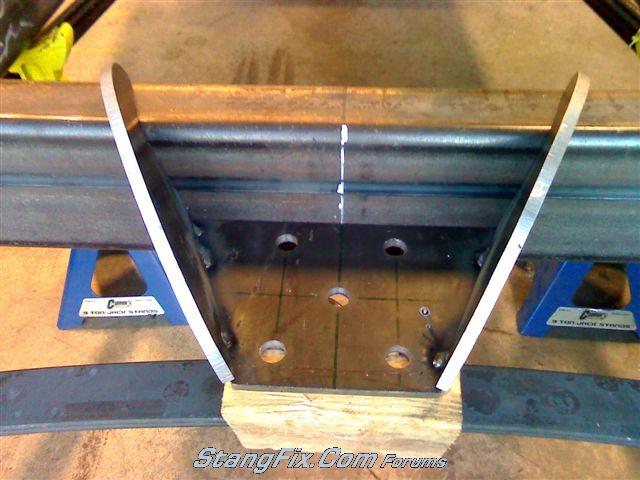
Spent about an hour last night and started fabb'ing the front spring perch. Here it is roughed in. Question though... should I put the hole saw to it and give it a large (1-1/2" +/-) lightening hole on each side for asthetics? Or leave it solid...

More then likely the grill shell will hide the perch anyway so the extra holes may be a waste anyway...

The hole would go on each vertical face/side...
26_07_06_10_6_37_29_0.jpg


26_07_06_10_6_37_29_1.jpg


Yes, No... maybe?
 
Leave it solid, that's gonna be holding an important part in place!
 
Yep, leave it solid. Use the body to give decorations.........yea....on a decorative on a rat rod.
 
I would cut the hole, but weld in a piece of round tube the same size. You get the look and keep the strength. Its in the details....
 
I wouldn't be able to get the U-bolts installed from the top if there was a tube running horizontal from side to side (I assume that's what you meant...)

I may just add one more identical curved plate vertically, straight through the middle back to the frame and just notch the bottom to clear the spring bolt head.
 
No, I thought you meant a lightning hole in the frame, not the bracket. I would drill through the frame and weld in a piece of tube.
 
No, sorry - the original question was about drilling holes in the bracket wings - not the frame.

The frame is slated to get lightening holes on the sides though. About (6) 2" holes down each front rail portion.
 
"70_Fastback" said:
The frame is slated to get lightening holes on the sides though. About (6) 2" holes down each front rail portion.

Check & complete. Although I did change it a bit - I did (5) 2-3/4" DOM tubed sleeves down each side rail. What a PITA!

Took 2 full days to do the 10 lightening holes. I started by locating and pre-punchnig center holes, then drilled each hole with a 2-7/8" hole saw. And let me preface that drilling 20 (twenty) 2-7/8" holes with a hole saw AND hand drill SUCKS. My fingers are still numb this morning from the constant vibration...

A quick walk though:

started drilling...
26_14_06_10_7_18_02_0.JPG


5 holes in. There is the first DOM sleeve sitting in the back hole...
26_14_06_10_7_18_03_1.JPG


5 DOM sleeves installed and tacked in place...
26_14_06_10_7_18_03_2.JPG


All welded up and burned in... ready for grinding.
26_14_06_10_7_18_03_3.JPG


All smoothed down...
26_14_06_10_7_18_03_4.JPG


A shot from the front. The spring perch is all burned in and the end cap/fish plates are burned in...
26_14_06_10_7_18_45_0.JPG


Just more random pics...
26_14_06_10_7_18_45_1.JPG


I'm very happy with how they turned out.
26_14_06_10_7_18_45_2.JPG


All 10 in...
26_14_06_10_7_18_45_3.JPG


26_14_06_10_7_18_45_4.JPG


26_14_06_10_7_19_45_0.JPG


Good detail shot
26_14_06_10_7_19_45_1.JPG


26_14_06_10_7_19_45_2.JPG


26_14_06_10_7_19_45_3.JPG


Another of the front spring perch and end caps/plates...
26_14_06_10_7_19_45_4.JPG


26_14_06_10_7_19_55_0.JPG


And note... I'll never do THAT again. :lol
 
Back
Top