Navigation
Install the app
How to install the app on iOS
Follow along with the video below to see how to install our site as a web app on your home screen.
Note: This feature may not be available in some browsers.
More options
-
Hello there guest and Welcome to The #1 Classic Mustang forum!
To gain full access you must Register. Registration is free and it takes only a few moments to complete.
Already a member? Login here then!
You are using an out of date browser. It may not display this or other websites correctly.
You should upgrade or use an alternative browser.
You should upgrade or use an alternative browser.
70_Fastback: RAT ROD - 193x Ford / 1942 GMC Truck
- Thread starter 70_Fastback
- Start date
70_Fastback
Hell Bent for Speed
"stangg" said:Swap the O and R's positions, then in painted small script have a " 'n rat" added just to the upper right of the "F" and you have F'n rat ROD... cause it really is a Friggin cool rat rod...
Thanks.
Oh, and hey - I didn't ignore your PM by the way. I deleted it in lieu of replying. Been meaning to get around to writing back. LoL.
tarafied1
Well-Known Member
looks like all it will haul is ... well you know!
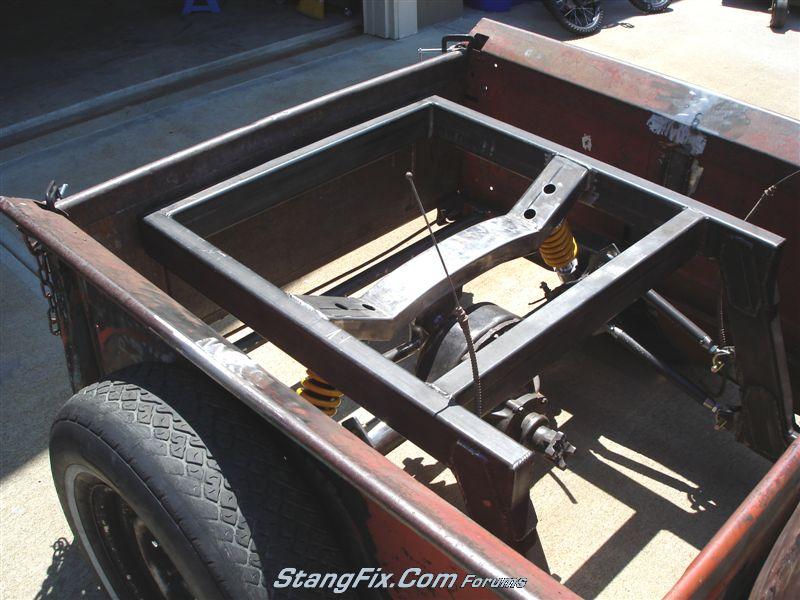
lOOks great!
lOOks great!
70_Fastback
Hell Bent for Speed
sooo.... what you're saying is that is looks OK so far for the prototype? 
AzPete
Well-Known Member
You need to put the bed on hyd. lifts and the floor to it separate. Then, when you need to haul something, just run the sides up to make it a real truck bed.......... :lol :lol :lol :lol
tarafied1
Well-Known Member
yeah, for a prototype! :lol"70_Fastback" said:sooo.... what you're saying is that is looks OK so far for the prototype?
just awesome dude, probably the best engineered rat rod and perfectly executed fab work!!!
SELLERSRODSHOP
Well-Known Member
"And I'm not totally sold on the "F O R D " script on that tailgate. I believe it's a 50's something gate. It doesn't look nostalgic enough for the build.
Thoughts....?"
i've got a section of old "T" model running board laying outside the shop with the script in it you can have if it will work. i'll guage it tomorow & see how thick it is as far as grafting into your gate. i think it would look cool grafted into a lower corner of the gate vs. the center.
70_Fastback
Hell Bent for Speed
I'm all over that!
SELLERSRODSHOP
Well-Known Member
here is the running board piece. would be cool to graft a section in with the ford script & a pattern of the diamonds.


SELLERSRODSHOP
Well-Known Member
maybe like this??


70_Fastback
Hell Bent for Speed
How tall is your diamond'd area though?
edit:
And that steering shaft is 3/4" OD diameter. I finally got that speer-o-matic column taken apart and mic'd the shaft.
edit:
And that steering shaft is 3/4" OD diameter. I finally got that speer-o-matic column taken apart and mic'd the shaft.
70_Fastback
Hell Bent for Speed
And now it's time for your weekend update...
Not a major milestone weekend, just tackled a smaller, yet tedious job as I was not feeling like starting something that I couldn't wrap up this weekend - plus my work time was cut down some because of my Mom's birthday and we got together. Anyway...
I chopped the windshield frame and made new posts for the slider brackets and got everything mounted. Turned out nice.
The original windshield frame was pretty much beyond repair, so I used it first to do some mock ups, etc before I cut into the good one that I bought from ebay.
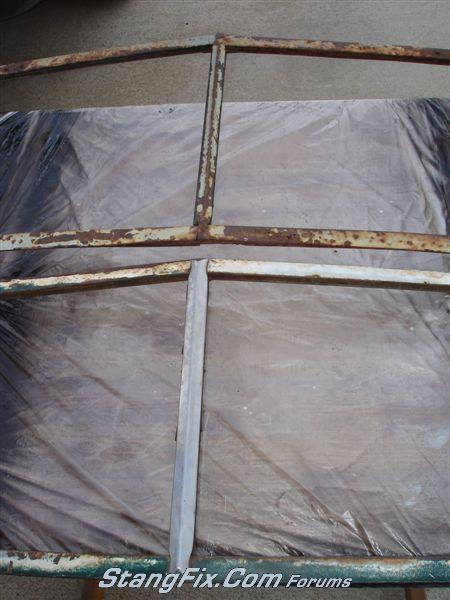
My original one is on top, the donor is on the bottom.
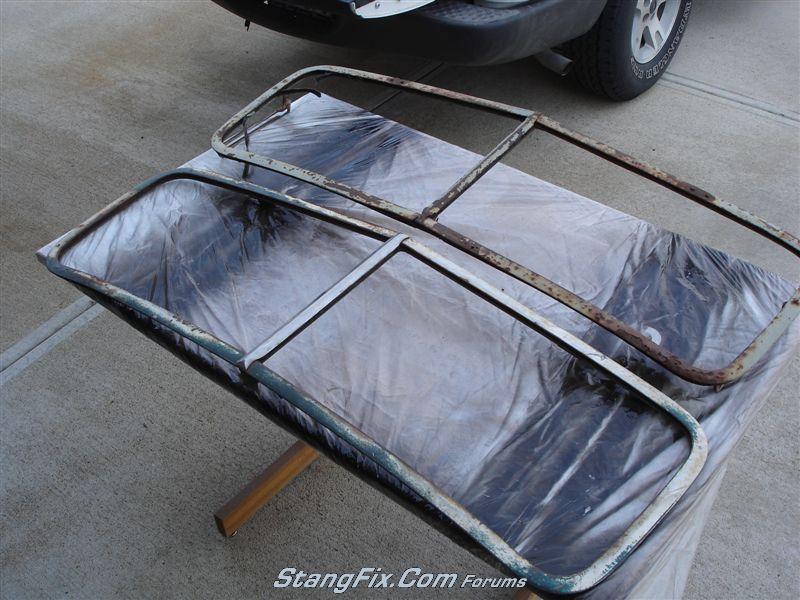
Some pretty serious rust through:
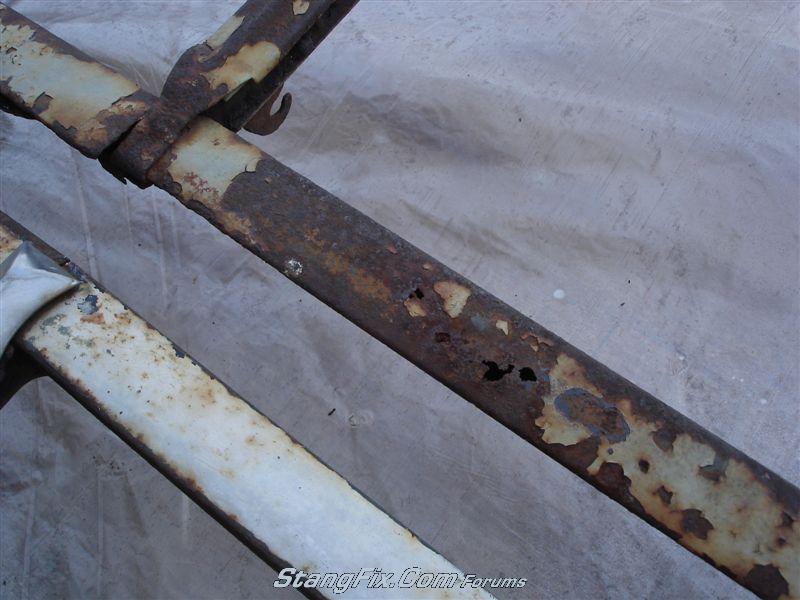
And some major rot:
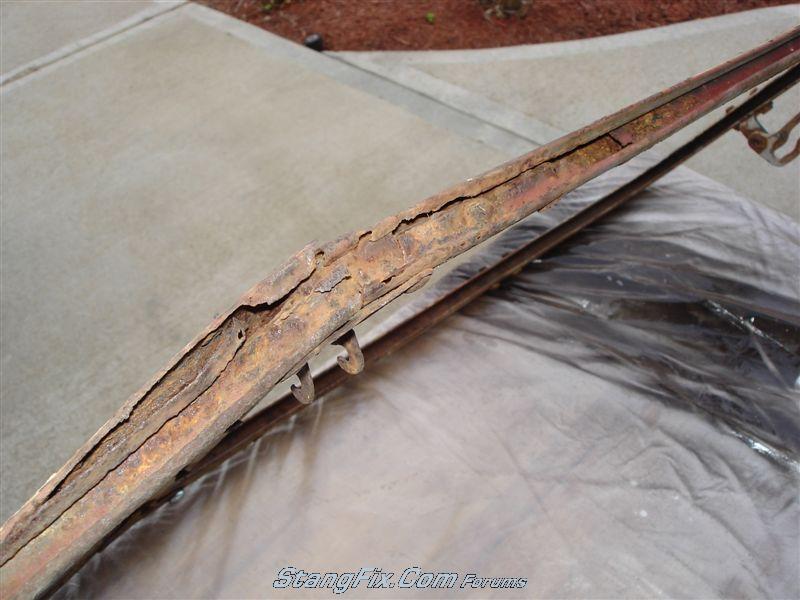
Note the differences in the frames. I believe the differences are largly due to mine being a military cab. My frame had a formed metal center divider and the other frame - which was from a COE truck, has a nicer stainless divider.
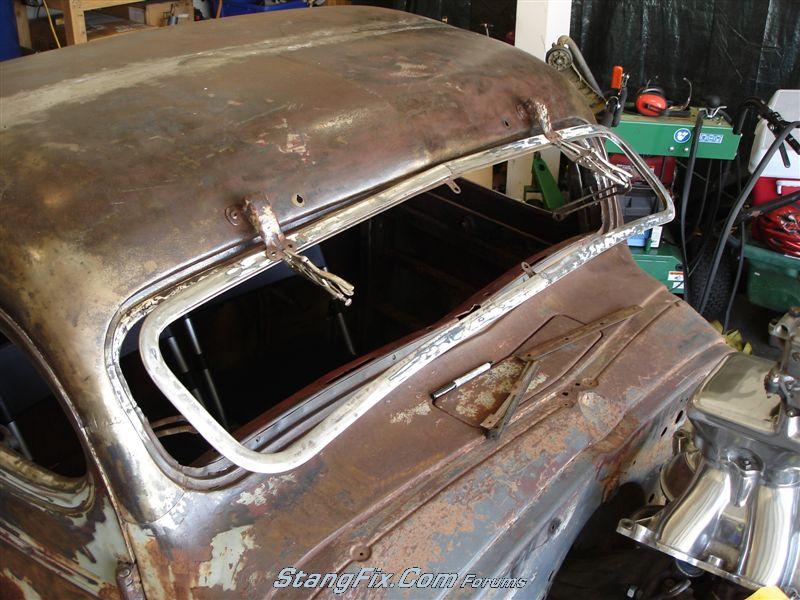
There are also considerable differences between the two frames and how they hinged and tilted out from the cab. My cab has those big exterior mounted flip up hinges - with the slider brackets on the sides. The COE frame has the hinges mounted on top of the frame (you can see them cut off in the picture) and no side sliding rails.

Ok, here is the donor frame cut in half and mocked up in place. I had to make relief cuts in the corners so I could tighten up the radius since I pulled the A piller posts in some during the chop.

Next, I determined how much I needed to remove from the bottom frame piece - which was 4-1/2". I had to make relief cuts in the bottom as well and pull them out a bit. I also made some 1/4"x1/2" steel slugs and slid them into the frame channel and tacked them in place. This helped align the two frame sections together and facilitated a nice weld too.

Frame halves welded together:

Comparison between the 2 different center divider pieces:

I went with the stainless piece:
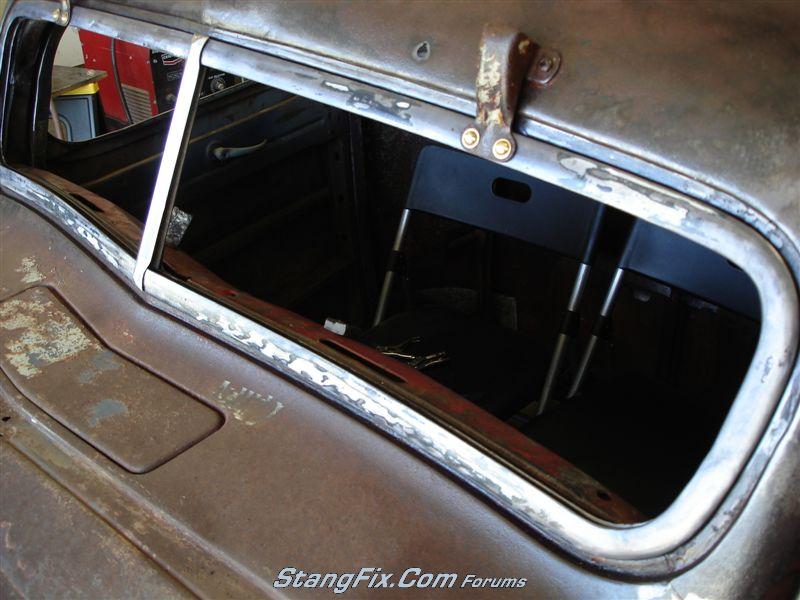
I actually just cut the piece in half and slid the bottom section into the upper section - much how the rear stainless trim on our mustangs slide together and form the seam in the middle. I just made the seam down near the bottom.
Next was the massivly long slider rails. They were way too long since everything was chopped. They held the windshield out way too much. So they had to be cut down too.

Shortened 3-1/2"
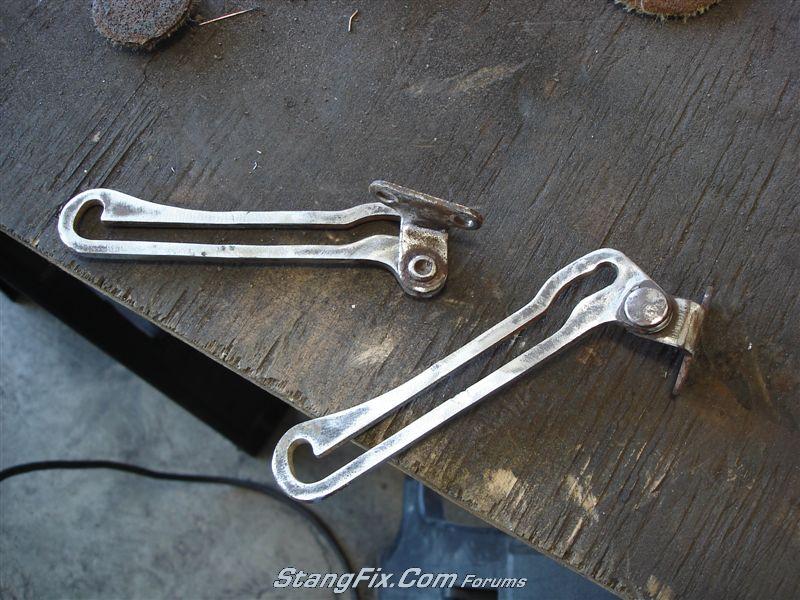
I had to make new guide posts as well. Basically copied the existing brackets and relocated them.
(And no, not all of the cab welds are dressed yet...)
Note the bronze spacers on the posts are actually cut down ammo shells.

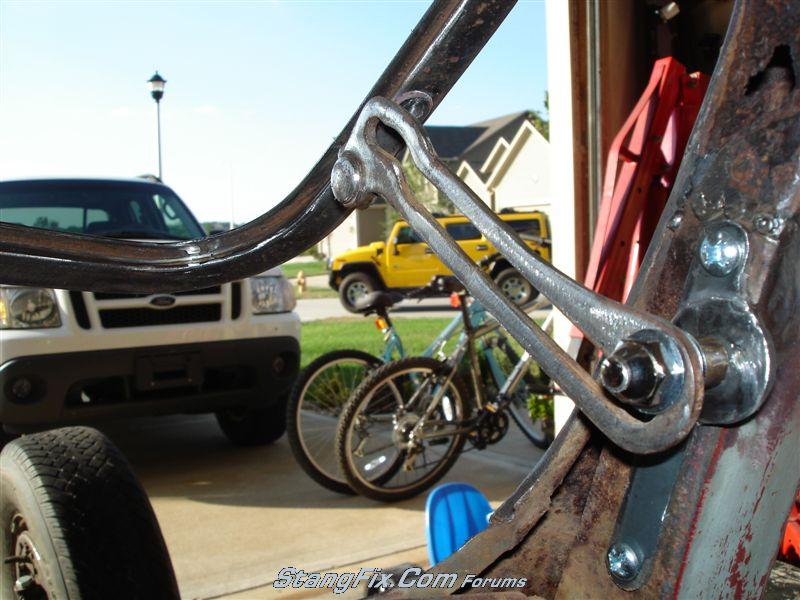
Tilted out - which is cool as hell IMO.
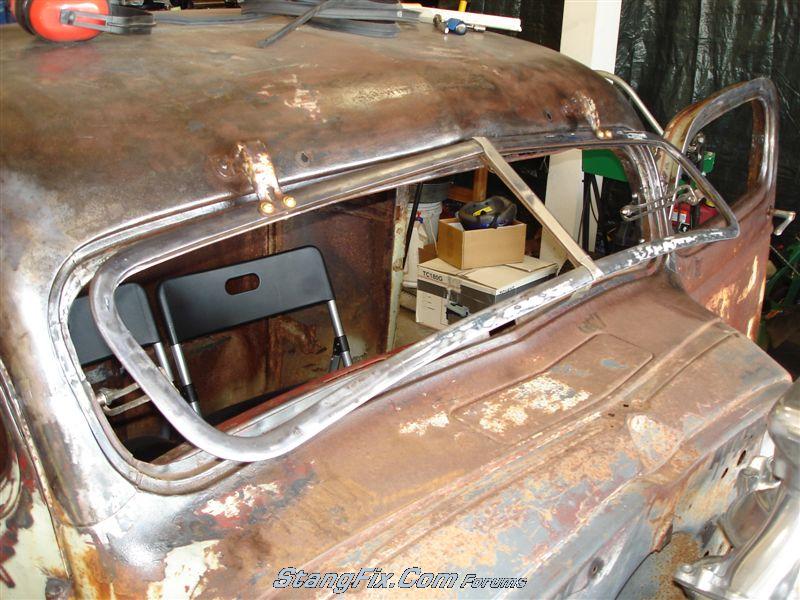
And closed. I just need to install the weather stip moulding - which is laying on top of the cab there.
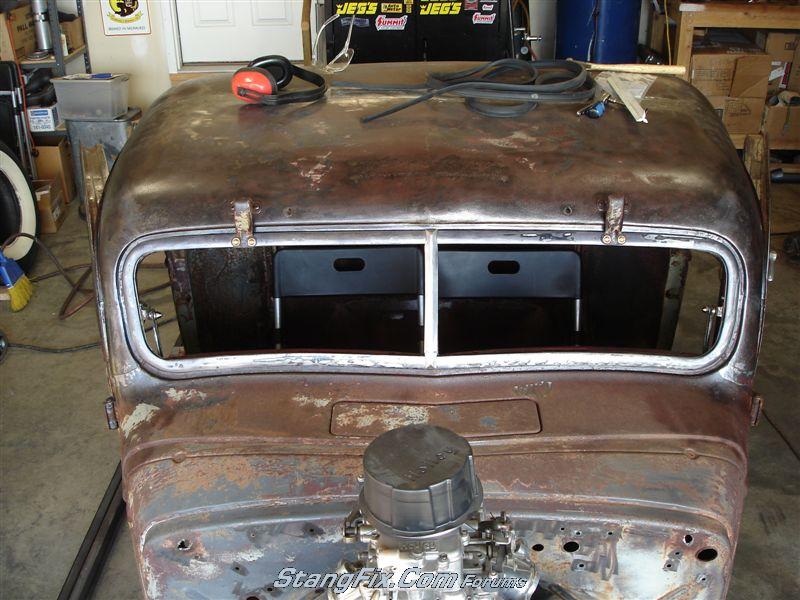
Not a major milestone weekend, just tackled a smaller, yet tedious job as I was not feeling like starting something that I couldn't wrap up this weekend - plus my work time was cut down some because of my Mom's birthday and we got together. Anyway...
I chopped the windshield frame and made new posts for the slider brackets and got everything mounted. Turned out nice.
The original windshield frame was pretty much beyond repair, so I used it first to do some mock ups, etc before I cut into the good one that I bought from ebay.
My original one is on top, the donor is on the bottom.
Some pretty serious rust through:
And some major rot:
Note the differences in the frames. I believe the differences are largly due to mine being a military cab. My frame had a formed metal center divider and the other frame - which was from a COE truck, has a nicer stainless divider.
There are also considerable differences between the two frames and how they hinged and tilted out from the cab. My cab has those big exterior mounted flip up hinges - with the slider brackets on the sides. The COE frame has the hinges mounted on top of the frame (you can see them cut off in the picture) and no side sliding rails.
Ok, here is the donor frame cut in half and mocked up in place. I had to make relief cuts in the corners so I could tighten up the radius since I pulled the A piller posts in some during the chop.
Next, I determined how much I needed to remove from the bottom frame piece - which was 4-1/2". I had to make relief cuts in the bottom as well and pull them out a bit. I also made some 1/4"x1/2" steel slugs and slid them into the frame channel and tacked them in place. This helped align the two frame sections together and facilitated a nice weld too.
Frame halves welded together:
Comparison between the 2 different center divider pieces:
I went with the stainless piece:
I actually just cut the piece in half and slid the bottom section into the upper section - much how the rear stainless trim on our mustangs slide together and form the seam in the middle. I just made the seam down near the bottom.
Next was the massivly long slider rails. They were way too long since everything was chopped. They held the windshield out way too much. So they had to be cut down too.
Shortened 3-1/2"
I had to make new guide posts as well. Basically copied the existing brackets and relocated them.
(And no, not all of the cab welds are dressed yet...)
Note the bronze spacers on the posts are actually cut down ammo shells.
Tilted out - which is cool as hell IMO.
And closed. I just need to install the weather stip moulding - which is laying on top of the cab there.
Fast68back
Guest
SWEEEEET Work J
A
Anonymous
Guest
Oh sure, you have plenty of time to work on the Rat, but no time to spend with friends (or enemies).
Nice work J!!
Nice work J!!
AzPete
Well-Known Member
Just quit work and open up a rat rod shop......nice.
70_Fastback
Hell Bent for Speed
"AzPete" said:Just quit work and open up a rat rod shop......nice.
If it would only pay the bills I would Pete.
I have been researching it though - believe me.
With your skills you could easily make it happen. You make projects that would intimidate most of us (certainly myself) look mundane. For instance, you only had a bit of time this past weekend so you simply chopped and otherwise modified a windshield frame to completion."70_Fastback" said:If it would only pay the bills I would Pete.
I have been researching it though - believe me.
Boys will always pay money for their toys. I, for example, would hire you in an instant to finish up my mini-tub work, for example (otherwise it might never get done). Maybe build a custom 4-link, etc. There is no end to the projects that could come your way.
Do good work. Do it honestly. You'd do fine. Life is too short. If you seriously would like to do it and could make it happen...make it happen.
70_Fastback
Hell Bent for Speed
"stangg" said:Looks great... love the bucket seats...
LMAO! Thanks man.
LoL, I actually put them in there for the boys to sit on and I rolled them outside in the truck. They thought it was awesome. I have some pictures of them somewhere. Klayton was even making his "rat rod" sounds while I rolled them out. At first I thought I ran over the neighbors dog but soon realized it was just my kid "un-corked". LoL.
70_Fastback
Hell Bent for Speed
"Horseplay" said:With your skills you could easily make it happen. You make projects that would intimidate most of us (certainly myself) look mundane. For instance, you only had a bit of time this past weekend so you simply chopped and otherwise modified a windshield frame to completion.
Boys will always pay money for their toys. I, for example, would hire you in an instant to finish up my mini-tub work, for example (otherwise it might never get done). Maybe build a custom 4-link, etc. There is no end to the projects that could come your way.
Do good work. Do it honestly. You'd do fine. Life is too short. If you seriously would like to do it and could make it happen...make it happen.
I would SWEAR that you have been talking to my fiance' (shut up Rick) - she is saying the exact same thing.
And thanks for the sincere words as well.
My main concernt about doing that type of venture is that it's an area that is greatly affected by the economy. Times get tough - what is one of the first items that you would cut? Typically toys.
