• Hello there guest and Welcome to The #1 Classic Mustang forum!
    To gain full access you must Register. Registration is free and it takes only a few moments to complete.
    Already a member? Login here then!

Chasers 66 408 Restomod / ProTouring Coupe

Well its starting to cooperate...

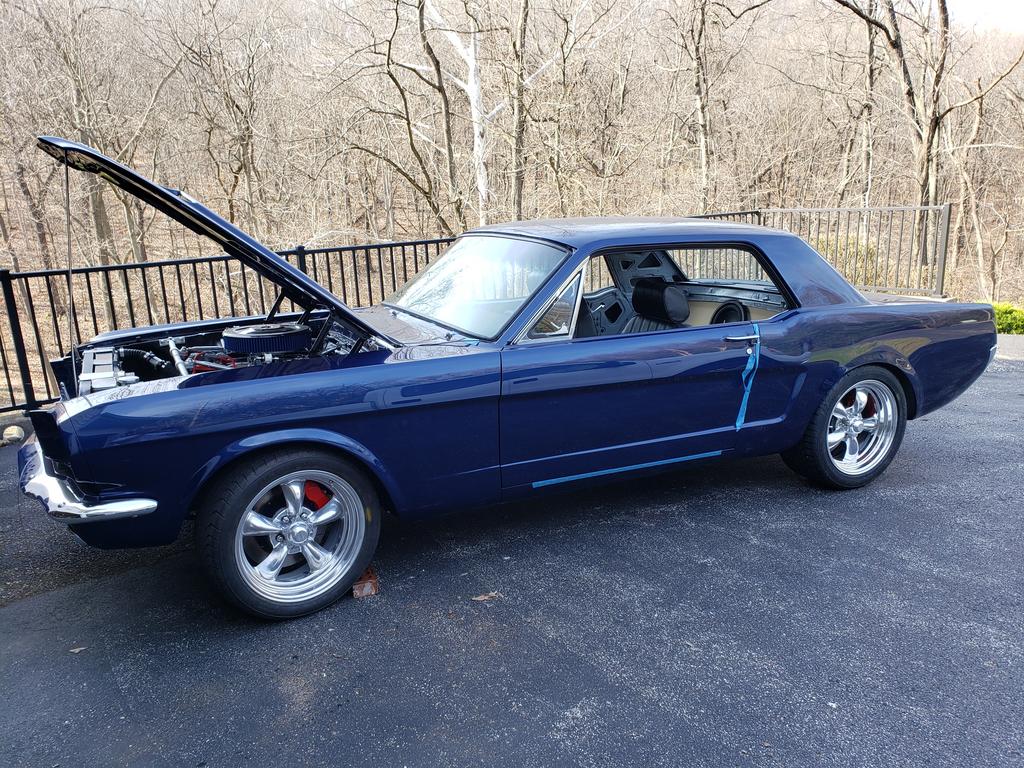
I was also fighting an issue with the brake lights in that...they were always on when I'd hook the switch up. After looking closer, the SSBC adjustable brake pedal switch pedestal was about 1/16" or so too long. I ground it down, reinstalled, and now its working like a champ! The LED taillights from vintage LED's look amazing! Although I'm not sure how I like the sequential setting...thats easy to mess with though.

I then turned my attention to the heater hoses. Getting them on was a bit of a trick to do by myself. Even with pushing the tubes on the climate control back, they kept flexing back inside of the car. I put the handle of my ratchet in to act as a stop, put a little dish soap in the mounting end of the hoses, and off we went. I did elect to hose clamp them in the engine bay vs under the dash. I may switch that up later when I change the water pump to a reverse rotation (serpentine AC) but, for now, I'm going to leave it.

I was also able to get all the door glass in and rough aligned...once i remembered how to do it...it's been a few years. I'll do final alignment tonight and then put the fuzzies in. I'm pretty excited about this part cause its starting to make the car look more final!

The 6 1/2" Alpine R's are mounted to the kickplates, plates installed, and wires ran for that. I also moved the radio circuit to one of the accessory feeds. I'm still troubled by why the AAW radio wire doesnt charge when the key is on and will be looking more in to that in the future. Until then, the accessory feed will work fine.

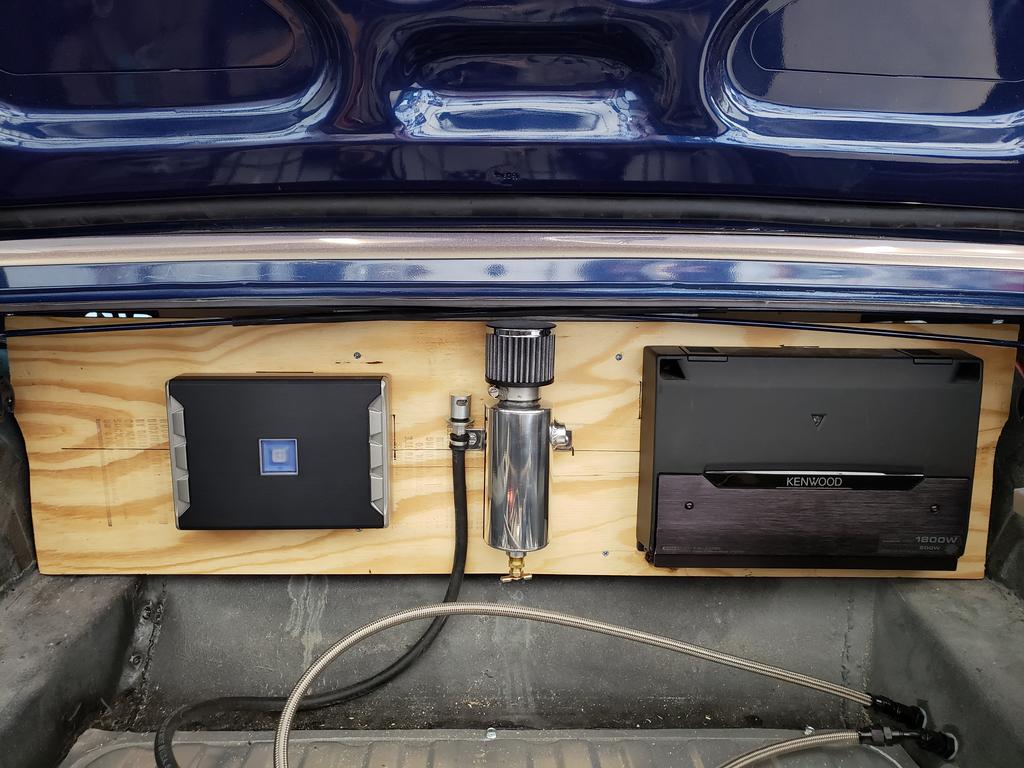
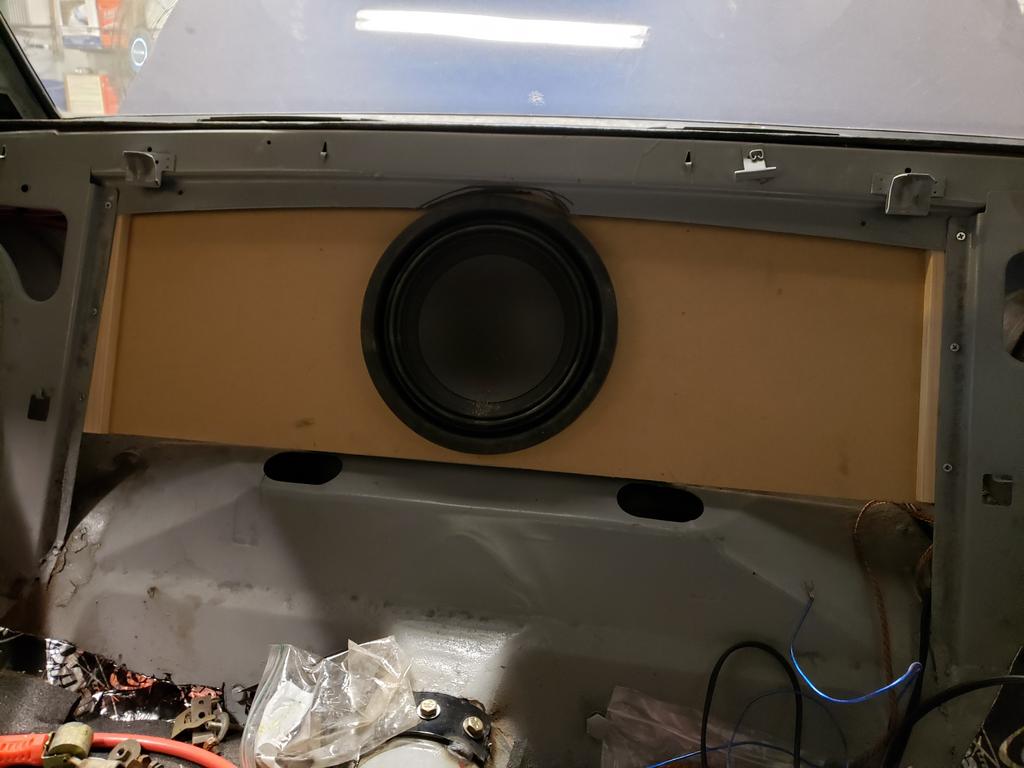
Lastly, I installed the subwoofer and box. I had to notch a little out of the top of the divider but the rest of my design popped right in. The notch job isnt great and I will be making it prettier in the next couple days. Although you'll never see it since the back of the seat will be covering it but I digress. I have a 10" Alpine Type R in there that will be fed by a Kenwood 1k watt mono amp. I had hoped the amp would be small enough to mount to the backside of the subwoofer mounting board but alas, that's not the case. I had plans to do a hider board on the backside of the box in the trunk area anyway so I'll be mounting it there instead. Probably best for venting the amp anyway. What will bug me is that I am going to be mounting both the mono and 4 channel to that board...and they are two different makes of amp. Again, it's not the end of the world and easily changed later...but it'll be sort of annoying to my OCD.

20190402-172523.jpg


I re-read Horseplay's post again specifically the part about relaying key'd power on a junction block. I hadnt thought of that. I do have a relay that I had wired in but not in use. I kind of like the idea of moving some switched power-y stuff over to that. I'd probably move the radio, powersteering, and blower over to it initially. Going to think about that one a little more.
 
Make sure you are connecting the power to your radio correctly. The way your posts read I don't think you are. Many radios these days require constant power not keyed. This is to maintain preset info, time, etc. Many have dual power connections one being constant and one keyed. Also if you use my suggestion of including "power posts" you must still have fuse or breaker protection on each line coming off to any components.

Before you connect a car battery to your new electrical system I suggest ringing out all the wires one by one to make sure you have everything correct. I also use one of those small emergency jump start battery devices as a power source to power individual circuits one by one to confirm proper operation. If you've never seen a full on electrical short that is unprotected reach ground it's not pretty. You can melt all kinds of stuff or worse before you can disconnect a battery. My way you can knock off the alligator clipped power lead quick if need be and not cause any damage. For guys not well versed in electrical work of the scale of a total re-wire its just another way to play it safe. Just a suggestion.
 
Uh nope...radios connected correctly. There are two wires for the radio in the AAW kit (for those not familiar)...a yellow and a tan. The yellow is constant power and the tan is keyed power. Yellow confirms as constant power.
I'd be putting a fuse panel on the lines coming off the junction. I dont believe I stated that earlier.
I've run multiple electrical separation tests (what you described). Although I use a lipo battery pack with a switch. That way, if something goes sideways, i just flip the switch. I'm a bit past novice level on a lot of this stuff having done full re-wires on 5 different cars. This one is giving me more fight than the others.
 
Big stuff today! My wife helped install the front and rear windshields which was awesome! I still need to glaze them but at least the hard part is over.
I then installed the amps, catch can, and tank breather. I was a little concerned about the differing sizes of the amps but, now that it's in, i'm pretty happy with it. I am going to use some of my leftover braided line to make the feed from the housing to the bottom of the can. That way fluid can work it's way back down to the housing.

20190406-102820.jpg


The coolant leak was due to some poor machining on the thermostat housing. I have one of those pivoting CSR housing with the o-ring. There was a burr on the thermostat mating surface. Cleaned it up and it sealed great.

After that, i pulled the toe in a little bit as the wheels were flared out some. I intend to do another full alignment Monday.

Then came the FUN part. After going through all my pre-fire checks...I fired it up. I was pretty amped up and forgot to video it.
First thing, sucker is LOUD although that's a bit expected since it's a 3" exhaust that is currently terminated in front of the rear end. i 'hope' having the tubes run out the rear will help quiet it down some. If not, i'm going to put a 2.5" exhaust in.
Second, i think the trans is a little low on fluid. I know some leaked out on the driveshaft install. The reason I mention this is because getting it in gear is a bit of a chore. I also want to re-check the pinion angle. When i have it saftey checked (Missouri law), I'm going to have my mechanic also check pinion angle among other things.
Last...the current alignment SUCKS but it worked.
The first drive was TERRIFYING!! I LOVE IT. I drove it about a mile but it's unreal. I didnt get on it very much and its still scary quick! It'll take a little bit to get dialed in but man...it's FUN!
I was shaking for about an hour after the drive...

20190406-164623.jpg
 
Is that the fuel tank vent mounted to the board? Isn't that going to put gas fumes into the passenger compartment? I'd think this would cause a problem when you go for a state safety inspection.

And you know the rules here. Video or it never happened! :p
 
Yeah yeah i know :-D

The view of the board is a bit misleading as there are actually two barriers between the cabin and the trunk but, I get what you're saying. It would probably be best to move it to a wheel well?
I would start getting concerned about clearance to the tire if I did that though. I'll take a look at that today.

I took the day off to straighten out (literally) the wheel alignment. The car handled...terribly. So when i checked the alignment it was WAY off...like...1+ deg camber passenger side, -3 drivers side...I should probably put seat belts in it :-D

I also bought a progressive linkage for the Sniper. Having all 4 venturi's open at one time makes the car a bit of a handful...especially being a manual.
 
You can mount the vent up in the space above the rear end. It can be higher than the tank. Or just use a vented gas cap and plug up the tank vent port. That roll over vent cap piece will not work under the car do to its size. At least I couldn't find a suitable way to do it. Like you, I didn't want it in the wheel well. I used a pressure release type piece that works great with a return style fuel system. Whatever you do get it out of the cabin. It will fill the place up with the nastiness of ethanol fuel. Now if we could still run real gas I'd say leave it. Love that smell...even if it does kill us.
 
I also bought a progressive linkage for the Sniper. Having all 4 venturi's open at one time makes the car a bit of a handful...especially being a manual.

Did you get the fixed or adjustable version? Do you know the part number? I did a search on the Holley site and got over 1,500 hits, I just don't have it in me to wade through all that.
 
Slowly chipping away. I called my mechanic to get the list of requirements to pass a Missouri safety inspection. At the time, my horn and windshield wipers were the only things that sounded like they would flag it. As luck would have it, both were easy fixes. The windshield wipers werent working because i missed the ground wire on the motor. Boom...done...we have windshield wipers.
The ididit column was equally as easy once I realized I was overthinking it. I put the horn button wire in, hooked to button, grounded button...boom horn! With that, I think I can satisfy all their requirements so I 'think' I'm going to schedule an appointment for Friday. I want to drive it a little more to make sure the kinks are worked out.

Then I turned to the exhaust system. I have 3" pipes with X feeding in to Magnaflow mufflers. I REALLY want to keep the 3" to the mufflers but this thing is LOUD. So first order of business, I made up some tailpipes (ghetto...will do them right over the next few days) which quieted it down some but it's still pretty obnoxious. So i'm going to order a set of Dynomax Super Turbos and cross my fingers.

Given that all the important stuff is sorted, I decided to mess around with the sound system. The first determination is that the angle on my little "console" under the dash is too steep. The radio would not seat in no matter what I did. So i unscrewed the panel, tilted it up, and have found a good angle to make it work. Thus, I'm going to re-make the console with the appropriate angle and enjoy some tunes.
I got the amps, speakers, and basic wiring hooked up. Sounds AWESOME! The subwoofer is a little boomy but I can pull some of that out with the amp. The wires are very haphazard and I plan to focus on getting them 'prettied' up once i'm happy with the configuration.

All in all, a good weekend knocking down the punch list.

Goals for this week:
* drive it
* swap out the throttle linkage to the progressive linkage to make the car a little more manageable
* drive it some more
* rebuild console
* install microphone for radio
* (maybe) work out the wiring in the trunk
* (maybe) hookup the backup camera
 
Chaser, in post 184 I see the fuel vent, but what is the can next to it with the air filter(?) on the top? Whatever this is I've not seen this in the trunk before, but am interested. Please explain.
The Tanks Inc fuel vent isn't configured well for our application. You may want to use something like the Newton TPV6 or its sister part, and a sintered filter by IIMuch, but definitely move the venting end out of the trunk.
 
@Mach1 Driver Thats a fluid catch can for the differential housing. I plan to run a line from the housing, through the trunk, to the bottom of the catch can. That way, as the fluid heats up and moves up the hose it'll go in to the catch can. When it cools, seep back down.

Yeah i really hate that little fuel vent. I'll look in to a TPV6...it looks like it'd be easier to mount for sure. In the meantime, i'm going move that vent to exit next to the fuel lines.

Although, I currently have bigger problems. I was running down some ignition issues last night. It sounded like the whole system was lean misfiring on occasion. Messing with the ignition timing in the sniper, i was able to get it to 'behave' and decided to take it out for a drive. I didnt make it about a half mile and the car shut down and would not start. Everything was checking out fine. Checking in to it further when I got it back to the house, I noticed that when the fuel pump would prime and shut off, fuel pressure wasn't holding...it'd quickly seep back off. I've seen this before................when it was out of gas. So for the next few days I'll be filling up 5 gals on my way home from work :-D

All blessings in disguise though as I did notice a might bigger issue. There was a puddle of brake fluid under the transmission in the general area of the Tilton. The lines on it feel very loose so i hope that's the case. However, small mistakes can often lead to big problems. My mistake here is that, i'm pretty sure i didnt read the instructions close enough and may have not installed the clutch pedal stop appropriately. In doing so i was probably overthrowing the bearing which they do not like. I'm going to call Modern Driveline today to discuss with them but, i may have torched the throwout bearing. Inspecting what I can, it looks like fluid is weeping out of the lines though. The Tilton is dry, fluid is coming down the bleeder line, and everything else looks ok. Either way the trans has to come out so I started on that this morning.
On the bright side a manual trans isn't too terribly hard to pull out...more annoying than anything.
 
Last edited:
The Tilton bearing hose ends at the bearing are factory fit and are made to pivot (looseness you feel?) but not be tightened. Are you thinking your leak might be where you connected to the actual bearing lines? Just as reference, the fittings are -4AN. perhaps incorrect size on your other line? You wouldn't be the first to accidentally use a standard flare against a AN. ;)
If you bought all the bits from MDL I wouldn't worry too much about over stroking the pedal and in turn over traveling the bearing. The master they provide is on the lower end of the volume required so even at full stroke of the MC it's not too much for the bearing. They standard they send is a .7 bore 1.25" stroke as I recall.
You mentioned earlier about shifting problems and thought maybe you needed more fluid in the the trans. On a manual trans I'd say nay to that and most likely you didn't have the bearing bled fully or had a leak. Seems you know you have the leak part, anyway! When speaking with MDL be sure to go over the bleeding process. They claim it is really easy to not get right. Tried to sell me a tool they have to make it easier. Might want to get that or use the old fashioned line in a bottle process which worked just fine for me.
And lastly, I'll add that the TPV6 piece is the type I was recommending and use as well. Slick and easy to mount where it can be outside the cabin and still high enough to function properly.
 
@Horseplay Thank you for the insights T.
The fluid appears to be coming from the Tilton at the lines.The leaks are well forward of the lines themselves...at least from what I can tell.
When I bled it, I did it the old fashioned way after first trying to use the vacuum bleeder...and doing it their way. I got all the stuff from MDL so it should jive. It is very possible that the fluid could be coming out of the bleeder line but I had fluid higher up on the hose itself.
I plan to fill it and pump the daylights out of it hoping to trace the leak before going too much further.

What all do i need for the TPV6 stuff? The unit, an elbow, and a filter?
 
When you get it all back together make sure you are using the highest mounted line as the bleeder. What I do is use a piece of fish tank hose for bleeding. Press it onto the end of the bleeder fitting making sure it is snug and air tight. Open the bleeder. Put the other end of the hose in a water bottle 1/3 full of the same fluid you are using in the system. Tape the hose to the top of the bottle so that it won't move and the end is resting at the bottom of the bottle, fully submerged. Rig something up to hold the bottle securely in an upright position. Fill the reservoir to the top and get ready to work the pedal. Consistent, smooth depression of the pedal. Same as you allow it to return. Keep your eye on the reservoir so it doesn't run too low and watch for the bubbles in the bottle to go away and a solid flow of fluid into the bottle (no bubbles in the line). When you're sure the air is purged, close the bleeder while still keeping the line submerged and you can't go wrong. Do brakes the same way. Makes it a simple one man job.
 
That was the same process I used so i feel good about that.

Paul from MDL is going to give me a jingle here in a little bit to discuss. Although, the initial chat with one of the folks there sounded promising. I 'may not' have to pull the trans which would be amazeballs.
Since it's back in the air, I'm going to run through everything again.
 
Man, folks are proud of their stuff. Anyway, thinking through the vent filter some, I'd be running a -6 fitting into my braided line, exiting (somewhere...probably front in this case) the trunk area via bulkhead fitting, 90 degree angle to the TPV6 (-6 fitting), and into the II Much filter (-6 fitting).

If thats the case, then I could terminate the fuel vent currently provided through the front of the trunk floor in preparation for the adaptation.
 
.....slow work day today
I think i've sorted out how I want to do the tank venting. All done with the leftover braid and fittings I have from the fuel lines cause, why not.

I'm going to go 90 degrees out of the vent exit
route up and over the filler tube next to the tail light panel
terminate just past the filler house mount on the outside of the bracket with another 90
connect TPV6
straight fitting into more braid down into the fuel tank area to a bulkhead on the floor.

It's going to go to atmosphere for now but until I can figure out what filter I want to use. those IIMuch filters look nice but dayum...pricetag.
 
Paul from MDL called last night and kind of set me at ease on the throwout bearing. He gave me a punch list of stuff to check which i started looking at before work this morning. I've verified to the best of my ability:
* 1/8" clearance between the tilton surface and the clutch plate
* clutch plate finger test (for lack of a better term) which proves out the seal in the bearing (what gets messed up when it's overthrown)
* bleeder is fully closed
* bleeder adapter is closed
With that out of the way I started looking into the lines to see where it's leaking on them. The mainline from the master cylinder looks ok. It does not appear to be leaking. The bleeder line on the other hand has a leak...somewhere. I dont think it's at the bearing and more likely one of the crimps. Being on my own doing this, I cant find out exactly where. However, when I wipe the line down dry, pump the clutch, and then check; I have fluid on the line appearing like, halfway up. I'm going to see if my wife can help this afternoon but my suspicion is that the lower crimp has given out.
 
Back
Top