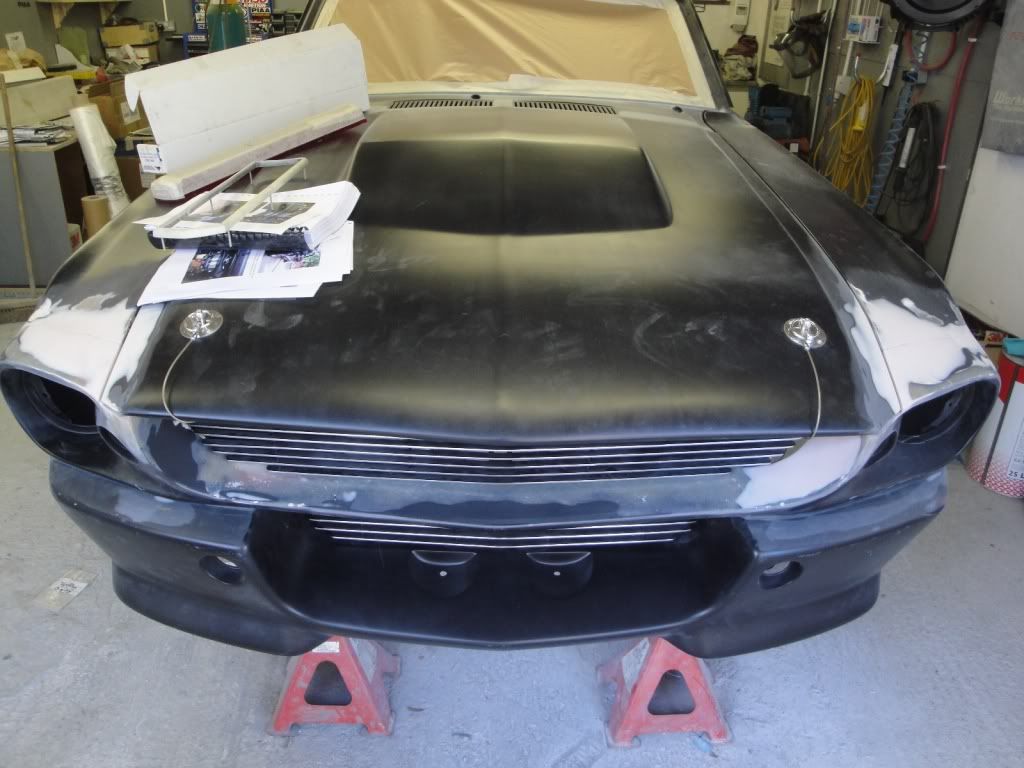
• Hello there guest and Welcome to The #1 Classic Mustang forum!
    To gain full access you must Register. Registration is free and it takes only a few moments to complete.
    Already a member? Login here then!

Johnny M - E-car build tread

"Fast68back" said:
Are you going to use the PIAA lights in your backup light housings as well? I'd like to do that mod one day. Although, my current back up lights arent even connected....

That's the plan....sort of!!!

I need to install an amber light somehow. Its the one thing i wont get away without having over here. I will prob. drill the side of the lamp housing and install a small pigtail and amber bulb.
 
I've been pretty busy lately but I'm still managing to get some hours with the car.....

Here's a list of completed items

Hydraulic throw out bearing installed. Had to modify the spacing collar but works now
Fuel line as far as the engine bay
Brake line from rear end to engine bay
Battery cables installed
Installed the manual hidden boot release
Got a box of parts in from the US which included all rubbers and weatherstriping.
Sorted out the heating/cooling dept. (thanks to Craig M)

And most importantly i have found two guys to paint my car!!!!! I heard about two Polish guys a while back that do great work on classic cars, so I have been asking around for about a year to try and get in touch with them. By chance i called a cousin of mine looking for someone to spray one of our drilling rigs and he gave me the number of a Polish guy which turned out to be one of the guys I was looking for. Anyways, long story short I got chatting to him and his mate and went to have a look at their work. I was very very impressed, one of the best buddies is a panel beater and I brought him along to check out their work, he was also very impressed. So I pulled the trigger and they started on the body work last weekend. They are working in my shop and then they will take the car to a spray booth once it is time for paint. I prefer it this way so I can keep control of everything. They work Thursday and Friday evening then all day Sat and Sun which is about 60 hours per week which suits me in terms of spreading out the cost and it allows me to still work on my car mon/tue/wed.


I can safely say that the FG is crap, total crap. To anyone out there if you want to build an E-car and you want the gaps to be anyway in line then plan to spend alot of time and money doing so.

I bought my Kit from South West Fabrications who were the original manufacturers for Unique performance. They made the kit exclusively for UP and only after UP went bust did they start selling to Joe Public. They offered me the first kit at 50% discount in return for an honest review of the kit on the internet. When i sent them my honest review with a break down of all the issues they replied asking me not to post the review. Ok, my review was 2 year late and they tell me that they have fixed all the issues with the kits but i would approach with caution :rant........As Gene in G-tech says "these kits are universal, they need that much work you could fit them to any car"

Here are the list of issues I've had so far and this is not the end of it.

Deck Lid
After having a good look at the FG deck lid I decided not to use it. We estimated about 1 weeks work to get it in good shape. With the car sitting so low to get the lines 100% perfect all the way around the gap would have taken considerable time. I was able to source a cheap OEM metal deck lid and then I bought the Mustangs to Fear bolt/bond on spoiler.
Front Fender
Again after test fitting I decided not to use the FG fenders. I cut the flare and the rocker extension out of the FG unit and bonded it onto the OEM steel fenders. Again I weighed up the estimated work taken to make the FG fenders works compared to the time to modify the OEN ones. I know several other guys on the forums ended up doing the same thing with your FG fenders.
Rear Flare
These worked well.
Headlight panel
The gap on the top of the panel where the hood sits was too narrow for the hood. This gap had to be extended to allow the hood to close. There was a lot of bubbles in the gel coating on this part. I have attached a picture so try and explain these problems. The curve of the centre opening is very different on both sides. The passenger side curves up and goes straight up, however the driver sides curves up and then comes back in on itself. On the underside of the panel the indent for the passenger side light is off centre.
500E Hood
The hood was about 8mm too narrow on the passenger side. It had to be extended with FG.
Lower Scoop
This part was generally good.
Lower Valance
The distance between the centre opening and the lower spot lights is different on both sides. Approx 8mm difference. I have highlighted them in the attached document.
Mount Kit
We had to modify the light mounted bar to suit.
Rear Bumper
The Rear bumper had to be heavily modified on the ends to look right. It was too wide for the body so we had to build up the inside of the bumper to allow us to sand it down. And the shape of the bumper was different to the quarter extension.
Rocker Panel
This panels were generally good and did not take much work to fit. However I decided not to mould them into the wings.
Rear Quarter Ext
These were generally good and needed a reasonable amount of work to fit.
Tail light panel
This panel was good. It took a reasonable amount of work to make it fit.
Upper Scoop
The upper scoops fit very well.

I have also attached a document illustrating my difficulties.

They asked me not to post this info but I owe it to anyone considering their kit. And i am pissed at how much i have to spend to make this kit work. :rant

Anyways....some progress pics.
Got my air cleaner cover in.
DSC02488-Copy.jpg

DSC02489.jpg


Hyd. Throw out bearing
DSC02484.jpg


Got all the small FG brackets, sand blasted, primed, painted and installed.
DSC02507.jpg


Fuel line and inline filter.
DSC02510.jpg


Battery Cut off switch
I still need to make a cover for this.
DSC02515.jpg

DSC02519.jpg


Lines and edges coming together after hacking the kit to bits.
DSC02505.jpg

DSC02502.jpg


The To Do list
Get the motor back in to check spacing on the new master brake cylinder and booster i got from R&C
Tackle the cabling nightmare.
Source headlights
Order new headers, Rad and Fans.
 

Attachments

  • Front FG Feedback 2010.pdf
    303.4 KB · Views: 5
Last edited by a moderator:
Bodywork pics.

The two lads worked on my car all weekend while i went on a stag weekend in Kerry....

They nearly have all the gaps set and rubbing down will start soon. They had to cut the cowl panel as it was sitting too high in the middle. This was due to a crappy job by the guys that did the cowl replacement.

DSC02543.jpg

DSC02541.jpg

DSC02539.jpg

DSC02536.jpg

DSC02542.jpg
 
Last edited by a moderator:
"fordrule" said:
wow just went through your entire build thread and wow what a build. cant wait to see the outcome of her..wow

Thanks man........

I haven't posted many pics lately as the finer details of bodywork dont really show up in pics. So far, there has been 80 hours spent on hacking FG and panel alligment. Seriously......I honestly believe that putting an FG E-Kit on a stang is not worth the effort. It will easily add 200-300 skilled man hours to a projet. So when you see a price tag of $3-4K on a FG kit you need to double that to see the true cost fo getting it on your car. :rant

Anyways, i am at the stage where i need to pick colours... :yah

3 years into my "18 month" Project i am finally going to get some colour on my car. :thu

I went to a wedding last night and didn't drink because I want to work on my car today....most of my buddys think i have a "problem" when it comes to my mustang. :shrug
 
"Johnny M" said:
I honestly believe that putting an FG E-Kit on a stang is not worth the effort.
+1 I don't see how people can build more than 1 it is alot of work if your doing it alone, I like the look but if i had a time machine i would go back and build a Titus T/A coupe. with all the time spent on fiberglass i could have been driving it around months ago :rant
 
"S8NS 289" said:
+1 I don't see how people can build more than 1 it is alot of work if your doing it alone, I like the look but if i had a time machine i would go back and build a Titus T/A coupe. with all the time spent on fiberglass i could have been driving it around months ago :rant

Some love to drive them
Some love to work on them
Some love the convertibles
Some love the coupes
Some love the fastbacks
Some love the 64
some love the 65
Some love the 66
Some love the 67
Some love the ......
Some love ..............
Some ...............

We all have different reasons and taste.
So let us all respect that !!!
My humble opinion.
 
I agree Bruno.....

So, A small update....I feel i owe it being COTM!!!

My work shop has been turned into a paint shop...
DSC02565.jpg


So the 80 hours i mentioned earlier were spent getting all these gaps perfect......I've seen plenty of these cars that look like ass so time and money is being spent making them right.

DSC02575.jpg

DSC02574.jpg

DSC02573.jpg

DSC02557.jpg


And i really like this pic....I think its my new fav pic of my car...
DSC02567.jpg


Sorry about the lack of meat in my post but pictures do not do the bodywork justice...

So little time so much to do
 
Last edited by a moderator:
I admire the work you put into your car. :thu :thu

All I can say : Respect man !! :wor :wor

I can't do this . I would have gone :rant
 
Wow, fabulous thread!
Congrats on COTM
Thanks for the fender bracket, funny thing when my body guy took my cowl off he found mine, rattling around in the bottom. So I will Karma it along.
Your story is identical to my experience.
Bought my '67 three years ago in NC, took it to "the classic chassis", now I am trying to figure out why my hood is crooked, etc.;
Long story on that three year ordeal. I have the side exhaust cut also, I bought an E-car kit three years ago also.
I have the Rod and Custom kit, and the MTF blanking panels.
William was in my town this weekend and was going to have him check out my car, but I didn't follow up with him


I have almost decided to scrap the E-car build and go '68 Gt500.
Reading your posts makes me want to hurry my build along.
Great job, thanks again for shipping me the part!
Small acts like that restore my faith in the car world.
 
"scubadds" said:
Wow, fabulous thread!
Congrats on COTM
Thanks for the fender bracket, funny thing when my body guy took my cowl off he found mine, rattling around in the bottom. So I will Karma it along.
Your story is identical to my experience.
Bought my '67 three years ago in NC, took it to "the classic chassis", now I am trying to figure out why my hood is crooked, etc.;
Long story on that three year ordeal. I have the side exhaust cut also, I bought an E-car kit three years ago also.
I have the Rod and Custom kit, and the MTF blanking panels.
William was in my town this weekend and was going to have him check out my car, but I didn't follow up with him


I have almost decided to scrap the E-car build and go '68 Gt500.
Reading your posts makes me want to hurry my build along.
Great job, thanks again for shipping me the part!
Small acts like that restore my faith in the car world.

Thanks Byran,
I was at your stage at one time and its very diffucult to keep the motivation up but the guys on here and the thought of that first drive kept me going.

HAHAHAHAHA that bracket is going to be well travelled....The US to Ireland back to the US and wherever next? I like to help other Stangnfixers out because i have recieved an amazing amount of help from the guys on here.
 
"Johnny M" said:
My work shop has been turned into a paint shop...
I know that feeling..... Its a very dusty, messy feeling...

Spending the extra time on the gaps goes a long way on the finished product. Looks great, keep up the good work!
 
"RyanG85" said:
I know that feeling..... Its a very dusty, messy feeling...

Spending the extra time on the gaps goes a long way on the finished product. Looks great, keep up the good work!

All the prep work is being carried out in my shop and then i will rent a spray booth when the guys are ready to paint....

While my car is away I am going to gut my garage, pour a new concrete floor, skim it and insulated the walls...So i dont mind a mess at this stage. I have already stripped everything else out and I want to have a nice clean shop for assembly once she comes back all nice and shiney...... :yah
 
Update from Paint Jail

Hey All,
I thought i would send out a small update to show some progress with the bodywork.

I got some adjustable trunk bump stops from MTF. Great for getting the trunk perfectly alligned.
IMG_0796.jpg

IMG_0797.jpg


I didn't like the raw FG on the underside of the hood so that was fixed.
IMG_0837.jpg

IMG_0838.jpg


IMG_0844.jpg


Wing in spray filler. still needs to be sanded and primed a few times.
IMG_0882.jpg

IMG_0884.jpg


Front end almost done.
IMG_0908.jpg


I got the headlights (nearly) mounted yesterday
IMG_0912.jpg


Some tech specs by the bodywork guys :shrug
IMG_0910.jpg


The Spray Booth is booked for 3 weeks time.....Now its time to decide on colours..... :confu
 
Last edited by a moderator:
The car is looking great Johnny. Did you use gelcoat to smooth the underside of the unfinished hood? Also what headlights/buckets did you go with?

This car would look great black with grey stripes! :yah
 
Back
Top