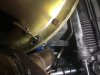
This week I’ve been working on lowering clutch cable penetration through the Bell housing. The current penetration creates a bend in the cable so I’ve been drilling and grinding a new, lower penetration. My bell housing is explosion proof so it was tough to get through easily. Today though, success.
Navigation
Install the app
How to install the app on iOS
Follow along with the video below to see how to install our site as a web app on your home screen.
Note: This feature may not be available in some browsers.
More options
-
Hello there guest and Welcome to The #1 Classic Mustang forum!
To gain full access you must Register. Registration is free and it takes only a few moments to complete.
Already a member? Login here then!
You are using an out of date browser. It may not display this or other websites correctly.
You should upgrade or use an alternative browser.
You should upgrade or use an alternative browser.
Mach1Mark's '65 coupe restomod
- Thread starter Mach1Mark
- Start date
In late Sept I delivered my '65 to the Mustang Barn in PA to finish the wiring install. All the other shops I contacted didnt want to accept a small job with one exception. I decided on MB because they are a Mustang shop, the other was another hot rod shop in Atlanta.
In conversation with MB they told me the wiring is messed up. Example: the back-up light wire is connected to the speedo. Im expecting they should be done with the short punch list by March.
In conversation with MB they told me the wiring is messed up. Example: the back-up light wire is connected to the speedo. Im expecting they should be done with the short punch list by March.
Mach1 Driver
Well-Known Member
Aww, just curious, how is the speedometer electric? Do you have something like Dakota Digital?In late Sept I delivered my '65 to the Mustang Barn in PA to finish the wiring install. All the other shops I contacted didnt want to accept a small job with one exception. I decided on MB because they are a Mustang shop, the other was another hot rod shop in Atlanta.
In conversation with MB they told me the wiring is messed up. Example: the back-up light wire is connected to the speedo. Im expecting they should be done with the short punch list by March.
I bought a six gauge set from Holman-Moody and they put their brand on Classic Instruments. The speedo uses a VSS transmitter attached in the gear port and is wired to the gauge.Aww, just curious, how is the speedometer electric? Do you have something like Dakota Digital?

I hope you have better luck with the speedo than I. Same set up as yours and I have a "bouncy" speedo needle at times. Honestly though never looked into a fix as I typically only drive at either wide open throttle or I'm braking. Don't really use the speedo  . Still, I expected better.
. Still, I expected better.Got a call today from Dan @ Mustang Barn, he had a couple of stereo wiring questions before buttoning up the dash wiring. Getting ready to fire up the engine to verify connections. Im SOOO excited !! My Colt is gonna be back on the road soon !!
Happy Times!
Grabber70Mach
Well-Known Member
Cool, bet that's a great feeling.
It is. There are some issues we are working to resolve as with any custom i.e. restomod build. The cooling system is not cooling enough and Im working to find solutions. Im thinking we need to check the air-fuel mixture ration at the tail pipes to make sure the engine isnt running running lean which would make it run hot. Stay tuned.Cool, bet that's a great feeling.
kb3
Well-Known Member
Did you ever get your fan situation worked out? Also what radiator are you running in the car?
Thanks for asking, Ken.Did you ever get your fan situation worked out? Also what radiator are you running in the car?
The 15" Derale stainless flex fan I currently have installed and the four-core aluminum Champion radiator are not working to keep things cool. Im going to have to find a way to get an electric fan installed which means a thinner radiator, likely a two-one inch core version. Considering the ECP radiator. If you or anyone else has a suggestion Id like to hear it.
kb3
Well-Known Member
I am a strong proponent of the two row ECP unit. I know that Terry would push the same idea. I have been running it in our 65 fastback for several years with an electric fan and the car never gets warm, including slow cruises in 100F plus days, with the AC on !
I spoke with Terry the other day and he gave me his positive anecdotal experience with his ECP radiator. Ive been trying to come up with some alternative configurations for my cooling system like putting the A/C condenser behind the radiator and using a pusher electric fan or eliminating my A/C system altogether. I hate that idea because well . . . South Carolina in the summer. But, Im still thinking.I am a strong proponent of the two row ECP unit. I know that Terry would push the same idea. I have been running it in our 65 fastback for several years with an electric fan and the car never gets warm, including slow cruises in 100F plus days, with the AC on !
We have solved the fuel gauge / sending unit problem: the Ford sending unit range is not the same as the Classic Instruments reading range. Found out that Classic makes a signal interface module. Expensive but much cheaper that four hours of shop time to mod the GM-type sending unit into my Ford OE tank or buying a tank already cut to accept the top mounted sending unit.
Classic Instruments Store / SN34
I got a call from Dan at the Mustang Barn last Friday. He informed me that the list of items remaining to finish my wiring install should be done this next week. I asked that they do an alignment on the new front end in addition to the door glass alignment. I ordered a replacement temp sender from Classic Instruments and it should arrive tomorrow for install. Fuel pump appears to have a bug but it works. I will dig into it when my Mustang is back in my garage. That leaves the thinner radiator/elect fan install as the only thing on th list. I will dig into that too. Road trip to SE PA next weekend !!!
I went to Pennsylvania this weekend to pick up my coupe from The Mustang Barn. Im pleased with the work Dan and his guys did. All the wiring is sorted out and everything seems to work.
I got caught in the initial stage of the current snow blizzard while on the interstate between Philly and Baltimore. I was getting nervous that there might be an accident or several or the interstate would be closed because of bad weather. A new york city friend gave me an alternate route around Baltimore and DC and it saved me from getting stranded Im sure. My truck is a 2WD with summer tires that are half worn, I was really nervous about getting stuck. Total round trip time was 36 hours over almost 1400 miles.
I got caught in the initial stage of the current snow blizzard while on the interstate between Philly and Baltimore. I was getting nervous that there might be an accident or several or the interstate would be closed because of bad weather. A new york city friend gave me an alternate route around Baltimore and DC and it saved me from getting stranded Im sure. My truck is a 2WD with summer tires that are half worn, I was really nervous about getting stuck. Total round trip time was 36 hours over almost 1400 miles.
Last edited:
Sounds like a wonderful little journey, Mark At least you got it back home safe and sound.
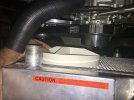
At least you got it back home safe and sound.Yesterday: Clean out trunk and sort through boxes/items. Remove trunk mat and clean all surfaces, trim swimming pool noodles to fill gaps around fuel tank, replace trunk mat and trim, add corrugated wiring sleeve on fuel gauge interface module wiring. Test fit rear window cranks then install nylon washers and tighten set screws. Measure radiator gap for new elect fan sizing. Lost the plastic master cylinder cover when I lost my grip . . . remember to look on the header.
Today: Removed the radiator fan bolts without removing the radiator. Scrubbed and cleaned the pass. side door sill cover. Checked fit of pass. side kick panel with speaker. May need to install padding at the top to keep to keep it from vibrating. Installed sill cover. Shortened the pass. seat bracket bolts to allow the seat to be mounted lower. Trimmed the pass. Seat mounting tabs to be able to mount the seat lower. Filed the edges of the brackets and touched them with black model paint to cover the bare metal.
Today: Removed the radiator fan bolts without removing the radiator. Scrubbed and cleaned the pass. side door sill cover. Checked fit of pass. side kick panel with speaker. May need to install padding at the top to keep to keep it from vibrating. Installed sill cover. Shortened the pass. seat bracket bolts to allow the seat to be mounted lower. Trimmed the pass. Seat mounting tabs to be able to mount the seat lower. Filed the edges of the brackets and touched them with black model paint to cover the bare metal.
Better retrieve that MC cover before you forget...
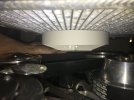
Yesterday: re-installed my four-core Champion radiator. Cleaned and installed the driver side door sill plate. Removed and re-installed the driver seat mount bolts shank down to give the seat track room to be installed at the lowest position. Fight driver seat for an hour to get all four bolts to thread into the mount. Sort the OE door panel clips to find fifteen that are usable to install the door panel. Clean and polish driver door handle and window crank, install new c-clips. Trim new door panel springs to be less stiff than OE springs which are smaller gauge wire. Move new A/C evaporator to be mounted higher (closer to the bottom of the dash) and install rubber trim strip.
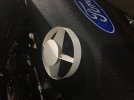
Today: made construction paper model of the Perma-Cool electric fans Im planning on installing to see if there is clearance. There is. Which leaves me the option of swapping out the radiator for a thinner, more efficient two-core radiator.
Note to self: still need to find master cylinder cap, charge battery for snake camera.
Attachments

You are planning to use a shroud, right? Without one those fans will give a worse result than before as they physically cover less surface area of the radiator. A properly designed shroud will let them draw air across the full surface. Make sure when you are playing with your mock-up you are allowing for the thickness of the shroud as it stands off the rad.
I know you've likely accounted for all this stuff but thought it might serve to help others reading along that might not think of these points.
I know you've likely accounted for all this stuff but thought it might serve to help others reading along that might not think of these points.