• Hello there guest and Welcome to The #1 Classic Mustang forum!
    To gain full access you must Register. Registration is free and it takes only a few moments to complete.
    Already a member? Login here then!

69 Sportsroof "Mystique"

A couple thoughts after watching your subframe connector video. It is REALLY not advisable to jack up the rear like that when welding a connector in. There is a good amount of flex in a unibody car like a Mustang. Ideally, the car should be sitting on its wheels, level to the ground. With the back up like you had it you may very well have locked in some unwanted rake or even twist in the body. If you needed more room underneath to work it would have been better to get a second set of those blocks and have all four wheels up on them to level the car out.
As far as your welds go, grind 'em off, clean up the metal and try again. All that porosity in the welds from the lack of shielding gas makes them worthless. They will be brittle and crack for sure. There is also likely very little penetration yielding a pretty worthless connection. The other welds look pretty "booger" too. Typically, welds like that also lack good penetration and are prone to failure. There will be a lot of stress on those connections and the body flexes and moves going down the road. You want to make sure your welds are up to it. Honestly, I'd be concerned right now. Do some practice welds on similar thicknesses of metal to get your welder dialed in up on a bench or table. Once you have that locked in concentrate on being comfortable and in good position when you go back and do the rewelding. In the video, it looks like you weren't holding consistent torch distance/angle as one reason your welds turned out as they did.
Not bashing or trying to be critical. Welding is not easy and I am by far not an expert but I have learned enough over the years to know that short of a good weld all you get are bad ones. Bad welds are not something you want when talking about frames and suspensions! They'll bite you every time.
I would of though having the car up via the rear end would be the same as on through ground since all the weight is on the axle. Didnt think about it flexing but its too late now.

Other then the ones with the shielding gas i made sure i got really good penetration, the issue i was having and causing the Booger welds was actually me just not running a clean line or burning through the sub frame..(like you said, comfortable positioning, lighting, under the car causes issues) I agree, i did grind away the bad welds, and restarted them, I also made sure to get some really solid welds on other parts of that connector especially. Appreciate you feedback and completly understand the concern.
 
Like Bruno wrote, best to relieve the shoe pressure against the drums first. Odds are the shoes have worn into the drums creating a ridge which is why the drums wouldn't slip off more easily. Fairly common when people just swap in new shoes and don't turn the drums. Both sides wear not just the shoes. The shoes looked to be fairly new. Lots of meat left on them.

Take some time to see what kind of damage you may have done with your air chisel. It doesn't take much more than a scratch on the mating surface to allow a weeping leak to show up in the rear end. I'd suggest using a slim coat of RTV on both sides of a good gasket, like a Lubelocker, when putting the pumpkin back in. While its all taken apart you might consider adding a drain and filler plugs to the things. Make life a whole lot easier in a few hundred miles when you need to drain and refill it again for the first time after break-in.
 
I also put a magnet to the underside of the pumpkin housing. You can even put it inside if you have enough room. Especially when breaking in a new set of gears or a truetrac diff. As i did.
 
Hey, should have also pointed out in the video you likened a Trak-Loc and "Posi" to a Truetrac. They are not at all the same. The Ford Trac-Lok and GM Posi are clutch style limited slips diffs. A Truetrac is a helical gear style unit that doesn't really wear. Doesn't need friction modifiers, etc. Far superior to the old tech of clutches. While both work fine, the Truetrac is more of a install it and forget it device. They just work and love to be beat on!
 
Like Bruno wrote, best to relieve the shoe pressure against the drums first. Odds are the shoes have worn into the drums creating a ridge which is why the drums wouldn't slip off more easily. Fairly common when people just swap in new shoes and don't turn the drums. Both sides wear not just the shoes. The shoes looked to be fairly new. Lots of meat left on them.

Take some time to see what kind of damage you may have done with your air chisel. It doesn't take much more than a scratch on the mating surface to allow a weeping leak to show up in the rear end. I'd suggest using a slim coat of RTV on both sides of a good gasket, like a Lubelocker, when putting the pumpkin back in. While its all taken apart you might consider adding a drain and filler plugs to the things. Make life a whole lot easier in a few hundred miles when you need to drain and refill it again for the first time after break-in.
Definitely should of adjusted the drums first, I don't do much with drums so didn't even think about it.

Ive got a full disc conversion for the rear because everything was prettt rusty and rough looking. Its just the cheap kit, use edarado rotors and pontiac calipers with e brake.

Yeah I did a little damage on the outside edge that won't effect it. I suspect thats why it was on so tight as i did notice some spots on the surface after pulling the gasket off. I smoothed it down With a sanding disc on my die grinder and I'm using the lube locker gasket just for that purpose. I absolutely love those things.
 
Hey, should have also pointed out in the video you likened a Trak-Loc and "Posi" to a Truetrac. They are not at all the same. The Ford Trac-Lok and GM Posi are clutch style limited slips diffs. A Truetrac is a helical gear style unit that doesn't really wear. Doesn't need friction modifiers, etc. Far superior to the old tech of clutches. While both work fine, the Truetrac is more of a install it and forget it device. They just work and love to be beat on!
Thanks for the info, I always forget which go to which because everyone uses different terms and it becomes word vomit lol
 
I also put a magnet to the underside of the pumpkin housing. You can even put it inside if you have enough room. Especially when breaking in a new set of gears or a truetrac diff. As i did.
That's a smart move. Thanks for the info as always. I really do appreciate you guys give me good info. It helps me improve and see what I miss
 
I did this when installing 3.55 gears with truetrac in my 8 inch rear axle.

Verstuurd vanaf mijn SM-A605FN met Tapatalk
 
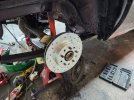
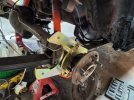
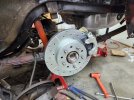
Got the posi fully installed and disc brake conversions most the way. One of the Eldorado calipers piston isn't compressed enough to go over the rotor. Always something. Other then that, just have to run the ebrake and brake lines.

20240106_150019.jpg20240106_150024.jpg20240106_150039.jpg
 
You can't compress the piston far enough to create space to slip over the rotor? That seems odd. Especially since the other fit. Share a few pics of the caliper. Curious to see if there is something unique about it.
 
One thing I don't like is the fact that the rotors aren't centered by the center hub of the axle but by the studs. I don't like that !

The rotors have to be centered by the hub like the rims do. I have seen this construction fault alot on forums.

The center hub of the axle deals with the force that is applied by the wheel. The wheelnuts its only purpose should be to tight the rim and rotor to the axle, nothing more.

Just my 2 eurocent.
 
There is risk over time of the studs shearing off with this set-up, for sure. You can buy rings that fit the hub to align the rotor and better distribute the load, I think. I know I've seen such at one time or another. I'm still curious as to why one caliper fit and the other didn't. Casting flaw that needs filed down, maybe? Strange.
 
As for the caliper...air trapped inside the caliper? Iow plastic plugs removed ? Other then that I would bring it back where it came from and showed them .

Don't know for rotors but for rims those adapters exist.
 
As for the caliper...air trapped inside the caliper? Iow plastic plugs removed ? Other then that I would bring it back where it came from and showed them .

Don't know for rotors but for rims those adapters exist.
I was thinking more along the lines of a pad not seating properly.
 
I presume the pads comes along with the calipers or the kit. And on one side it does fit ????
But then again , it doesn't harm to check all the parts over and compare . Was it in a box that has been opened in the past ??
Are the caliper the same , mirror wise. Bleeder on top L and R ?
The same with pads ?? Maybe the inner pads are different then then outer.
That I have seen here more then once .
Maybe you did install both inner pads on one side and now you have difficulties on the other side.
Again , 2 eurocent.
 
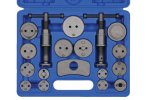
They are 85 Cadillac Calipers which is a very common rear swap. You have to turn the piston to compress it so i have a tool on the way to do so. I have started looking at the hub centric rings but oddly it seems they have the same Hub size. They are 79 Trans Am Rotors...This is actually the same kit u used on my 67 years ago...Im going to look a little closer and see whats going on, do the measurements, and get the hub ring.
 
You have to turn the piston to compress it so i have a tool on the way to do so
Ooh. Its like VW did use prior the common electric e-brake system used nowedays.
Something like this ??
 

Attachments

  • brake set kit.jpg
    brake set kit.jpg
    59.3 KB · Views: 1
Back
Top