• Hello there guest and Welcome to The #1 Classic Mustang forum!
    To gain full access you must Register. Registration is free and it takes only a few moments to complete.
    Already a member? Login here then!

'66FB GT "Slick Guzzo" Upgrade Build-Up

Re: '66FB GT Upgrade Build-Up

mine looked very similar, I opted to cut the front end off and start over...
72_30_06_09_9_01_41.jpg


It's not so bad if you do one side at a time.
 
Last edited by a moderator:
Re: '66FB GT Upgrade Build-Up

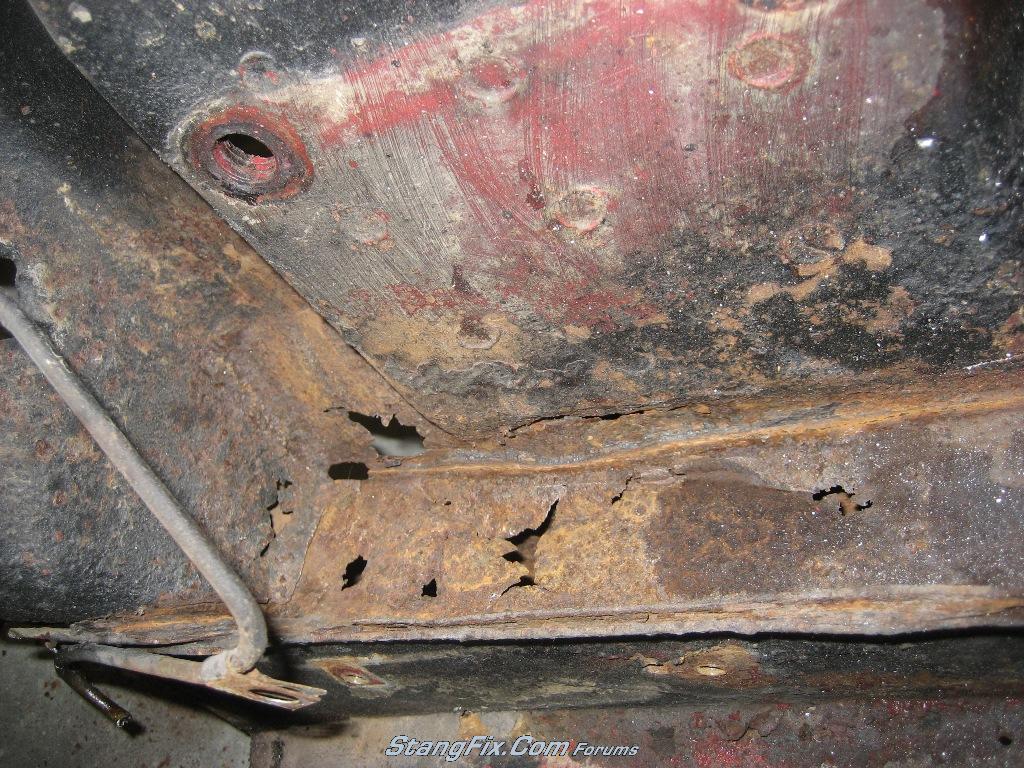
gimme your thoughts?? looks like the shock tower is savable...

1. thinking of not cutting out anything on the shock tower and adding a patch (marked in red).


Something to keep in mind.... where you see holes in the metal.... this is where the metal has gotten so thin that it rotted away. The metal surrounding these holes is surely VERY thin also. You'll have to cut back quite aways to get to metal un-effected by the rust.


2. for the frame, maybe do the same or patch the whole area.


You may want to cut it all our and lay a whole new piece of metal in there. Preferably something that will wrap up the sides a little for extra support.


3. for the front side apron, fill the gaps with scrap sheet metal and weld.


Cosmetic. Cut out a strip the whole length of the lower apron and weld in a new piece of metal.


4. where the bumper brackets are, thinking of cutting out the rot and adding patch.


That'll work fine
 
Re: '66FB GT Upgrade Build-Up

most of the front is on... just have to get the bump steer kit, roller idler arm, cross-member, brakes, & wheels installed. then, alignment, bed brakes... any advice is appreciated.

EDIT: itchin' to paint the blue parts black. coil springs and LCA's are the remains from previous setup.
 

Attachments

  • IMG_5163b.jpg
    551.2 KB · Views: 44
Re: '66FB GT Upgrade Build-Up

installing the big front 12" disc brakes. instructions say to use thread-locker "green" for the hat to rotor assembly. is that the only place i use thread-locker?

and, i have a leak from the bottom center bolt of the 9" rear. i tightened by hand and it's still leaking. do i use some thread sealer or just tighten it even more?
 
Re: '66FB GT Upgrade Build-Up

oh, don't rent tools from AutoZone... they are pieces of crap. i got the OEM pitman arm puller and the metal is brittle made in China. i went to NAPA and the tools are top quality. the pitman arm i pulled from the car was a fighter!
 
Re: '66FB GT Upgrade Build-Up

I burred out the thin metal... sprayed weld-through primer. I did the patches from 1 & 2... welded the holes I could get to shut from the engine compartment side. And for 2, I added a bigger patch. 3 & 4, I will tackle after I get the car running. Then, POR15 everything. I wanted to add the BOSS shock tower reinforcement below the UCA, but was itching to get all the parts on and run the car... maybe later. I wanted to have a metal template cover the whole water pocket, but not interfere with the 1.75" UCA drop.
 
Re: '66FB GT Upgrade Build-Up

"hivewax" said:
here's the problem. what's your take on this? should i grind the head down?
.

I found that hex head grade 8 bolts worked in that spot for me. I just lined up the flat side against the axle tube, and it barely fit. If that works for you, it's easy to find a length that you need.

On another note, when I installed my rear disc brakes I first oriented the calipers at 10 o'clock. However, I found that my E-brake cables didn't work well in that orientation, so I moved the calibers to the 2 o'clock position, which worked better.

Keep up the great progress. It's been cool following your build.
 
Re: '66FB GT Upgrade Build-Up

"hivewax" said:
installing the big front 12" disc brakes. instructions say to use thread-locker "green" for the hat to rotor assembly. is that the only place i use thread-locker?

and, i have a leak from the bottom center bolt of the 9" rear. i tightened by hand and it's still leaking. do i use some thread sealer or just tighten it even more?


Use thread locker on any bolts that mount a caliper locating bracket onto the spindle.


You can try tightening the drain plug a little more, but it should have some plumbers tape on the threads to help seal it.
 
Re: '66FB GT Upgrade Build-Up

Not the drain plug. The bottom most bolt of the housing to center-section assembly. I put a container underneath since Thursday and about a pint leaked out. Cobra Auto said to try tightening and adding thread sealer.

For the caliper bracket to spindle, instructions said to not use lock washers for they will dig into the rotor and hat. But if the lock washers are behind the spindle, I don't see them interfering with the rotor/hat. CA said just use thread-locker for a bolt and normal nut with washer on the hat face.
 
Re: '66FB GT Upgrade Build-Up

The bottom most bolt of the housing to center-section assembly.


Gotcha....

Are you using the crush washers underneath the nuts? They're designed to seal the nut's.


I bolted and torqued the heck out of my caliper bracket to spindle bolts and within a 1000 miles the bolts were literally falling out. Thread locker on the bolts and a re-torque and they've stayed tightened for the last 7k miles.
 
Re: '66FB GT Upgrade Build-Up

Cannot recollect if or not crush washers were installed. I'll verify when I get back home. If not, I have the extra AMK housing bolt with copper washers... hope those are crushable.

And, what about using lock washers between the nut and spindle?
 
Re: '66FB GT Upgrade Build-Up

Yes, the copper washers are the "crush" washers.


I didn't use lock washers on my front brake hardware, just the thread locker.
 
Re: '66FB GT Upgrade Build-Up

Here's the pumpkin leak. Do you think I have to remove the lock washers? It's not leaking past the nut.
 

Attachments

  • IMG_5209b.jpg
    479.4 KB · Views: 39
Re: '66FB GT Upgrade Build-Up

Why Moser would put lock washers with the kit? Maybe the Joe Gibbs synthetic gear oil I'm using is too thin.

Another fluster is tapping the hub w/studs into the hat. I'm tapping that sucker at the studs going around, but it's digging into the holes and the bolt threads are getting damaged. What are my options?! Hydraulic press?

EDIT: Studs squared red are the problems... they are not perfectly straight.
 

Attachments

  • IMG_5215b.jpg
    68.6 KB · Views: 35
Re: '66FB GT Upgrade Build-Up

just got the front brakes on. popped a wheel on to check clearance. next up is to install the dual master cylinder, proportional valve, then bleed brakes.

haven't fixed the pumpkin leak yet. CA tech said i could shave some aluminum off the Strange center section so i get 2 of the nuts off, so i don't have to drain the gear oil, remove the drive-shaft, and loosen the center section to get to those 2 nuts...

what do you all think, should i start surface grinding the alum center section??
 

Attachments

  • IMG_5221b.jpg
    513.7 KB · Views: 29
  • IMG_5222b.jpg
    477.9 KB · Views: 13
  • IMG_5223b.jpg
    505.4 KB · Views: 12
  • IMG_5225b.jpg
    550.4 KB · Views: 13
  • IMG_5226b.jpg
    552.5 KB · Views: 17
Re: '66FB GT Upgrade Build-Up

what do you all think, should i start surface grinding the alum center section??

80 grit on a block of wood should scuff the mating surface sufficiently.
 
Re: '66FB GT Upgrade Build-Up

a block of wood won't fit in-between the stud and the humped section of the pumpkin. if you look at the pictures of the leak, you'll see i have ~1/4" or less of space of were the humps are... maybe use the Dremel.
 
Re: '66FB GT Upgrade Build-Up

Ah.... I thought you were going to scuff the housing to center section mating flange to try to get the leak to stop. You're just going to scuff it on the outside around the two lower studs....

Yeah, a Dremel tool would be perfect, but I'm not sure if that's going to fix the leak.
 
Back
Top