• Hello there guest and Welcome to The #1 Classic Mustang forum!
    To gain full access you must Register. Registration is free and it takes only a few moments to complete.
    Already a member? Login here then!

Selene/Fred is a San Jose built 1965 Mustang

"Midlife" said:
3/16 is fine for plug/rosette welding for patches. That's what I used...

Thanks Mid, good to know, I was starting to get really bummed thinking about drilling 3/8 holes everywhere.
 
"Joyr1der" said:
Thanks. I may make a build thread, but I already have a blog at mustang68.com which I want to carry on doing...I guess a build thread would probably bring my project to the attention of more folks, and I could get a lot more help that way, so it's certainly something I'm thinking about.

Ian, thanks for including the link on your avatar. I checked it out yesterday and bookmarked it. I like what your doing over there, keep up the good work.

Does the Mustang have a name yet? LoL
 
Got a little work done yesterday. Still trying Yo get the patch as close as possible.

Figured out how poorly fab'd this Scott drake repro really is. From bend to bend it is over 1/2" short. Blaw!

I got a little frustrated so I stepped back for a bit and removed my tunnel vision to finally notice the bad metal on the radiator support.

4c66d5e7-897b-1396.jpg


Cut out a patch out of the Front LS floor pan I have been chopping up to practice welding.

4c66d5e7-89bb-3ea2.jpg


Cut out the bad metal

4c66d5e7-89d7-c254.jpg


The tools of the trade

4c66d5e7-89ee-6b24.jpg


Going to take today to figure out how to weld in that patch for the front right side apron and then weld in my radiator support patch.
 
Abe,

You are doing great, but you know something? If you spent half the time you use to take pics, to work on Fred, he might infact be done by now.


Just sayin.... :part


And :wtf is this with the pimping of my services out to others? Where's my cut of the action? Besides this weekend I'm booked working on KBMWRS's rig.
 
"cmayna" said:
Abe,

You are doing great, but you know something? If you spent half the time you use to take pics, to work on Fred, he might infact be done by now.


Just sayin.... :part


And :wtf is this with the pimping of my services out to others? Where's my cut of the action? Besides this weekend I'm booked working on KBMWRS's rig.

I get carried away with the pics for sure. I like pics though. LoL

Your company is always welcome, you don't even have to do anything but throw back a drink.

Picked up Fred's one piece outer/inner rocker panel

a6cd89e5-02f5-8ef8.jpg


a6cd89e5-0380-17fd.jpg
 
"monkeystash" said:
Abe, I'm really looking forward to seeing that new floor and rocker go in. Keep up the good work!

Thanks Ryan, trying to get my welding skills as refined as possible by chopping up repro pieces I was going to use like the remainder of the front RS apron and just practicing as much as I can.

I hope that maybe, with some measurements I am trying to get a hold of I can tackle the rocker soon, or if the front RS apron comes in in the next two days I might jump into that first.
 
Sluggo suggested me asking some members for some dimensions that are hard to find in preperation of the rocker removal.

A huge thank you to Monkeystash for helping me out with the dimensions I need. I really appreciate it buddy. Soon I will be getting ready to rip out that half/rocker of a rocker.

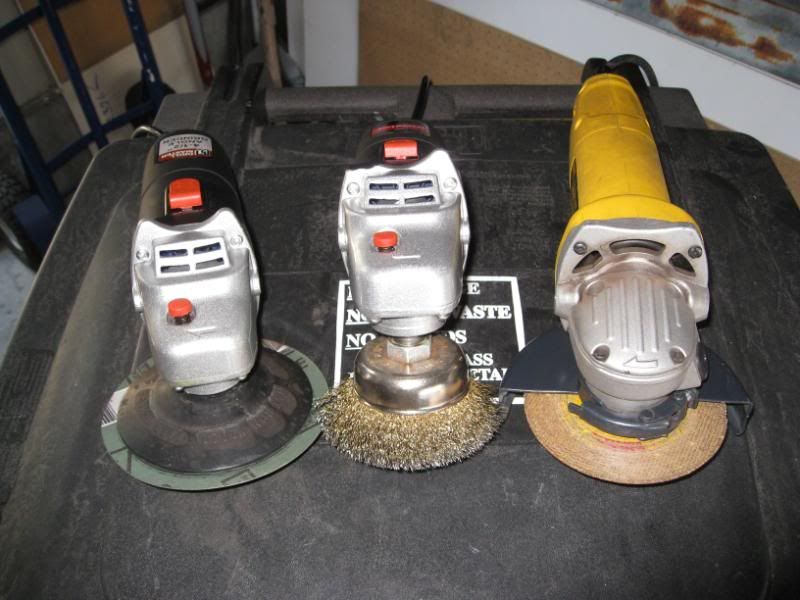
I was convinced by a buddy of mine from http://www.garagejournal.com to collect all my spare change and run over to harbor freight with Februarys Mustang Monthly and pick up two 4-1/2 grinders. I wasn't sure why at first, as I was thinking about it, I realized how nice it would be if I had a separate grinder for different applications. I went down to HF and picked up two 4-1/2 grinders for 9.99 a piece and now have one grinder with my wire wheel attachment, one grinder with the sanding attachment Craig picked up from HD for me, and the Dewalt for the cutting disc. I am loving it, well, at least until one of the el cheapo's goes out.

IMG_3426.jpg
 
Prepped for the arrival of the new fender apron.

a6cd8a2b-99f9-8a88.jpg


a6cd8a2b-9a07-be3e.jpg


a6cd8a2b-9a17-a01e.jpg


I can't seem to get a good angle on this thing with my puller. Anyone have any tips on how to separate the spindle from the LCA?

a6cd8a2b-9aad-4e2c.jpg
 
To separate the spindle, whack the side where the LCA stud comes through. Don't hit the stud, whack the side of the spindle just next to the stud. Use a BFH and it'll fall right out.
 
Yep....what he said... There is one sweet spot where the spindle falls out with one smack. All the other spots you hit are just practice swings.
 
"AzPete" said:
Yep....what he said... There is one sweet spot where the spindle falls out with one smack. All the other spots you hit are just practice swings.

Is that what we did for 2 hours? We tried a pickle fork and broke the fork before resorting to smacking it, but it still took several efforts. We must have been using the Martha Stewart version of the pickle fork...
 
Back
Top